N BATTLE OF BRITAIN 75: SPECIAL ISSUE O I IT E
132
G PA
ED
R
BRITAIN’S BEST SELLING MILITARY HISTORY MONTHLY
A FEW OF THE 'FEW' Casualties of 1940
LUS:
P rs: Dambuste ast L f o Death ilot P g in iv Surv : d o HMS Ho f o ry e v Reco Ship's Bell
35 Pages of New Anniversary Content Including: • Tangmere Churchyard: The Stories Behind the Stones • Bracklesham Disaster • Postcard From Luftwaffe POWs
BATTLE OF
BRITAIN 75TH ANNIVERSARY special issue
SMALLEST ARMOURED TRAIN IN THE WORLD
Punching Above its Weight on the Kent Coast
SIGNING UP TO THE SUICIDE CLUB Blocking Ostend Harbour 1918
SEPTEMBER 2015 ISSUE 101 UK £4.50
www.britainatwar.com Should you wish to correspond with any of the ‘Britain at War’ team in particular, you can find them listed below: Editor: Andy Saunders Assistant Editor: John Ash Editorial Correspondents: Geoff Simpson, Alex Bowers, Mark Khan Australasia Correspondent: Ken Wright Designer: Dan Jarman EDITORIAL ENQUIRIES: Britain at War Magazine, PO Box 380, Hastings, East Sussex, TN34 9JA Tel: +44 (0)1424 752648 or email:
[email protected]. ADVERTISING ENQUIRIES: For all aspects of advertising in ‘Britain at War’ Magazine please contact Alison Sanders, Advertisement Sales Manager Tel: +44 (0)1780 755131 or email:
[email protected]. GENERAL ENQUIRIES: For general enquiries and advertising queries please contact the main office at: Britain at War Magazine Key Publishing Ltd PO Box 100, Stamford, Lincs, PE9 1XQ Tel: +44 (0)1780 755131 Fax: +44 (0)1780 757261 SUBSCRIPTIONS, BINDERS AND BACK ISSUES: Britain at War, Key Publishing, PO Box 300, Stamford, Lincs, PE9 1NA Email:
[email protected]
SUBSCRIPTIONS, BINDERS AND BACK ISSUES HOTLINE:+44 (0)1780 480404 Or order online at www.britainatwar.com Executive Chairman: Richard Cox Managing Director/Publisher: Adrian Cox Commercial Director: Ann Saundry Production Manager: Janet Watkins Group Marketing Manager: Martin Steele ‘Britain at War’ Magazine is published on the last Thursday of the preceeding month by Key Publishing Ltd. ISSN 1753-3090 Printed by Warner’s (Midland) plc. Distributed by Seymour Distribution Ltd. (www.seymour.co.uk)
From the
Editor
T
HIS MONTH we commemorate the 75th anniversary of what was arguably one of the most momentous and pivotal battles of the Second World War; The Battle of Britain. As we do so, we also mark in our news pages the sad passing of other veterans of the battle as the surviving band of Churchill’s ‘Few’ gets ever fewer. Whilst the battle has become legendary, and very much a part of the collective consciousness of the nation, it also remains the case that there are many untold stories from the Battle of Britain – including an account, this month, of an unfortunate friendly-fire episode where a squadron of Hurricanes mistook three Bristol Blenheims for Junkers 88s, carrying out an attack that ended with tragic results. Whilst not being one of the most glorious episodes of our 1940 history it is important that such stories are told. Here, at Britain at War, we always strive to bring you unusual and fascinating accounts. The unfortunate encounter over Bracklesham Bay, of course, happened not a stone’s throw from the setting for our Battle of Britain Special Supplement; St Andrew’s Churchyard, right alongside the famous airfield of RAF Tangmere. Here, a number of casualties from the battle have their last resting place, British and German, and we take a fascinating look at the story of the men behind the names on the headstones. That they are buried, side by side, with their former enemies in this quiet English country churchyard is poignant enough, but the hidden stories of these men are heroic and tragic in equal measure. No longer are these men just names carved onto cold stone. Now, their individual stories can be told. Our remembrance of them in this way in our special supplement is surely fitting during this anniversary period. Reflecting, overall, on our 75th anniversary commemorative Battle of Britain content this month it is certainly the case that Winston Churchill’s declaration resonates throughout. This surely was ‘their finest hour’.
All newsagents are able to obtain copies of ‘Britain at War’ from their regional wholesaler. If you experience difficulties in obtaining a copy please call Seymour on +44 (0)20 7429 4000. All rights reserved. Reproduction in whole or part and in any form whatsoever, is strictly prohibited without the prior, written permission of the Editor. Whilst every care is taken with the material submitted to ‘Britain at War’ Magazine, no responsibility can be accepted for loss or damage. Opinions expressed in this magazine do not necessarily reflect those of the Editor or Key Publishing Ltd. Whilst every effort had been made to contact all copyright holders, the sources of some pictures that may be used are varied and, in many cases, obscure. The publishers will be glad to make good in future editions any error or omissions brought to their attention. The publication of any quotes or illustrations on which clearance has not been given is unintentional. We are unable to guarantee the bonafides of any of our advertisers. Readers are strongly recommended to take their own precautions before parting with any information or item of value, including, but not limited to, money, manuscripts, photographs or personal information in response to any advertisements within this publication.
© Key Publishing Ltd. 2015
Andy Saunders (Editor)
COVER STORY
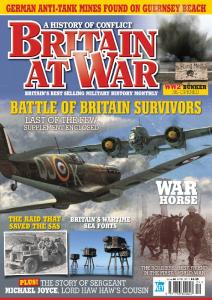
On 11 July 1940 the Hurricanes of ‘B’ Flight of 501 Squadron were ordered to intercept a raider approaching Portland Bill. At 5,000 ft a Dornier 17 was spotted and the bomber jettisoned its bombs off Chesil Beach. The three Hurricanes pursued the Dornier, in poor weather, down to just 10 ft above the water. Unfortunately, during one of the attacks Plt Off Duncan Hewitt’s Hurricane hit the sea. It was thought that he had possibly been caught in the bomber’s slipstream. Although his body was later seen in the water it proved impossible to recover and he is commemorated by name on Panel 8 of the Runnymede Memorial. (ARTWORK BY PIOTR FORKASZIEWICZ)
https://www.facebook.com/britainatwarmag @britainatwar
www.britainatwar.com
3
FEATURES 22 OPERATION VS: MISSION MOST DESPERATE
Steve Snelling provides a compelling account of the brave volunteers of ‘The Suicide Club’ who ran a terrifying gauntlet of machine guns and heavy artillery to block Ostend Harbour.
42 GREMLINS AND MASTERDOM
Stuart Hadaway remembers Britain’s forgotten immediate post-war campaign in Vietnam with all its astonishing oddities as British and Japanese troops temporarily undertake operations together.
50 FOR GALLANTRY: HOME FRONT HEROES
GC recipient Tony Gledhill marks the 75th anniversary of the George Cross and George Medal with a detailed look into their institution in 1940.
90 ATTACK ON GPT RIDGE: KOHIMA 1944
In the first of a two part article, Imperial War Museum Historian Peter Hart uses accounts from the men of 2nd Norfolk Regiment to explore the Battle of Kohima, a pivotal event of the Burma Campaign fought largely at close quarters.
98 RESCUE AGAINST THE ODDS
The tale of one of Britain’s most distinguished Lifeboatmen and his epic efforts to save the men of a wartime coastal convoy, on perhaps one of the worst of summer days seen in Britain.
WIN OUR COMPETITION
Still time to win dozens of great prizes in our 100th issue competition! Send us your photo of a copy of 'Britain at War' in an interesting military history location. E-mail your pictures to:
[email protected] Hurry! Closing Date: 30th September 2015
Contents ISSUE 101 SEPTEMBER 2015
22 OPERATION VS 4
www.britainatwar.com
42 GREMLINS AND MASTERDOM
REGULARS 6 BRIEFING ROOM
The latest news and events for your diary.
10 OBITUARIES
We bid farewell to some remarkable military personalities including the last surviving Dam Buster pilot and three heroes of the Battle of Britain. Sadly, the veterans of the Second World War get ever fewer.
20 FIELDPOST
Your letters, input and feedback.
58 FIRST WORLD WAR DIARY
Our monthly diary of key First World War events arrives in September 1915. Things were changing in Russia, and it was a month of big offensives across Europe.
109 RECONNAISSANCE REPORT
Our team scout out new books and products.
125 GREAT WAR GALLANTRY
The continuing monthly series recounting tales of valour, including another Hero of the Month from Lord Ashcroft.
130 THE FIRST WORLD WAR IN OBJECTS
We look at the story of original battlefield grave markers, poignantly returned to grieving families at the war’s end.
NEWS FEATURE 16 WHAT HAPPENED TO HMAS SYDNEY? Our Assistant Editor looks at new evidence and asks just what happened to HMAS Sydney after her mutually destructive engagement with HSK Kormoran.
FREE BOOK! Claim your FREE Spitfire
Pilot or Doctor’s War book when you subscribe to Britain at War. See pages 40 and 41 for details
Battle of Britain 75th Anniversary Special Issue
32 Postcard From Bowmanville The hidden tales of ten Luftwaffe officers, captured in 1940, are given up by an intriguing POW postcard. The background is revealed by Chris Goss.
65 Tangmere’s Few
In our Battle of Britain special free supplement ‘Britain at War’ Editor Andy Saunders provides a detailed look at the stories behind the Battle of Britain casualties, RAF and Luftwaffe, buried adjacent to the famous airfield of RAF Tangmere. The supplement includes the story of all-American hero ‘Billy’ Fiske.
118 Disaster Over Bracklesham A terrible friendly-fire incident over the West Sussex coast is detailed by Andrew Bird. Sadly, it was just one of many such incidents occurring at the height of the Battle of Britain.
98 RESCUE AGAINST THE ODDS www.britainatwar.com
5
BRIEFING ROOM |
News • Restorations • Discoveries • Events • Exhibitions from around the UK
Ship’s Bell from HMS Hood Recovered
A RESEARCH team has successfully recovered a bell of ill-fated battlecruiser HMS Hood from her resting place at the bottom of the Denmark Strait. HMS Hood, the Royal Navy’s last battlecruiser, was sunk by a terrific explosion on 24 May 1941 after a brief engagement with Bismarck and Prinz Eugen. Although seemingly a catastrophic defeat for the British, the damage sustained by the Bismarck necessitated an immediate return to port, and facilitated her destruction three days later. Nevertheless, of the Hood’s 1,418 strong crew, only three survived. Led by philanthropist and entrepreneur Paul G. Allen, the team returned to the site discovered by David Mearns with permission to retrieve
one of the ship’s two bells to return it to Portsmouth, Hood’s home port, where it will be part of a permanent memorial. With Allen’s backing, use of his yacht M/Y Octopus, and support from Mearn’s company, Blue Water Recoveries, the team has used an advanced remotely operated vehicle to recover the bell, said to be in good condition. However, before the bell is displayed at the National Museum of the Royal Navy, it will require a year-long conservation effort. President of the HMS Hood Association, Rear Admiral Philip Wilcocks, whose uncle was on board Hood, stated: “The HMS Hood Association is extremely grateful to Paul Allen, David Mearns and the crew of M/Y Octopus for their tremendous
efforts and professionalism in recovering the bell of HMS Hood... the recovery of her bell and its subsequent place of honour in the National Museum of the Royal Navy in Portsmouth will mean that future generations will be able to gaze upon her bell and remember with gratitude and thanks the heroism, courage and personal sacrifice of Hood’s ship’s company who died in the service of their country.” Paul Allen said, “It is a true honour to undertake the expedition to recover the bell” and David Mearns explained: “I am extremely pleased that we have been able to fulfil one of the last wishes of Ted Briggs, one of only 3 survivors of Hood’s crew of 1,418 men, to recover the ship’s bell as a memorial to
his shipmates”. The Ministry of Defence and the Royal Navy have expressed gratitude for Mr. Allen’s generosity, recovering the bell at no cost to the MOD, while First Sea Lord, Admiral Sir George Zambellas said: ‘HMS Hood is one of the greatest fighting ships in our nation’s long and glorious maritime history. That she was lost with her guns thundering in defence of the convoys that formed Britain’s lifeline is a tragic reminder of the high price that our island nation paid for survival, and for the freedom and prosperity we enjoy today... The recovery of the Ship’s Bell will help ensure the 1,415 men lost, and the name Hood, will always be remembered by a grateful nation.”
=
*
BULLETIN BOARD
(IMAGES COURTESY OF COURTESY OF PAUL G. ALLEN)
6
?
A search is underway for every living Bomber Command veteran in order to invite them to the unveiling of a memorial spire in Lincoln on 2 October 2016. The spire, taller than the Angel of the North, is surrounded by a wall recording the 55,573 names of men who died serving with the formation and is part of new International Bomber Command Centre which is due to open in 2016. Around 900 veterans have been identified so far, and it is thought that over 100 are still out there. Anyone knowing of any Bomber Command veteran is urged to register their names by emailing events@internationalbcc. co.uk or by writing to The IBCC, 13 Cherry Holt Road, Bourne, Lincolnshire, PE10 9LA.
www.britainatwar.com
Veterans of the Korean War attended a ceremony in London to mark the 62nd anniversary of the ceasefire. The event, which also took place 65 years after British troops first arrived there, took place at the new Korean War Memorial in Whitehall. According to the Foreign and Commonwealth Office, 87,000 British soldiers served in Korea, the second largest UN contribution, over 1,000 would not return home.
A VC winning soldier from Middlesbrough has finally had his name added to his headstone 30 years after his death in 1982. Private Tom Dresser won his VC at the Battle of Arras in 1917 but his name was not added to his headstone, shared with his wife, because of security concerns at the height of The Troubles.
Exhibitions from around the UK • Events • Discoveries • Restorations • News
RAF Museum Battle of Britain Conference THROUGH ICONIC images such as Guy Hamilton’s 1969 film Battle of Britain, the Battle maintains a specific place in British collective memory and is one of the most celebrated events in the history of the RAF due to the role of Fighter Command in defending against the threat of invasion in 1940. Recently, however, historians have questioned some of the myths that surround this important event in British history. On Saturday 26 September 2015, to mark the 75th anniversary, the RAF Museum hosts an international conference that aims to reassess some of these myths and the Battle’s contribution to overall victory. The conference has been organised in conjunction with the University of Exeter and the British Commission for Military History.
The event has exciting line-up of speakers covering areas such as the role of Bomber Command and Royal Navy during the Battle, as well as considering the views of the German and Italian militaries. The conference will also consider some of the consequences of the Battle and two-keynote lectures. The first, delivered by Dr Helen Doe, covers the challenges and opportunities for biographers of Battle of Britain personnel. The second, delivered by Dr Garry Campion, will consider the valorisation of the Battle of Britain. Registration costs are £50 for a full delegate, £25 for students. For more details, including a registration pack and booking form for ‘A Necessary Victory? The Context and Consequences of the Battle of Britain’, email the RAF Museum’s Dr Ross Mahoney: (ross.
[email protected]).
| BRIEFING ROOM
Telex Announcing End of WW2 Auctioned
DOCUMENTS WHICH first announced the end of World War Two to millions of Allied soldiers fetched £11,000 when they were auctioned by Nottingham based auctioneer International Autograph Auctions. The telex from Supreme Commander Allied Expeditionary Force General Eisenhower, who later became President of the United States, announced the surrender of German forces on 7 May 1945 and would likely have been the first time Allied troops were told that the war was over.
General Eisenhower sent four messages on VE Day, but only the telex was broadcast to troops, and it sold for more than £5,000. A cipher message of the ceasefire order sold for £3,430, and the last wartime intelligence report from the European theatre of operations, which stated ‘there is no longer an enemy to defeat’, also fetched £2,695. Auctioneer Richard Davie said that to ‘some people they could be worth an awful lot more… to hold them in your hands is like holding actual history.’
War And Peace Revival Has New Owner
NO DOUBT many will be relieved to hear that the War and Peace Revival has a new owner, John Allison, who will continue the show. John was the first to contact Rex Cadman following the announcement of his and Barbara Shea’s retirement after 27 years of running the legendary show. They were flooded with queries and offers from people wanting to discuss War and Peace, but when the War and Peace team met John there was an immediate
$
Australasia’s most famous painting, ‘Simpson and his Donkey’, sold at auction for $NZ 420,000, a record breaking sum for artist Horace Moore-Jones. The artwork was purchased by a local, and it is expected that the painting will now remain in New Zealand. The photograph the artist based the painting on also sold to the same buyer for $NZ 32,000.
connection. “We were left with a really positive feeling that if anyone was going to take over organising War and Peace, then these were the people to do it.” Explained Rex. John Allison founded the Field and Rural Life Media Group, a digital media platform that has been embraced by the shooting industry. Tying his firm to the industry has worked well, bringing manufacturers, distributors and retailers together, forging a sense of pride and public brand
=
Royal Navy divers have deployed from Faslane and have spent a fortnight working at the ranges at Cape Wrath, northwestern Scotland, as part of an annual operation. The team, from the Northern Diving Group, is tasked with finding and disposing off a vast array of unexploded shells and bombs that survived training exercises and now rest on the seabed.
awareness. Allison organises the largest public shooting show in Europe each February, the Warwickshire based British Shooting Show. John Allison is also a collector of militaria and military vehicles and to have become custodian and to have secured the future of the War and Peace Revival is in his words “a great privilege and I’m grateful to Rex and Barbara for their continuing support in the future.” So, John Allison and his team have
a busy 12 months ahead of them, taking over the organising of next year’s show scheduled for 20-24 July 2016. We wish him, Rex, and Barbara the best of luck in their new endeavours, but we leave the last words to Rex; “Barbara and I would just like to say thank you to everyone for 27 fabulous years - it’s been a blast. We have loved every minute of it. We both look forward to seeing you next year in our new role as visitors - something we have not tried since 1988!”
=
2
The Royal Navy’s Aircraft Handlers Branch has celebrated their 70th anniversary whilst preparing for service aboard Britain’s new carriers. The Aircraft Handlers were heavily involved with operations in the Far East during the last years of World War Two in addition to working with the fast jets of the Cold War carriers.
The Ministry of Defence has urged the country to remember those soldiers from Britain’s African colonies this upcoming VJ Day. Using the social media site Twitter, the MOD explained that in May 1945 alone an estimate 119,000 men from the aforementioned colonies fought the Japanese in Burma, let alone in other parts of the Far East, and encouraged their commemoration.
www.britainatwar.com
7
BRIEFING ROOM |
News • Restorations • Discoveries • Events • Exhibitions from around the UK
MOD announce Death of Lance Corporal Campbell
THE MINISTRY of Defence have announced with great sadness the death of Lance Corporal Michael Campbell, bringing the death toll of Britain’s campaign in Afghanistan to 454. Campbell, from 3 Royal Welsh, died on 23 July following an operation treating wounds sustained in combat in 2012. Whilst on patrol in April 2012, Campbell came under heavy and accurate enemy fire. Others in the troop returned fire, as did Campbell, despite being struck by a round to the hip while crossing
a road. He drew fire to allow others to traverse an open area into better cover before he was evacuated for treatment, first at Bastion, and then in the UK. Lance Corporal Campbell was a veteran of a number of tours in Iraq and Afghanistan and remains a highly thought of soldier. Mature, dedicated, and professional to the last, the MOD has labelled him as a ‘perfect example of a Reserve soldier seamlessly integrating into a Regular Unit’ and that he had ‘epitomised everything a Reservist in 3 R WELSH should be’ and ‘a true Welsh Warrior’. A number of officers and colleagues within the Royal Welsh have praised Campbell’s bravery, talent, commitment, flexibility and charisma and Defence Secretary Michael Fallon has offered his condolences to Campbell’s family whilst again commending the soldier.
‘Digging In’ Project Awarded Grant
BULLETIN BOARD
A HERITAGE Lottery funded project has enabled the construction of replica Allied and German trench systems in Glasgow’s Pollok Country Park. A grant of £99,600 will see the trenches open to the public on 19 September 2015 until November 2018. The project, known as ‘Digging In’, involves a partnership including the University of Glasgow, Stewart’s Melville College, Glasgow City Council and Northlight Heritage and will host a regular programme of public events and school visits. Hands-on learning activities and living history displays will be organised in the hope of conveying how soldiers managed life in the hostile, stressful and dangerous environment of the Western Front and the conflict’s impact on
8
=
Contractors working in Bethnal Green’s Temple Street uncovered an unexploded 250kg Second World War bomb, causing severe disruption and prompting an evacuation and travel diversions. The bomb was found deep underground during basement renovations. Specialist officers and bomb disposal experts were called in to render the device safe. (IMAGE: CROWN COPYRIGHT)
www.britainatwar.com
communities on the Home Front. The replica trenches will serve as a hub for learning about many aspects of the war including its impact on mental health, the role of women during the conflict, advances in medicine, technology, aerial photography and mapping. Dr. Tony Pollard, Director of the Centre for Battlefield Archaeology at the University of Glasgow, said: “As a conflict archaeologist who has excavated trenches and graves on the Western Front, I know it is impossible to step back in time and fully appreciate what it was like to have been there during the Great War. But I am really looking forward to ‘Digging In’ and applying what I have learned in helping to create a unique learning environment.”
Saintes Mosquito Crash Remembered
A service was held in France to remember the Mosquito that crashed at Écurat, near Saintes, in Southwestern France. The service, held on 19 July, was attended by the mayors of Saintes and Ecurat as well as veterans and a collection of historic vehicles. The Mosquito, from 151 Squadron RAF, crashed after attacking the railway at Saintes. A French replica Mosquito also participated in the ceremony, completing six flybys and in the ceremony, completing six flybys and a number of wingovers. (RAF ASSOCIATION SUD-OUEST FRANCE)
?
West Midlands Police are currently investigating the theft of Second World War medals from a 97 year old veteran. Mr William Fearn was in hospital at the time his ‘Africa Star’, ‘Defence Medal’, ‘1939-1945 Star’ and ‘1945 War Medal’ were stolen from his home. Police are urging anyone who had been offered the medals to come forward immediately. PC Lee Parry of the Birmingham Investigation Team said: “Officers continue to make enquiries including checking CCTV, speaking to residents and to local stores and second hand dealers. We need to support and protect our veterans and believe that someone out there will have information that could help solve this crime.”
BRIEFING ROOM |
News • Restorations • Discoveries • Events • Exhibitions from around the UK
Dam Buster Les Munro Dies
SQUADRON LEADER John Leslie ‘Les’ Munro, CNZM, DSO, QSO, DFC who has died in New Zealand, aged 96, was the last survivor of the pilots of 617 Squadron who flew specially adapted Lancasters to attack German dams in May 1943. He therefore entered RAF history as one of the ‘Dam Busters’. The raid, by nineteen aircraft, not only breached the Mohne and Eder dams, but provided an enormous propaganda triumph which Prime Minister Winston Churchill was able to exploit in his discussions
with American President, Franklin Roosevelt. Flight Lieutenant Munro was the skipper of Lancaster AJ-W, ‘W for William’ on the raid, with a crew consisting of: Sgt F E Appleby (Flight Engineer), Fg Off F G Rumbles (Navigator), Wt Off P E Pigeon, RCAF (Wireless Operator), Sgt J H Clay (Bomb Aimer), Sgt W Howarth (Front Gunner) and Flt Sgt H A Weeks, RCAF (Rear Gunner). They were destined not to see their target, the Sorpe Dam, because as W for William reached the enemy coast it was hit by light flak in the area of Vlieland, West Frisian Islands. Sgt Frank Appleby assessed the situation and made a dispiriting report to Munro. The damage was severe, including the fact that the intercom was knocked out and the ability to communicate with the world outside the aircraft had been lost. Appleby later recalled that Munro took to using handwritten notes, with the Flight Engineer acting as messenger. With deep regret Munro decided to return with his ‘bouncing bomb’ although Wg Cdr Guy Gibson, who would receive the VC for his leadership of the dams attack, was not an easy man to explain failure
to. His reaction to Munro’s account was unreasonably frosty. Many years later, Les Munro said of having to return: ‘I was bitterly disappointed, but I suppose that is why I am alive today.’ He was embarrassed to be treated as a hero. Fifty three men died on the raid and three became POW. Les Munro had joined the Royal New Zealand Air Force in 1941 and eventually flew more than 50 operations in Bomber Command. After the war he became a farmer. Shortly before his death Les Munro decided to sell his medals,
logbooks and other memorabilia to raise money for the maintenance of the Bomber Command memorial in London. He later accepted an offer from Lord Ashcroft to donate £75,000 for that purpose, with the items going instead to the Museum of Transport and Technology in Auckland, New Zealand. There are two surviving Dam Buster aircrew, George “Johnnie” Johnson (Bomb Aimer in Flt Lt McCarthy’s aircraft) and Fred Sutherland, (Front Gunner in the Lancaster skippered by Plt Off Knight).
ABOVE: Les Munro the last survivor of the pilots of 617 squadron.
BULLETIN BOARD
RIGHT: Les Munro flying KC-W, LM482, probably on 14 June 1944 heading for Le Havre. Lancaster KC-A is 'Thumper',DV385, flown by 'Bob' Knights. (WW2 IMAGES)
*
Led by Wing Commander Guy Gibson, 19 modified Lancaster Mk.III bombers set off from RAF Scampton, near Lincoln, to attack the targeted dams on the night of 16 May 1943 in three waves. Munro flew Lancaster ‘W Willie’ in the second wave and was tasked with attacking the Sorpe Dam.
10 www.britainatwar.com
*
The 19 bomber crews involved in Operation Chastise included personnel from several different nationalities, many of whom had been attached to RAF squadrons under the British Commonwealth Air Training Plan. British air crew were therefore joined by others from Canada, Australia, New Zealand and even the United States.
*
The Operations Room for the Dams mission was located at St Vincents Hall, Grantham, also in Lincolnshire. This was home to 5 Group Headquarters. The house is now the location of two memorials, one to 5 Group Bomber Command and another to 617 Sqn ensuring the Dambusters continued commemoration.
*
Gibson’s black Labrador Retriever was 617 Sqn’s mascot. He often accompanied Gibson on training flights and was indeed a lover of beer, which he drank from his own bowl in the Officer’s Mess. He was run over on the morning of the attack. His grave is at RAF Scampton, Lincolnshire, where it is lovingly maintained.
Exhibitions from around the UK • Events • Discoveries • Restorations • News
| BRIEFING ROOM
Death of Battle of Britain Veterans
The recent deaths of three veterans of the Battle of Britain reduces to 21 the number of full members of the Battle of Britain Fighter Association writes Geoff Simpson. Only holders of the 1939-1945 Star with Battle of Britain Clasp may become full members of the Association and the members of that band are dwindling with the passage of time as, sadly, the ‘Few’ get ever fewer. DENIS ROBINSON was born on 24 June 1918 at Christchurch, Dorset. He joined the RAFVR as an airman u/t pilot in March 1938. He was called to full time service in October 1939, took an instructor’s course at the Central Flying School and was eventually, in June 1940, posted to 152 Squadron at Acklington. On 8 August, by which time the squadron had moved to Warmwell, Sergeant Robinson was shot down and crash landed in a field near Wareham, avoiding injury. A photograph of his Spitfire on its nose in the field has become a frequently reproduced image of the Battle of Britain. Five days later Robinson was credited with shooting down a Messerschmitt Bf 109 to add to the one he had damaged on 25 July. He often flew as the squadron’s weaver,
believing that he was allocated that task in part as a punishment for expressing opinions on tactics. At the end of September Robinson was posted away and shortly afterwards became an instructor. He was commissioned and, from November 1941, instructed in Canada at Swift Current, Battleford and Patricia Bay. He returned to the UK in mid-1944. Robinson went to 109 OTU, Crosby on 27 August 1944 , to convert to transport aircraft and in March 1945 he became one of the RAF pilots seconded to BOAC, as it geared up for post war services. He was released from the RAF in 1946 as a Flight Lieutenant and joined BOAC, later flying for British Caledonian and British Island Airways before retiring in 1978.
FLIGHT LIEUTENANT Owen Valentine Burns, AE, who died on June 30, a few months short of his 100th birthday, was a wireless operator/air gunner in the Battle of Britain. Owen Burns was born in Birkenhead on November 20 2015. His father was killed in France in 1918, serving as an NCO with the Cheshire Regiment. On 3 October 1939 Owen Burns joined the RAFVR. His first operational posting, as a Sergeant, was to 235 Squadron, based at Bircham Newton and flying Blenheims. He arrived on the
squadron in June 1940. During the Battle of Britain the squadron was principally employed on aerodrome protection duties, as well as escorted aircraft that were attacking the French ports and German shipping. There were also calls to escort aircraft arriving in the UK. During a sortie on 11 September 1940, escorting Fleet Air Arm Albacores to Calais, Burns’ aircraft survived an attack on the formation by numerous Messerschmitt Bf 109s On an offensive sweep on 18 November 1940 Burns was credited with shooting down a Dornier Do 18 flying boat. Burns received a broken collar bone when he was thrown out of a Blenheim which crashed on landing at Langham on 14 February 1941, causing him, by his own later account of the incident, to
miss the Valentine’s night party he had organised. The pilot was badly injured and the observer was killed. Control duties followed before Burns served in Hudsons on ASR duties with No 279 Squadron. He re-wrote gunnery instruction manuals and was gunnery officer at 19 Group. For a time he was PA to the AOC. He left the RAF in 1948. Owen Burns spent much of his civilian career with Haig Whisky, before retiring in 1980. For many years he did not realize that he was eligible to join the Battle of Britain Fighter Association, but, when he did, he became a great supporter of the Association and the Battle of Britain Memorial Trust. Less than three weeks before he died, he attended a tea for BBFA members given by the Prince of Wales and Duchess of Cornwall at Clarence House.
*
*
ABOVE: Owen Burns.
The Battle of Britain was the first major military campaign fought entirely by air forces and the most unrelenting aerial campaign at that date. While the Luftwaffe could call on a pool of experienced pilots with experience dating back to the Spanish Civil War, the RAF enjoyed no similar luxury, their first experience of combat being in France in 1940.
ABOVE: Denis Robinson.
In later life he was happy to help researchers and kept his own archive of material related to the Battle of Britain. He died on 28 July 2015.
Although all collectively known as ‘The Few’, alongside the 2,353 British pilots recognised in the RAF’s Roll of Honour hundreds of pilots from other countries participated in British efforts during the battle from Poland, New Zealand, Canada, and Czechoslovakia amongst others with some pilots from neutral Ireland and the United States and others from Jamaica and Barbados.
FLIGHT LIEUTENANT Henry Arnold Sprague, who has died in Canada, aged 99, earned the Battle of Britain Clasp with 3 Squadron and later became a PoW. Sprague, a native of British Colombia, joined the Royal Canadian Air Force in late 1939. He arrived in the UK and had a brief spell at a holding unit before going to 6 OTU, Sutton Bridge on 21 September 1940 to convert to Hurricanes. On 5 October he joined 3 Squadron. After the Battle, Pilot Officer Sprague went to 96 Squadron and then to 1 Squadron (RCAF), which, shortly afterwards, was renumbered as 401 Squadron. On 31 July 1941 he was posted to 56 Squadron at Duxford. Sprague re-joined 401 Squadron at Biggin Hill on 19 September and was still serving with this squadron when his Spitfire was shot down by German fighters near Boulogne on 22 November, resulting in him becoming a prisoner of the Germans. Sprague spent time in Stalag Luft lll before he was freed in May 1945 and returned to Canada. He was released from the RCAF on 23 August 1945.
ABOVE: Henry Sprague.
*
One of the largest oversights of the British air defence network in 1940 was lack of any provision to rescue Allied pilots who had ditched in the sea. Their clothing and preservation equipment was woefully inadequate and no real rescue system was established until after the Battle of Britain. In contrast, the Luftwaffe was much better prepared.
www.britainatwar.com 11
BRIEFING ROOM |
News • Restorations • Discoveries • Events • Exhibitions from around the UK
‘Black Peter’ Operational After 70 Year Hiatus
ABOVE: Black Peter in flight. BELOW: Puma HC.2 ‘Black Peter’. The HC.2 is the result of an upgrade which installed new Makila engines, gearboxes, tail rotors, avionics, ballistic protection and countermeasures. It can carry twice the payload three times the distance of the older HC.1. (IMAGES COURTESY OF ANDREW THOMAS)
THE RAF’s elite night flying helicopter squadron has returned to service after a lengthy refit with a deployment to Afghanistan, and they brought with them an old friend not seen operationally for seven decades. No. 230 Squadron RAF, operating the new Puma HC.2, have deployed from RAF Benson to Kabul to support the British training teams there and have done so with a unique helicopter. One of their HC.2s has been painted completely in black, and is marked with 1940s South East Asia Command roundels. In 1944, 230 Squadron operated Short Sunderland flying boats out of Ceylon
and one of their aircraft, JM 673 P, was commanded by Wing Commander Dundas Bednall. Bednall took the unusual step of painting his aircraft in a nonstandard matt black to better camouflage the Sunderland at night - It was soon nicknamed ‘Black Peter’. On 29 November 1944, JM673 departed Ceylon at 06:45 for an anti-submarine sortie, she was crewed by 10 men and piloted by Flight Lieutenant Kenneth Ingham (Bednall’s aircraft was often flown by others). Throughout her patrol, a cyclone developed along the eastern part of her route. Attempts to recall the
aircraft were made but there was no reply and no trace of the aircraft or crew were ever found. The HC.2’s colour scheme was painted specially to
BOB Bunker restoration
PLACES TO VISIT
A HISTORICAL Battle of Britain bunker at RAF Northolt, Uxbridge, which was used as an operations centre in the summer of 1940, has been promised £1 million from the British government in order to preserve it. A visitor’s centre will be built on the site which currently floods frequently and has fallen into a state of disrepair. London’s Mayor Boris Johnson, who helped
lobby the government, welcomed the news and the RAF will work with local authorities to protect the sustainability of the site. The restoration of the bunker, known as the Group Fighter Command Centre, is viewed by the government as a memorial to all RAF crewmen who fought in the Second World War, and veterans are donating items for display.
Listening Post Sale
A 60 year old Cold War listening station at Aird Uig, on the Isle of Lewis is set to be turned into a place where tourists can enjoy whale song and a dark skies observatory. Locals from Gallan Head voted in favour of the community buy-out plans. The listening and surveillance station was part of NATO’s early warning
,
Brooklands Great War 100 Brooklands Museum, Weybridge, Surrey, 27 September The Brooklands Museum marks the centenary of the First World War remember Brookland’s involvement in the Great War with a gathering of pre-1919 vehicles including commercial vehicles, buses, motorcycles and aircraft.
,
,
,
The Victory Show Foxlands Farm, Cosby, Leicestershire, 4-6 September Over 40 re-enactment groups and more than 200 tanks and vehicles join a variety of aircraft including the Meteor and the Blenheim in an action packed weekend. Do not miss one of the last chances to see the Vulcan flying either!
12 www.britainatwar.com
commemorate the 95th anniversary of the squadron, as well as the 70th anniversary of the last time the original Black Peter took to the skies and failed to return home.
system designed to protect the North Atlantic from Soviet submarines and aircraft, but the Ministry of Defence no longer use the derelict clifftop buildings. Other possible attractions include unexplored sea caves and never before attempted cliff climbs. Locals are convinced that the old base could develop the area’s economy.
The Battle of Britain Anniversary Air Show IWM Duxford, Cambridgeshire, 19-20 September Book in advance and don’t forget to take a walk down the flight line as IWM Duxford gathers a mighty host of legendary aircraft, including 20 Spitfires and 5 Hurricanes, as the RAF base relives the Battle of Britain and recreates a squadron scramble. Scottish Airshow Ayr Seafront & Prestwick Airport, South Ayrshire, 5-6 September An exciting seafront flying display including the Red Arrows, historic Swedish aircraft, and the last flight of the Vulcan over Scotland takes place on the 5th followed by a static display at Prestwick Airport on the 6th.
The Memorial Pegasus museum
is dedicated to the men of 6th British Airborne Division. The 1st liberators to arrive in Normandy on June 6th 1944. Archive films, a guided visit and many interesting and authentic objects enable the visitors to relive this momentous time. The original Pegasus Bridge is on display in the park of the museum along with a full size copy of a wartime Horsa glider.
Open everyday from February to Mid - December Only five minutes drive from the Brittany Ferries Terminal at Caen/Ouistreham
Tel: +33 (0) 231 781944 Fax: +33 (0) 231 781942 Memorial Pegasus Avenue du Major Howard 14860 RanvilleNormandy • France www.memorial-pegasus.org
Exhibitions from around the UK • Events • Discoveries • Restorations • News
| BRIEFING ROOM
Ravensbrück Museum Reconciles with Violette Szabo Family as Medals Sold
A HEREFORD based museum has received an unprecedented letter of remorse from Dr. Ensa Eschebach, the director of the museum at the Ravensbrück Concentration Camp ahead of the auction of heroine’s medals. The Ravensbrück camp, located to the north of Berlin, was opened in May 1939 and was intended to hold female inmates only. Rapidly expanded throughout the war, the camp held well in excess of 100,000 prisoners. Until the camp was liberated in April 1945, tens of thousands died within its fences, although, sadly, we can’t be sure of an exact figure as most of the camps documents were destroyed. What is certain is that amongst the many who perished are four British female members of the Special Operations Executive, including Violette Szabo. Szabo, 23, was shot at the camp on 5 February 1945. Eschebach’s letter of goodwill apologises for the death of Violette Szabo, and shows regret and remorse for ‘all cruelties and crime Germans did to people all over Europe’. The letter was presented at the annual celebration of what would have been Violette Szabo’s 94th birthday, an event marked
by her daughter Tania, who received her mother’s posthumous George Cross from King George VI, and Virginia McKenna OBE, who portrayed Szabo in the 1958 film ‘Carve Her Name With Pride’. The event was filmed on behalf of Ravensbrück Museum in recognition of their letter and ongoing work to preserve the truth of atrocities in WWII. The news came just a month before Szabo’s medals, including her George Cross (of which, only four have been awarded to women), were sold at auction for £260,000. The medals sold in less than a minute to Lord Ashcroft’s extensive collection and will remain in the country, joining others from his collection on public display in London’s Imperial War Museum. Lord Ashcroft stated: “I am absolutely thrilled to have acquired such an iconic medal group, awarded to a remarkable woman.” While Tania Szabo commented: “She will continue to inspire people.” See also our George Cross feature on page 50.
Lost British Submarines Discovered After 70 Years A ROYAL Navy U-class submarine lost since 1942 is now believed to have been found 74 years after it disappeared. Belgian diver Jean-Pierre Misson claims to have discovered the wreck of HMS Urge off of Ras el Hilal, near Derna, Libya, a site now occupied by militants. Misson discovered the wreck in 2012 but only recently reported his findings as the security situation prevented him from diving the site. The news comes soon after Italian engineer Guido Gay’s
discovery of the British S-class submarine, HMS Saracen, scuttled off of Corsica on 14 August 1943. HMS Urge, paid for by the people of Bridgend, Wales, enjoyed a successful career, sinking the Italian tanker Franco Martelli and damaging the Aquitania and Marigolda in 1941 before damaging the battleship Vittorio Veneto. In 1942, she sank the cruiser Giovanni delle Blande Nere, participated in commando raids, and unsuccessfully
,
Jersey International Air Display/RAFA Guernsey Air Display St. Helier, Jersey/St. Peter Port, Guernsey, 10 September The Red Arrows and the Battle of Britain Memorial Flight headline an exciting line up ready to display at two simultaneous and long established annual air displays over the Channel Islands.
,
Village at War Weekend Friends of the Canal Museum, Stoke Bruerne, 12-13 September Experience life in a wartime British village as the canal side village of Stoke Bruerne fills sandbags and tapes up windows as the village ready for becoming home to a number living history reenactors, vehicles, and a variety of acts/groups.
attacked more merchant ships, the Italian troopship Victoria, destroyer Alpino, and the cruiser Bolzano. HMS Saracen, sank U-335 in the North Sea before moving to the Mediterranean and torpedoing the Italian submarine Granito and submarine chaser Maria Angelette amongst others. She was one of the most successful submarines of the theatre but sank after attacks from two Italian corvettes. Her crew, determined not to sink on
Friday 13th, held out until the next morning before scuttling. HMS Urge, reported missing on 6 May 1942, sank without trace in the Mediterranean while sailing from Malta to Alexandria, Egypt. Her sinking had been blamed on a mine near Malta but others claimed she was sunk by an Italian CR.42 biplane while attacking the San Giusto off of Libya. The location of the wreck gives strength to stories of air attack, but confirmation of Urge’s fate will have to wait.
,
Western Front Association Event - ‘Behind the Lines Sir Douglas Haig & the Cavalry Corps September - October 1918’ In October 1918 Rawlinson’s 4th Army resumed operations beyond the Hindenburg Line. At 19:30 on 16 September Simon Justice details the remarkable advance of the Cavalry Corps and examines the role of Haig in directing cavalry operations at the Kingswood Royal British Legion, Bristol.
,
Western Front Association Event - ‘Horrors in the Forest’ Join Martyn Fisher at the Church of St Mary the Less, Allerton Bywater, West Yorkshire at 13:30 on 3 October as he tells the story of the principle engagement of the American Expeditionary Forces at the Argonne in World War One.
www.britainatwar.com 15
NEWS FEATURE |
What Happened to HMAS Sydney?
O
N 19 November 1941, the German commerce raider HSK Kormoran was sailing north, up the coast of Western Australia, when she spotted the mast of what was thought to be a tall ship. That ship turned out to be the Leanderclass light cruiser HMAS Sydney. What followed was a devastating engagement and a decades long mystery. Recent developments appear to finally answer the question; what happened to HMAS Sydney and the 645 souls aboard her? John Ash investigates.
SHOW YOUR SECRET SIGN
As the two ships closed together, the Sydney, commanded by Captain Joseph Burnett, tried to establish the identity, origin, and destination of the German vessel which was masquerading as the Dutch merchant ship Straat Malakka. The two ships were now at a relatively point blank range, but to the crew of the Kormoran it seemed that their ruse had paid off. That is, until Sydney, by now only 1,500 metres away, signalled ‘IK - you should prepare for
a cyclone, hurricane, or typhoon’. Kormoran did not respond. To them, the message made no sense, but Sydney’s suspicions had been confirmed. ‘IK’ were the middle letters of Straat Malakka ‘s secret sign, ‘IIKP’ and verify to her identity, the real Straat Malakka should have signalled back ‘IP’. After a delay, Sydney signalled ‘Show your secret sign’. At once, Kapitän zur See Theodor Detmers, Kormoran’s commander, knew he’d been caught. The false Dutch flag was replaced by a German ensign, and both ships opened fire at around 17.30. While both ships’ first shots were ineffective, over the next 30 minutes both vessels would be crippled. Kormoran raked the cruiser’s side with her secondary weapons and fired torpedoes, destroying Sydney’s bridge, wireless offices and two of her turrets. One torpedo holed Sydney under the ‘A’ turret. Sydney struck Kormoran several times, damaging machinery and igniting an oil tank and then, allegedly, tried to ram Kormoran at 17.35, but missed. With all her guns out of action or out of range, the burning cruiser passed aft the raider. Ten minutes later, Sydney
fired torpedoes. Detmers was determined to sink the stricken cruiser and was turning his ship around, and although this turn spared the ship from the incoming torpedoes it was too much for her damaged engines which catastrophically failed. Both ships were now heavily damaged and ablaze, but Sydney continued to head south-south-east and quickly vanished from sight although the glow from her fires was visible until midnight. Kormoran was abandoned later that evening and scuttled at midnight. She slowly began to sink, exploding 30 minutes later. Her crew were by now in seven boats and rafts,
What Happened to
HMAS Sydney?
RIGHT: HMAS Sydney (ex HMS Phaeton) in 1940. After a successful career in the Mediterranean throughout 1940, Sydney’s posting in home waters would sadly prove to be her last. (ALLAN GREEN/STATE
LIBRARY OF VICTORIA)
16 www.britainatwar.com
Warship Wrecks Photographed
s
What Happened to HMAS Sydney?
| NEWS FEATURE
LEFT: One of Kormoran’s 15cm guns, nicknamed ‘Linda’ by her gun crew. She is also decorated with a skull and crossbones, part of which can just be made out from under the barrel. (COURTESY: WA MUSEUM AND CURTIN UNIVERSITY)
ABOVE: Auxiliary cruiser Kormoran underway in 1940, taken from a nearby U-Boat. Note the effective concealment of her weapons. (BUNDESARCHIV) BELOW: Close-up of previously a unseen 15cm shell hole through HMAS Sydney’s bridge, supporting the idea that Kormoran incapacitated the vessel by wiping out its command structure. (COURTESY: WA MUSEUM AND CURTIN UNIVERSITY)
ABOVE: Memo from Defence Secretary Frederick Shedden to Prime Minister John Curtin, the first formal notice that Sydney was believed lost. (NATIONAL
ARCHIVES OF AUSTRALIA)
one of which sank drowning all but three aboard it. German losses totalled some 82 men. There was little concern at first when Sydney failed to return on time since warships were expected to maintain radio silence, and were often delayed or diverted by a number of legitimate reasons. Wireless stations began hailing Sydney as the Australians began searching. The British tanker MV Trocas reported-in, stating she rescued 25 sailors from the Kormoran and confirmed the vessel had engaged in a mutually destructive engagement with a cruiser. Signals to Sydney ceased, as it was assumed that if she could respond, she would. Dozens of ships and aircraft became engaged in a search, including the Dutch cruiser HNLMS Tromp.
NO TRACE
Kormoran’s crew was picked up on land at 17-Mile Well, Red Bluff or at sea by MV Koolinda, AHS Centaur, HMAS Yandra, HMAS Wyrallah and RMS Aquitainia. On 29 November the search was terminated, and although all German lifeboats were found none from Sydney were discovered. No trace of the cruiser was found, other than a recovered lifejacket and a Carley float. Descriptions of the engagement from Kormoran led to predictions that 70% of Sydney’s crew had died or succumbed to smoke inhalation or wounds before the ship presumably broke apart. There was no time to lower boats, and any abandoning ship did so with short-use equipment and succumbed to the elements before any search began. www.britainatwar.com 17
NEWS FEATURE |
What Happened to HMAS Sydney? LEFT: One of HMAS Sydney’s lifeboats, Sydney this one a Carley float, wrecked and sunken. A number of Sydney’s lifeboats are thought to have been destroyed in the engagement. (COURTESY: WA MUSEUM
AND CURTIN UNIVERSITY)
LEFT: An image of the list of ships sunk by Kormoran throughout her career as a commerce raider.
(COURTESY: WA MUSEUM
AND CURTIN UNIVERSITY)
The torn off bow of the once formidable ‘Grey Gladiator’, HMAS Sydney. According to the Cole Report, it is thought that the cruiser sank incredibly quickly, almost vertically, shearing off her bow. (COURTESY: WA MUSEUM AND CURTIN UNIVERSITY)
Their bodies would not surface until after the search was terminated. The fate of HMAS Sydney could only be learned from the 317 captured crew of Kormoran, or confirmed if the wreck was found.
WHAT HAPPENED TO HMAS SYDNEY?
HMAS Sydney’s loss with all hands was a huge shock for Australia, and the largest single loss of life in the Royal Australian Navy’s history. The battle was responsible for 35% of the Navy’s total losses in the war. It was not clear how a purpose built warship like Sydney was defeated by a converted merchant vessel, but German accounts, generally perceived as correct during and after the war, suggest Burnett approached too close and lost any advantage Sydney’s guns and armour had. However, there are theories suggesting Kormoran had fired before raising her battle ensign, or else lured Burnett in close by feigning surrender or by falsifying signals to indicate an emergency necessitating assistance. It seems unlikely that a flag of surrender was raised, as this would have simply confirmed that Kormoran was certainly not the Straat Malakka. Additionally, previous attempts to stop raiders had resulted in a costly waste of ammunition. Burnett had commented on previous incidents and noticed that when firing at maximum range, it was not possible to capture a vessel before it was scuttled. Another argument suggests HMAS Sydney was not at action stations as she approached the raider. Certainly, Detmers observed that Sydney’s secondary guns were not manned and that crewmembers, assumed to be pantrymen, were on deck observing Kormoran. However, Detmers is possibly mistaken as the men he saw could have manned the secondary batteries but were standing well away from the ship’s Walrus seaplane catapult launch.
18 www.britainatwar.com
They may also have been damage control parties, or men preparing to launch a boat to board Kormoran. Nevertheless, a 2009 inquiry (The Cole Inquiry) concluded that Sydney was not at action stations as it would be uncommon, based on other ships logs, for an Australian warship to approach an unidentified merchant vessel prepared for battle. The inquiry determined that Burnett thought he was approaching an innocent vessel that was merely absent from his shipping lists, a not entirely unusual circumstance. By the time he became suspicious of ‘Straat Malakka’ he’d already come too close.
WRECKS LOCATED
For decades, searches for the ships found nothing, but the wreck of Kormoran was finally located in 2008. After years of research based on primary documents, shipwreck hunter David Mearns believed that German accounts of the battle and the location were accurate, and convinced the Australian Navy that a successful search was possible. Between 2004 and 2008, millions of dollars (Aus) in funding was raised by the Australian government, as well by the public and business, but even this could only fund a search for 45 days. By analysing the drift of the two rafts from Kormoran, Mearns was able to roughly locate their start point, giving them a 60 x 39 mile box of ocean to scan with sonar. Finally, on 12 March 2008, the wreck of the raider was discovered. The find was announced on 17 March and a day later, it was announced that HMAS Sydney had also been found. Both ships lay some 2.5km down, broken in two, some 13 miles apart. The Sydney was later inspected, and the damage the search team reported corresponded with the information provided by the crew of Kormoran, but did not explain how the cruiser could have been so comprehensively disabled.
MYSTERY SOLVED
In April 2015, Curtin University and the Perth based Western Australian Museum joined together in a massive effort to map the wreck sites for further study and to monitor deterioration of the sunken ships. Their findings are to be put together as a series of 3D models as museum attractions. The week long expedition, which made use of modern 3D imaging technology, captured 300 hours of footage and 750,000 still images of the sites, compared to the 1,500 taken during the original discovery. Eager to learn more about the battle, the gargantuan effort of going through each image was quickly completed, and it was learned that one of the Kormoran’s guns was named ‘Linda’. A list of 11 of the 12 ships Kormoran sank was also discovered painted onto a bulkhead, the first being the Greek merchant Antonis in early 1941. Scans of Sydney also have thrown up interesting results, several of her guns appear intact and a sunken Carley float was found amongst the debris. The new images clearly support the theory that the bridge was destroyed, as per German accounts, and thus any command cohesion would have been lost early on in the battle.
POST-BATTLE HONOURS For sinking the HMAS Sydney, Theodor Detmers was awarded the Knight’s Cross, while the rest of the Kormoran’s crew were also decorated, mostly with the Iron Cross Second Class, others with first class decorations. Sydney was granted the battle honour ‘Kormoran 1941’, this is one of only a few such awards bestowed during the 20th century for single ship actions. It is also the second single ship action battle honour granted to a ship named HMAS Sydney, the first awarded to the First World War Chatham-class light cruiser HMAS Sydney which forced the Dresden-class light cruiser SMS Emden to surrender in 1914.
FIELD POST
Our Letter of the Month is sponsored by
Pen & Sword Books
'Britain at War' Magazine, PO Box 380, Hastings, East Sussex, TN34 9JA |
[email protected]
LETTER OF THE MONTH
Dining with the Ghosts SIR - In your December 2014 issue of Britain at War you featured a number of images of RAF bombers shot down or left behind in France during 1940. On the same theme, I have acquired a collection of photographs taken by a soldier of Panzer-AufklärungsAbteilung 37, the armoured reconnaissance element of General Rommel’s famous 7th Panzer-Division (Ghost Division) during the conquest of France in 1940. One of the photographs shows a quite unusual scene of a festively decorated table with a group of soldiers enjoying the luxuries of France: a few bottles of champagne and a large tin of caviar. Two of them are airmen of the Royal Air Force, and the young officer at the head of the table is none other than than Hauptmann Freiherr Hans-Ulrich von Luck und Witten, a close associate of Generalfeldmarschall Erwin Rommel. In June 1940 he commanded the PanzerAufklärungs-Abteilung. A caption on the back reads: “Fécamp, 12 Juni 1940”. But who are those two British airmen and how did they get to enjoy the hospitality of one of Germany’s most illustrious Panzer leaders? Despite being one of its youngest company commanders, von Luck had been given command of the unit after Major Erdmann was killed by friendly fire near Lille. On 9 June 1940 Luck’s unit reached the coast, where Rommel ordered him to proceed southwards where, supported by 88mm guns, he was to capture the port of Fécamp. Due to the presence of British warships (probably HMS Ambuscade and HMS Hampton) that were evacuating troops, the defenders denied von Luck’s demand for
surrender. On the 10 June, German artillery began to bombard the harbour and the ships on which enemy units were embarking. Added firepower came from a battery of heavy coastal guns which had been captured near Fécamp a few hours earlier. In the combined barrage the British ships steamed away and in the late evening, after a short but sharp battle against the French and British defenders, Fécamp was finally captured. On the 12 June, the fall of the nearby town and port of St. Valery brought another glowing victory for Rommel’s 7th Panzer Division, forcing the surrender of Allied troops who had been trying to evacuate from there. For the loss of just 28 men killed and 40 wounded Rommel’s men had taken 12,000 prisoners, 328 machine guns and 95 pieces of artillery. Later, von Luck wrote: ‘…. a couple of Wellington bombers [sic.] came flying towards us. The 88s opened fire immediately. One machine went down in flames. The crew hung from their parachutes and landed right in my positions. ‘You are in luck’ I greeted them.’You’ll be staying here with me for the time being’. When von Luck compiled his memoires decades after the war, he not only erred with the date (he places the incident on the
10 June) but he misidentified the type of the attacking British aircraft. On 12 June a number of Blenheims of 40 Sqn took off from RAF Wyton to bomb German troop concentrations around St. Valery. One of the machines was shot down by German anti-aircraft fire near Eletot, about 1.5 miles north-east of Fécamp. Its pilot, Sgt. David L. Doris, was killed. The other two crew, Sgt C.D.W. Bartlam and Sgt E. Rodgers, managed to bale-out and were taken prisoner. Instead of having them taken to the rear, Hauptmann von Luck made sure the British aviators were present as guests of honour at his table to celebrate the day’s hard won victory: ‘Sitting together at the festive table that evening, were the officers of my battalion, the successful leader of the 88mm
battery, a German U-Boat officer [who had been taken prisoner by the French and had been held in the local prison] and the crew of a British bomber, besides the mayor of Fécamp’. It would be interesting to know what became of Sergeants Bartlam and Rodgers after the war. Did they have families and did they ever speak about that unique incident? Maybe their families would be like to have a copy of the photograph? Any help in tracing the two families would be appreciated. Robin Schäfer, Germany, via email. EDITORS NOTE: Would any readers with information for Robin Schäfer please contact us via
[email protected]
The author of the Letter of the Month may select a book of their choice (maximum value £25) from the extensive range of titles available at www.pen-and-sword.co.uk 20 www.britainatwar.com
OPERATION VS: MISSION MOST DESPERATE Ostend Harbour Raid, 1918 MAIN PICTURE: HMS Vindictive. Commissioned in 1898, the cruiser carried the marine and seamen landing parties for the mole landing at Zeebrugge and was then fitted out as a blockship for her final mission to seal Ostend harbour a little under a month later. BOTTOM RIGHT: ‘You won’t get this letter unless I am a goner,’ wrote Godsal to his sister Dorothy shortly before the first aborted attempt to block Ostend in April 1918.
C
APTURED IN 1914, the German-held Belgian port of Ostend had been a thorn in the side of the Admiralty ever since. Together with its neighbour, Zeebrugge, it was a crucial gateway to the hunting grounds of the English Channel and the North Sea as well as a vital link to Bruges and the docks, repair yards and reinforced concrete shelters which protected and sustained the Flanders Flotilla. For years, proposals had been made to remove its sting. Most were rejected as impractical or downright impossible. In their place came a policy of containment. Minefields were extended, a net and drifter barrage established and long-distance bombardment tried. But it was all to no avail. The U-boats continued to come and go almost at will until, finally, caution gave way to audacity following the appointment of Vice-Admiral Roger Keyes as commander-in-chief Dover in January
1918. Writing to Admiral Sir David Beatty a few weeks earlier, Keyes had made his intentions clear. Referring to his plan for blocking the harbours at Zeebrugge and Ostend, he stated emphatically: ‘It can be done. Salvage people say the possibility of removing blockships quickly – the excuse given always – is much exaggerated – and in the meantime 25 per cent of our losses continue to be caused by Flanders submarines.’ Now he had the chance to turn his idea into a reality. The idea was for two elderly and expendable light-cruisers, their holds filled with concrete, to charge the harbour under cover of smoke and a smother of supporting shell-fire before sinking themselves across the entrance. Many volunteers came from the Grand Fleet, desperate for any part in anything resembling an offensive operation after months of inaction. And none more so than the officer destined to play a central role in the attempt to block Ostend – Alfred Edmund Godsal.
‘NO BETTER CHOICE’
At 33, Godsal was renowned for his boundless energy and enthusiasm. ‘In the monotonous existence the Grand Fleet leads,’ wrote one shipmate aboard the battleship HMS Centurion, ‘Godsal was… the leader in everything that was going.’ Always ‘noisily cheerful’, he was, in the words of his friend Commander Gerard Wells, ‘the life and soul of the ship’. Wells considered there was ‘no better choice’ to lead the rush into Ostend. Keyes agreed. As a former captain of Centurion, he had seen enough of Godsal to know he possessed just the kind of fighting spirit required for such a “death or glory” mission. Keyes’ first choice for a blockship command needed no urging and in the weeks following his recruitment Godsal threw himself into his new work with all his customary verve. According to Commander Ralph Sneyd, appointed to command one of the Zeebrugge blockships, ‘he was
V
OPERATION MISSION MOST
DESPERATE
22 www.britainatwar.com
OPERATION VS: MISSION MOST DESPERATE Ostend Harbour Raid, 1918
The 1918 attempt to block Ostend harbour was disarmingly simple and outrageously bold. The attackers would have to run the gauntlet of four heavy gun batteries, multiple machine-guns and searchlights lining the shore either side of the harbour’s twin piers. Small wonder that those who volunteered in droves regarded themselves as proud members of ‘The Suicide Club’. Steve Snelling tells the story.
VS
LEFT: Commander Alfred Edmund Godsal (18841918). Born at Whitchurch, Shropshire, he passed out of Britannia as a midshipman in 1899. Prior to volunteering for the Ostend operation, he had spent 5½ years in the dreadnought HMS Centurion where he was said to be ‘life and soul of the ship’.
www.britainatwar.com 23
OPERATION VS: MISSION MOST DESPERATE Ostend Harbour Raid, 1918
BELOW: Rocked by shells and sprayed with machine-gun fire, Vindictive swings across the harbour at Ostend in the culmination of Operation VS, the Royal Navy’s heroic effort to deny the port to German submarines, carried out on the night of May 9-10, 1918.
ABOVE: Commander Alfred Godsal, back left, with fellow Ostend blockship captain, Lieutenant Commander Henry Hardy, third from left at back, with a group of officers involved in planning and executing the raids on Zeebrugge and Ostend, including the Commanderin-Chief Dover, Vice-Admiral Roger Keyes, front left. The photograph was taken by the Queen of the Belgians on the day after the first attack when Godsal successfully lobbied Keyes for another chance to block Ostend.
responsible for the fitting of all the charges for sinking the ships and made an excellent job of it, in spite of a good deal of minor difficulties…’ By the end of March all was ready, but it would be a while before conditions were favourable enough to offer a chance of success. With ‘the day’ looming, Godsal dashed a letter off to his sister Dorothy. In the way of a ‘last will and testament’, the note, dated 8 April, 1918, was prefaced with the grim acknowledgment: ‘You won’t get this unless I am a goner…’ He wrote: ‘The job is Blocking Ostend (sic), for which I volunteered and am overjoyed in getting the chance. My ship Brilliant [is] an old cruiser filled mostly with cement with mines to blow her up. Our only difficulty is finding the Entrance, the rest should be easy, though doubtless risky. Smoke to conceal us helps the operation but will doubtless give us a certain amount of trouble…’
Whatever happened, he made it clear he had no regrets about joining such a perilous enterprise. ‘I am not much [of a] hand at writing,’ he concluded, ‘but though sorry to leave I shall feel a life well spent if I can only do my Bit.’
Both had persevered, obtaining berths in the RNVR. Now Bourke’s ML 276 would be a standby rescue launch to Drummond’s ML 254 accompanying the blockships into Ostend.
‘PROFESSIONAL INVALID’
‘CRUEL BAD LUCK’
Lieutenants Rowland Bourke and Geoffrey Drummond had much in common. They shared the same age – 32 – were from similar well-to-do backgrounds and were keen sailors. They had also both overcome serious health issues which had seemed to render them unfit for any kind of military service let alone one of such exceptional hazard. A rancher from British Columbia, London-born Bourke was lucky even to be alive after suffering near-blindness in a pre-war accident while Drummond described himself as ‘a professional invalid’ after more than one accident .
BELOW LEFT: Lieutenant Rowland Richard Louis Bourke (1885-1958) pictured here as a sub-lieutenant shortly after joining the Royal Naval Volunteer Reserve in January 1916. The thick-lens spectacles were a legacy of a pre-war explosive accident that fatally injured a cousin and nearly blinded him. BELOW: The wrecked hulks of HMS Brilliant and HMS Sirius aground on a sandbar a mile east of Ostend after the failed attempt to block the harbour on the night of April 22-23, 1918.
24 www.britainatwar.com
The planned operation, however, proved a torturous one. A first attempt on the night of April 11/12 was thwarted by the weather while a second effort on April 22/23 was undone by what Keyes called ‘cruel bad luck’. Vital navigational buoys had been moved and a change in the wind direction had rendered the smokescreen more a hindrance than a help. The results were calamitous. Off course and blinded by the smoke that was meant to protect them, the blockships Brilliant and Sirius blundered through a blizzard of fire on to a sandbar a mile east
OPERATION VS: MISSION MOST DESPERATE Ostend Harbour Raid, 1918
of Ostend. Unable to reach the harbour, Godsal ordered the charges blown. As Brilliant settled, Sirius, badly hit and close to sinking, followed suit. It was a disaster redeemed only by the rescue efforts of the supporting motor launches. Prominent among them was Rowland Bourke’s ML 276. Four times she ran alongside the stranded Brilliant under a galling fire. On the third occasion, she took off the ship’s redoubtable, red-bearded Number One, Lieutenant Victor Crutchley, who urged Bourke not to leave without his captain. Godsal refused to abandon ship until he was sure there was no one left aboard. All told, Bourke delivered 38 survivors to Dunkirk where he was
joined by Drummond’s ML 254. Drummond had spent much of an eventful if frustrating night drifting helplessly off the Belgian coast with mechanical troubles caused by faulty smoke-laying apparatus. Finally, with one engine working, he had reached the misplaced blockships in time to screen them while the crews were taken off. A swift inspection of the battered cruiser Vindictive, fresh from her exploits at Zeebrugge, was enough to convince Keyes that she was suitable for one last mission under Alfred Godsal’s resolute leadership with the faithful Crutchley again acting as his Number One. Although there was initially some doubt, Bourke and Drummond would also be bringing their rescue launches.
‘FLAMING ONIONS’
The first day of the next favourable period for the operation was May 9. The evening turned out to be near perfect with a steady breeze ideal for smoke-laying and a sea smooth enough for the smallest craft.
At around 2245 the Dunkirk armada was joined by the blockships Vindictive and Sappho and in no time they had disembarked their surplus crews and taken their places among their escorts. Operation VS was under way. However, the bad luck which had dogged all the previous attempts quickly returned. Shortly before midnight Sappho was forced to drop out with boiler trouble. Vindictive and Godsal would have to do the job alone, only now they would have two rescue launches for company, provided, that is, Drummond could overcome difficulties of his own. Having doled out tots of whisky to his
crew he was in the process of donning his gas mask when ‘there was a crash’ and he discovered his boat had been rammed by another launch. An initial inspection of the damaged fo’c’stle reported ‘all was well’, though subsequent events would prove otherwise, and, in the hiatus,
Drummond lost track of the armada. Spotting a flashing light, he headed for it only to find himself off course. But just when he was beginning to fear the worst, he was ‘lucky enough’ to spot some of the force’s smokecarrying launches. ‘Knowing the bearing they were working on,’ he wrote, ‘I was able to set a course for my proper station… [and] just as I got there the Vindictive loomed up going all out. I wrenched my helm over and rung for full speed but it was all we could do to keep her in sight.’ Events were moving inexorably towards their climax. At 0135 a searchlight stabbed the darkness as coastal motor-boats began trailing a smokescreen between ships and shore. Eights minute later, the covering bombardment thundered into life. ML 254 was nearing the piers when the barrage began and the Germans immediately replied. Shells were soon falling uncomfortably close, one of them near enough to knock Drummond off his feet.
TOP RIGHT: Lieutenant Commander Geoffrey Heneage Drummond (18861941), the ‘professional invalid’, pictured here in 1916 a few months after being accepted into the Royal Naval Volunteer Reserve. MIDDLE LEFT: After Zeebrugge. The Vindictive back at Dover displaying her battle scars following her most celebrated exploit. It took Keyes only two hours to decide she was perfect for the role of blocking Ostend. LEFT: Bourke, third from left in front row, at Larne where he commanded a motor launch on antisubmarine duties without success.
www.britainatwar.com 25
Advertorial
Avenue House at War
A
venue House in the centre of Finchley, North London, is the principle building of Stephens House & Gardens.
Currently situated within the basement is a fascinating insight into how the house gave service on the home front in two world wars. Through an exhibition, running until 30th September 2015, it is possible to experience the sights, sounds and smells of two highly interesting periods in the history of the home of Henry ‘Inky’ Stephens proprietor of the world renowned Stephens’ Ink Company. Stephens’ Ink was used to sign the Treaty of Versailles in 1919 bringing an official end to the hostilities of WWI. During WWI many private houses were used as hospitals to cope with the large number of casualties. Avenue House was requisitioned in 1916 and in 1919 it became the Central Hospital of the Royal Air Force which it remained until 1925. These hospitals were generally staffed by Voluntary Aid Detachment nurses.
A recent exciting acquisition to the exhibition has been the loan of original VAD uniforms and other interesting ephemera relating to Bunty and Anne Bradbury who both served in the VAD during WWI, while volunteering Anne met a severely wounded Royal Flying Corps airman called Hervey Rhodes, whom she was to marry in 1925. Hervey is the grandfather of Adam Sutcliffe who has generously loaned the items; Adam has also written a play around the wartime experiences of Hervey who served in the Royal Flying Corps as an observer/gunner with No. 12 Squadron flying the RE 8. Rhodes and his pilot South African Lt Croye Pithey, claimed
as a crew a total of five enemy aircraft destroyed and five more claimed ‘out of control’. Rhodes won the Distinguished Flying Cross and Bar. The play will be performed as a semi-staged reading in the Drawing Room of Avenue House on 23rd September, tickets from www.stephenshouseandgardens.com/events
During WWII the house was utilised as the Air Raid Precautions headquarters for Finchley and an Auxiliary Fire Service station was established on the site. The basement became the control room and an escape tunnel was constructed to the gardens. The Tower was adopted for fire-watching to enable spotters to note where bombs dropped locally and direct emergency teams to the scene of fires and explosions; the identity ‘Control 47’ remains to this day written in chalk on the fire surround in the Tower Room. On the 8th of May 1945 up to 10,000 people from the surrounding areas descended on the gardens to celebrate VE Day, one attendee remembering the night specifically because for the first time in many years that light was visible in the windows of the house without the need for blackout curtains. The exhibition is at: Stephens House & Gardens Avenue House, 17 East End Road, Finchley, London, N3 3QE Opening times: Tues, Weds, Thurs 14:00 - 16:30 Sat, Sun 12:00 - 16:30 Due to the authentic nature and location of this exhibition it is not possible to make it fully accessible to those with restricted mobility. Admission is free but donations are very welcome.
OPERATION VS: MISSION MOST DESPERATE Ostend Harbour Raid, 1918
At the same time, the shadowy forms of launches stole in and out of the screen, ‘the white faces of their occupants,’ noted Petrie, ‘thrown into relief against the wall of black smoke’. And then, all of a sudden, they caught sight of the ‘ghostly grey’ shape of Vindictive, looking ‘like a strange phantom ship, surrounded by columns of water!’
‘PRETTY DESPERATE’
The man-made smog mingled with an untimely sea fog was both blessing and curse for Godsal. As well as masking them from the shore, it made it virtually impossible to find their way into Ostend.
‘The fireworks were amazing and very pretty,’ he wrote. ‘The star shells were red, green, blue and yellow. And then there were the ‘flaming onions’ as we called them. We thought then that they were chained together. But it was afterwards discovered that they were revolving 1-inch guns firing 5 projectiles each in groups of five calibrated together so that one got a string of 25 on the same trajectory. ‘These ones were filled with magnesium powder which gave [off] a green flare and exploded [in flames] as soon as arrested… I got one string along my bridge. It took off the back of my right hand and broke everything there, signal lamps, switches, etc, but, by the mercy of providence, the compass and its light and the telegraph handles and chains were untouched. ‘Shortly after that a four-inch [shell] burst just by the mast. No 1 [Lieutenant Gordon Ross, who had brought a black kitten with him for luck] at that moment had left his torpedo-mat fort to get some more trays of Lewis gun
ammunition which we had stacked by the mast and it killed him outright.’ The same blast wounded the launch’s coxswain, Leading Deckhand David Rees, and killed the man standing next to Drummond, who was himself struck by a 2½ inch shard of copper which tore into the back of his left thigh. The scene by now was a hellish one. To Sub-Lieutenant James Petrie, Number One aboard Bourke’s ML 276, it seemed as though they were swallowed in a pall of ‘black smoke and [an] acrid fog of chloro-sulphuric acid gas’. All the while ‘the air [was] reverberating with the explosion of bombs on shore and guns of the shore batteries a few hundred yards away, shells churning the sea into foam, ricocheting along the surface and throwing up “geysers” through which we pass and become soaked.’ With the crew ‘gasping and choking’, ML 276 stopped and waited. Star shells were circling above and ‘flaming onions’ skipped along the surface, ‘throwing objects into silhouette’.
‘When by dead reckoning we should have been in a position close off the pier heads we could still see absolutely nothing but smoke and fog and fireworks,’ wrote Vindictive’s navigator, Lieutenant Sir John Alleyne, ‘so as we knew we must be close in to the beach and had no room to spare we turned on to a course parallel to the shore and searched to the south westward and then to the north eastward. ‘At one moment, under a burst of star shell, we plainly saw the houses on
LEFT: Centurion shipmates Commander Alfred Godsal, standing second from the right with a pet dog perched on his shoulder, and Sub-Lieutenant Victor Crutchley (1893-1986), seated second from the left with pipe. The two men teamed up as captain and Number One of HMS Brilliant and then HMS Vindictive. Crutchley, who received a Distinguished Service Cross for the first operation and a Victoria Cross for the second, rose to become an admiral in the Second World War and was knighted in 1946. LEFT: SubLieutenant (later Commander) James Petrie volunteered for the Ostend raid and was appointed First Lieutenant to Bourke aboard ML 276. His courage on the May 9-10 operation was recognised by the award of a Distinguished Service Cross. BELOW LEFT: James Petrie, standing second from the left, among a group of motor launch officers from the Dover Patrol who took part in the operations against Ostend and Zeebrugge in the spring of 1918. He was serving in ML 559 at the time. The officer sitting fifth from the left is Lieutenant Percy Thompson Dean who received a Victoria Cross for his rescue work at Zeebrugge.
www.britainatwar.com 27
OPERATION VS: MISSION MOST DESPERATE Ostend Harbour Raid, 1918 RIGHT: Screened by motor launches and coastal motorboats, Vindictive ploughs through a storm of shells on her way into Ostend on May 9/10, 1918. BELOW: Leading Deckhand David Rees, right, with another wounded survivor of the blocking operations. As coxswain of ML 254, the 20-yearold Welshman was badly wounded but stuck to his post.
the sea front, close on our port beam, but we still could not find the harbour entrance though we knew it must be somewhere quite close.’ Twenty minutes passed with no sign of the entrance. The tide was ebbing. ‘Things were looking pretty desperate,’ noted Alleyne. ‘Then suddenly we sighted one of the pier heads, plainly silhouetted under a burst of star shell, and only about four or five hundred yards away on the starboard quarter.’ Godsal ordered a turn to port, then straightened for the entrance before ordering Crutchley into Vindictive’s conning tower, ready to take over if the bridge was knocked out. Closing the pier heads, Vindictive was rocked by shell after shell. Soon came the rattle and swish of machine-gun fire
ABOVE: Another image of wounded survivors of the blocking operations. RIGHT: An artist’s impression of Victor Crutchley’s vain search for his friend and captain Alfred Godsal on the bullet and shellswept deck of Vindictive inside Ostend harbour.
28 www.britainatwar.com
raking the bridge. It was time for Godsal and Alleyne to join Crutchley, but as they emerged from the bridge Alleyne was hit in the back and ‘tobogganed’ down the bridge ladder towards the conning tower followed by his captain. The last few yards into Ostend were a torture, but Godsal was not to be deflected. As Vindictive steered between the pier heads, he ignored the storm of fire that was tearing his ship apart and ventured outside to get a clearer view. Standing in the open, exposed to every kind of murderous fire, he continued to give orders through an observation slit until a shell burst against the side of the conning tower after which the injured Alleyne ‘did not hear him any more’. Unable to lift his wounded body sufficiently to see out, Alleyne told the ‘still extremely hale and hearty’ Crutchley to take over. Godsal’s Number One responded instantly. ‘I… ordered the port telegraph to full speed astern to try to swing the ship across the channel,’ he later wrote. Vindictive grounded forward on the eastern pier, at an angle of about three points to the pier. ‘As soon as the ship stopped swinging and at the time I considered that no more could be done, I ordered the ship to be abandoned,’ added Crutchley. With the engine-room cleared, the main charges were detonated after which Crutchley fired the auxiliary charges. His final duty was to make a last search for his friend and captain. Using an electric torch which made him a target for every enemy machinegun in range, he picked his way
through the wreckage of the bridge and along the port side, stopping along the way to light two smoke canisters as bullets cracked around him. There was no sign of Godsal anywhere. Finally, having checked the after-control position in vain, he followed the last of the crew as they scrambled down on to the deck of a motor launch already crowded with survivors and low in the water. The boat was Drummond’s ML 254 and her presence there was something of a miracle.
‘FULL SPEED OUT’
Despite the damage to his launch, the loss of two crewmen and his own serious injury, Drummond had held his station outside the harbour entrance until the last moment. Then, as Vindictive surged in, he followed in through a hail of fire.
OPERATION VS: MISSION MOST DESPERATE Ostend Harbour Raid, 1918
But instead of ramming the western pier as intended, Vindictive was facing the eastern arm, leaving Drummond with no choice but to approach on the shore side in the full glare of searchlights and within 20 yards of an enemy machine-gun sited on the pier. Looking up, ML 254’s wounded coxswain could clearly see ‘the faces of the agitated Huns manipulating their machine-guns a few feet away’. Rees steered towards Vindictive’s side where the shattered remains of the afterfalls of two lifeboats acted as a fender. ‘Men were desperately jumping now to our deck,’ Rees later recalled. ‘It meant a leap of 15ft and some poor unfortunates, misjudging, fell into the water… Our hull was hit five ‘Just as we got to the head of the piers,’ he wrote, ‘I got a piece of shrapnel which lodged behind my collar bone within a fraction of my lungs.’ Already numb from loss of blood, it required a superhuman effort to stay upright and maintain control. With his view obscured by smoke, he tore open the bridge’s canvas roof and, with his head and shoulders exposed, guided her in, using his feet to work the boat’s telegraph system. Even then his troubles were far from over. The plan had been to run in along Vindictive’s starboard side where the crew were to shin down ropes into boats slung almost at the height of the launch’s deck. That way, they would have been protected by the cruiser’s bulk.
ABOVE: Lit by flares and searchlights, Vindictive settles after blowing her scuttling charges in the entrance of Ostend harbour. LEFT: Artist Charles Dixon’s impression of Drummond’s battered and sinking launch approaching HMS Warwick at the end of her heroic feat. According to her wounded coxswain, a scuttling charge was set aboard the abandoned boat but not before two of her crew had salvaged ‘the remnants of the ensign’. LEFT: Caught in a spider’s web of searchlights, Vindictive surges through a flurry of shell bursts into the harbour at Ostend while an already damaged ML 254 prepares to follow in Lieutenant Commander Geoffrey Drummond’s rough painting of the exploit.
www.britainatwar.com 29
OPERATION VS: MISSION MOST DESPERATE Ostend Harbour Raid, 1918 NEAR RIGHT: Geoffrey Drummond was still convalescing from the injuries sustained at Ostend when, in the summer of 1918, he married Maude Bosanquet. FAR RIGHT: Rowland Bourke headed off on five weeks’ leave in Canada after the Ostend operation. While there, he became engaged to Linda Barnett and learned that he had been awarded a Distinguished Service Order for his rescue of the crew of HMS Brilliant. He had just returned to England when his Victoria Cross was announced for his brave efforts to save men of the Vindictive during the May operation.
times by heavy shells. In addition, we were on fire aft… The gravity of our position is inexpressible.’ Despite the blaze and raking fire, Drummond held on until Crutchley assured him every man was safely aboard. Then, two bullets having penetrated his duffel coat without hitting him, he backed away only to be told another man had been seen in the water. ML 254 had barely come to a halt again when she was struck by ML 276 as she came round the stern of Vindictive. ‘As my ship appeared to be sinking (we had 2 ins freeboard forward instead of 2 ft 6 ins at least),’ wrote Drummond, ‘I called out to the other skipper that there was someone in the water and would he pick them up.’ Bourke had already lost his coxswain killed and a deckhand wounded, but with Petrie taking turns at the wheel and shooting out searchlights left and right he pressed on just in case he might be needed. Having literally run into Drummond he scoured the bullet-swept harbour for more survivors. ‘We thought we heard someone but could not be sure,’ he wrote, ‘and then, as we heard nothing, started out of the harbour, and again we thought we heard someone, so put back.’ All told, he made that perilous journey three times, in the course of which another crewman was killed and the remainder variously wounded. Just as he was leaving for the last time, the voice was heard again more distinctly. Turning about, they found three more survivors clinging to an upended boat almost beneath one of the harbour’s gun batteries. One of them
ABOVE: Ostend New Communal Cemetery where the dead of Vindictive, including Commander Alfred Godsal (Row A, plot 17), are buried. Following the raid, the Germans gave them an impressive funeral with full military honours (COURTESY OF THE
COMMONWEALTH WAR GRAVES COMMISSION)
30 www.britainatwar.com
Vindictive wounded navigator was Vindictive’s who, with help from Petrie, was hauled aboard as the water around them was churned by fire from pom-poms and machine-guns.
‘A GLORIOUS END’
Bourke’s was the last boat out of Ostend. Against all the odds, he managed to con his riddled boat all the way back to Dunkirk where an inspection revealed ML 276 to have been holed in 55 separate places. Of those, 16 were through the wheelhouse from which Bourke and Petrie emerged miraculously unscathed. Drummond had not been as fortunate. Twice badly wounded and weak from the loss of blood, he nevertheless managed, with the assistance of Crutchley, to keep his waterlogged launch afloat just long enough to
reach Keyes’ flagship, Warwick Warwick. Having left ML 254 to sink, Drummond was forced to abandon ship again when Warwick struck a mine. Transferred to the destroyer Velox, Dover Patrol’s ‘professional invalid’ was delivered safely to England and another spell in hospital. Operation VS was over. Air reconnaissance showed that Vindictive had come to rest at an angle that was insufficient ‘to entirely block the harbour’ though it was thought she would ‘hamper the enemy movements’. Yet, if it had been a failure, it was an undeniably heroic one. A flood of bravery awards was headed by three Victoria Crosses - one each to Bourke and Drummond, the rescue launch skippers who had once been considered unfit to serve their country, and the other to Crutchley, Vindictive’s Number One who had been a ‘tower of strength’ throughout. Had there been a fourth VC for Alfred Godsal few would have demurred. ‘Killed in his hour of achievement’, as Bourke put it, he would be posthumously awarded a Distinguished Service Order and a Croix de Guerre.
The Western Front F_P.indd 1
07/04/2015 12:13
POSTCARD FROM BOWMANVILLE Luftwaffe Prisoners - 1940
A postcard showing ten smiling German officers at Bowmanville POW Camp, Canada, hides a fascinating tale. Each officer joined the Luftwaffe at the Luftkriegschule, DresdenKlotzsche, on 4 December 1936. All were destined to be taken prisoner in the Spring and Summer of 1940. Chris Goss tells the story behind the capture of each man. 1. Oberleutnant Hans Schierhold.
Battle Britain
Hans was the first of the group of to be captured. An Observer with the specialist reconnaissance 75th ANNIVERSARY unit 2 Staffel/Aufklärungsgruppe 1940-2015 Oberbefehlshaber der Luftwaffe (2/AufklObdL), his Dornier 215 was reported missing on a reconnaissance sortie over western Belgium on the first day of the Battle of France. He and gunner Unteroffizier Ernst Wittchen were captured, whilst pilot Feldwebel Hans-Joachim Schmidt and radio operator Unteroffizier Gerhard Hentschler were captured only to lose their lives sometime between 30-31 May 1940 when the ship in which they were being transported to England was sunk off Dunkirk. Intercepted by ‘Spitfires’ 10 km south of Bruges, their aircraft is believed to have crashed at Dworp, Belgium, probably shot down by Plt Off Trevor Edwards and Plt Off John Cock of 87 Sqn.
POSTCARD FROM
BOWMANVILLE 32 www.britainatwar.com
M
E
POSTCARD FROM BOWMANVILLE 1940 - Luftwaffe Prisoners
2. Hauptmann Anton Stangl Anton had been flying the Messerschmitt 109 with 2 Staffel/Jagdgeschwader 76 (2/JG 76) when he shot down his first aircraft (a Curtiss Hawk south of Charleville) on 14 May 1940. By the end of the Battle of France had shot down a total of five French aircraft. On 6 July 1940 his unit was re-designated 5/JG 54 and for the Battle of Britain, was based in Holland. Anton’s only ‘kill’ of the Battle of Britain was a Spitfire over the Thames Estuary on 28 August. Four days later, he was captured in unusual circumstances as he recalls: “At 1212 hrs on 1 September 1940 I collided with another Messerschmitt 109 during a dogfight. I remember the time exactly as I had just looked at my watch 10 to 15 seconds before the collision. We were ordered to escort a bomber formation which was attacking docks to the east of London. We soon had contact with British fighters and my Staffel was split up and each pair was having to fight by themselves. I noticed a Spitfire below me and I knew immediately that I had an excellent chance of shooting him down so I called up my wingman and told him to be ready to roll over and attack. Now I did what I always did-I looked back to the left and saw another Messerschmitt of an unknown unit some 50-60 metres away with its airscrew shining in the sun headed towards me at full speed. That look behind saved my life. I realised immediately that a collision was unavoidable so I pushed my stick forward and to the right and felt a tremendous shock of the crash. My head was thrown forward and hit the gun sight and I blacked out....” With his fighter disintegrating, he managed to bale-out and landed in a tree at some Army barracks where he was captured as his fighter crashed at Bonnington, near Ashford, Kent.
R
www.britainatwar.com 33
POSTCARD FROM BOWMANVILLE Luftwaffe Prisoners - 1940
3. OBERLEUTNANT ERNST EWERS. Ernst was another Battle of France casualty. At the start of the war, he was flying Messerschmitt 109s with 1/JG 21 but at some stage in 1940 transferred to 4/JG 3. On the morning of 21 May 1940, he and Unteroffizier Rudolf Bruchert were shot down in combat near Peronne with Bloch 152s of Groupe de Chasse II/8 flown by Capt Bernard Vienot de Vaublanc, Sous/Lt Rene Pelletier and Sergent Guy Husson. Both German pilots were captured wounded.
5. HAUPTMANN HELMUT TIEDMANN Helmut Tiedmann was the most successful fighter pilot of the group. Flying Messerschmitt 109s with 2/JG 3, his first ‘kill’ was a Morane 406 north-west of Charleville on the evening of 16 May 1940. On 30 May, he was given command of 2/JG 3 following the death in combat of his Staffel Kapitän Hauptmann Heinz Gärtner, shot down by Spitfires of 610 Sqn over Dunkirk. By now he had a total of four victories and his last of the Battle of France, a Fairey Battle near Evreux on 16 June, would be his sixth [NB: This claim cannot be matched to any known loss-Author]. By now promoted to Oberleutnant, he would score the first ‘kill’ of I/JG 3 of the Battle of Britain, a Hurricane claimed on 15 August 1940. However, he would be shot down and captured three days later. Whilst on a bomber escort sortie over Kent in the early afternoon of 18 August 1940, his fighter was hit in the glycol system which forcedhim to shut down the engine. He managed to glide as far as Maidstone in Kent before crash-landing near Leeds Castle. He got well clear of his fighter and was on the run for nearly 12 hours before being captured by Home Guardsmen. TOP: Plt Off John Cock of 87 Squadron who was involved in the shooting down of Oberleutnant Hans Schierhold. ABOVE RIGHT: Oblt Krenn is marched onto a train at Chichester Railway Station, en-route to the London POW ‘cage’. RIGHT: Oblt Tiedmann’s Me 109 after being shot down near Leeds Castle, Kent, on 18 August 1940. The aircraft has been camouflaged with straw to prevent detection from German aircraft overhead. Tiedmann was ‘on the run’ for twelve hours before being captured by the Home Guard.
34 www.britainatwar.com
4. HAUPTMANN IGNATZ KRENN Krenn was the only bomber pilot in the group photograph. He had flown during the Battle of France with Stab.I/ Kampfgeschwader 55 and on 26 August 1940 was shot down attacking Portsmouth Harbour. Intercepted by a number of RAF pilots including Sqn Ldr John Badger and Sgt Jim Hallowes of 43 Sqn and Sqn Ldr ‘Sandy’ Johnstone of 602 Sqn, his Heinkel 111 force-landed at Court Wick Farm, Wick, near Littlehampton in West Sussex. He was uninjured as was the Radio Operator Unteroffizier Hans Degen but the remainder, Observer Unteroffizier Helmuth Morrack, Flight Engineer Unteroffizier Willi Schneiders and Gunner Feldwebel Alois Schreck suffered varying degrees of wounds.
POSTCARD FROM BOWMANVILLE 1940 - Luftwaffe Prisoners
6. Oberleutnant Rolf Book
ABOVE:A Dornier 215 of AufklOBdl during 1940.
7. HAUPTMANN HANS ULRICH KETTLING
After training, ‘Ul’ Kettling was posted to 9/JG 132 which was re-designated 4/ JG 141, then re-equipped with the Messerschmitt 110. The unit was further re-designated 4/Zerstörergeschwader 141 (4/ZG 141), and finally 1/ZG 76. Kettling took part in the Polish Campaign, claiming one ‘kill’, and again in the Norwegian Campaign where he claimed a Gloster Gladiator. At the start of the Battle of Britain, I/ZG 76 was based at Stavanger Sola and its first foray over the UK was on 15 August 1940, a mission from which Ulrich did not return. Using long-range tanks, the Messerschmitt 110 was able to escort a bomber force all the way but were no match for the Spitfires and Hurricanes that intercepted them. One RAF pilot was Plt Off Ted Shipman of 41 Sqn who had attacked one German fighter before he latched onto a second: “Picking up another Me 110, I tried a series of deflection shots at various ranges with the target wading [sic] violently. No result and no return fire. Getting astern of the same target, I tried from about 200 yards. This was a long burst and the starboard engine was out of action with clouds of smoke. The Me 110 then made an erratic turn to port and disappeared into the cloud below, apparently out of control.” It is believed that Ted damaged Kettling’s fighter. The German pilot recalled: “...The plane was hit, not severely, but the right engine went dead, lost coolant and the oil temperature rose rapidly. I had to switch off the engine and feather the propeller and tried to reach the protection of the bombers which were overhead in close formation. I was not successful-the plane was slow and I could not gain height. Over the radio, I heard the boys in the bombers talking about my plane so I gave my Mayday because the Spits came in for the second attack and the kill...” Now, a second 41 Sqn Spitfire flown by Plt Off Ben Bennions attacked: “...I found myself about 300 yards astern of an Me 110-I gave him a three second burst and the De Wilde appeared to be striking the fuselage. There was no reply from the rear gunner. The aircraft immediately dived for cloud cover on a southwesterly course. By this time, the recoil had put me about 400 yards astern but I dived after him, closing very slowly. He was travelling very fast indeed and getting closer to the clouds. I gave him another three second burst before entering the clouds...” Onboard the German fighter, things looked bleak: “...This time they got the left engine, my Bordfunker and the front windscreen (the tracer bullets missing me by a fraction of inches). Obergefreiter Volk was lying on the floor, covered with blood and unconscious. I had no means of ascertaining whether he was alive or not. Since all flight controls were in perfect order (without the engines of course) and the belly tank empty, I decided to bring the plane down for a belly landing”. ‘Ul’ Kettling managed to crash-land his fighter at an Army camp being constructed at Streatlam near Barnard Castle, Northumberland, where he and his badly wounded radio operator, Obergefreiter Fritz Volk, were captured.
Rolf Book was an Observer with the same unit as Hans Schierhold, namely 2/AufklObdL, attached to 2(Fern)/ Aufklärungsgruppe 121, but his war lasted a little longer than his friend. On 21 September 1940, he and his crew, Feldwebel Kurt Jensen (Pilot), Feldwebel Hans Kühl (Radio Operator) and Unteroffizier Gustav Pelzer (Flight Engineer) took off in their Dornier 215 from Caen to carry out a photo reconnaissance of Liverpool. Crossing the coast near Plymouth, they used cloud cover until approaching Liverpool where the cloud broke and they were able to take photographs for 12 minutes before turning for home. Rolf recalled what happened next: “...We suddenly noticed a fighter above and behind us, approaching very fast. Unfortunately (for us!) we couldn’t do much as our guns went on strike after a few shots and the rest was inevitable. We couldn’t bale out as Pelzer had been mortally wounded after the first attack and so we made a force-landing-not too bad I think...” The Dornier crash-landed at Tyddyn Sais Farm, Trawsfynydd in North Wales, the crash witnessed by the successful RAF pilot, Plt Off Dennis Adams of 611 Sqn. He had been scrambled from Ringway to intercept Rolf’s aircraft but took some time getting to 25,000 feet and even then the Dornier was still above him: “...I swung out to the right and did a beam attack on his starboard side, firing a five second burst. Immediately a stream of coolant or petrol came from the starboard engine and the rear gunner ceased firing. I then went astern of the enemy aircraft and fired a longish burst at 250 yds closing to approximately 150 yds. The port engine then emitted brown smoke or oil vapour and stopped. The enemy aircraft continued in a westerly direction, losing height, and finally crashed in a field just outside Dollgellau...” RIGHT: Hauptmann Anton Stangl. BELOW: Flt Lt ‘Jack’ Leather of 611 Squadron poses with a trophy cut from Book’s aircraft.
R www.britainatwar.com 35
POSTCARD FROM BOWMANVILLE 1940 - Luftwaffe Prisoners
9. HAUPTMANN JOACHIM SCHYPEK
8. HAUPTMANN OTTO WECKEISER Otto Weckeiser was another Messerschmitt 110 pilot flying with 15 Staffel/Lehrgeschwader 1 (15/LG 1). Again, he and his regular radio operator/gunner Gefreiter Horst Brüggow were relatively successful. When shot down, the rudder of their fighter showed kills on 13 August, 15 August (two) and 11 September; recent research has confirmed that both he and his gunner claimed a Hurricane each on 15 August, a Spitfire on 11 September but also a Hurricane on 30 August. However, Otto’s luck, as well as the luck of many others from V/LG 1, ran out on the morning of 27 September 1940 as he recorded: “After overflying the coast, we were attacked by fighters. Our formation immediately formed a defensive circle. My machine was hit after which both engines refused to respond. The electrics were shot up and we were losing coolant. I had to leave the circle and descent in a tight spiral, out-turning the enemy fighters which attacked constantly. In one of these attacks Horst Brüggow was wounded in the thigh. I made a belly landing...”. Crash landing at Sockett’s Manor near Oxted in Surrey, credit for downing the Me 110 was submitted by at least eight RAF pilots; Sgt George Steward of 17 Sqn, Plt Off Alan Johnson and Sgt Ray Sellers of 46 Sqn, Fg Off John Drummond of 92 Sqn, Plt Offs Keith Lofts and Brian Meaker and Sgt Henry Davidson of 249 Sqn and Sgt Jan Budzinski of 605 Sqn. This mission would see the annihilation of V/LG 1 with the unit losing seven out of 10 aircraft including that flown by the Gruppen Kommandeur Hauptmann Horst Leinsberger-11 aircrew would be killed and just three captured. As a result, V/LG 1 was disbanded.
Another fighter pilot, at the start of the war, Jochen (as he was known) was flying Messerschmitt 109s with 2/JG 76 and flew 34 operational flights over Poland and during the Phoney War. He flew on the first day of the Battle of France claiming his first ‘kill’, a Curtiss Hawk, four days later. By 15 June 1940 he had flown a total of 100 operational flights almost without incident. Following the Battle of France, his unit was re-designated 5/JG 54 and moved to Rotterdam. Jochen scored his second kill on 27 June 1940 when he shot down a Bristol Blenheim of 235 Sqn. On 8 August 1940, his unit moved to Hermelinghen in the Pas de Calais where he made claims for Spitfires on 9 September 1940 and on 5 October 1940. With the Battle of Britain having just six more days to run he was shot down and taken prisoner on 25 October 1940. On an escort sortie to London, the German formation was bounced by RAF fighters and Jochen was immediately being chased by a Spitfire, believed to have been flown by Fg Off Peter Brown of 41 Sqn. In a desperate attempt to throw off his attacker, the German pilot threw his fighter all over the sky but to no avail as his aircraft had been hit in the cooling system. However, being at 25-26,000 feet, Jochen hoped to glide to the Channel, ditch and be picked up by German air sea rescue but as he approached Dungeness, it was clear he wasn’t going to make it, and by now he was too low to bale out: ‘...I was now low enough to see soldiers working behind the beach with shovels so I made my decision to turn round and do a belly landing. I eventually touched the ground, rather gently I remember, skidded a little to the right and stopped. I had thrown off the cockpit roof and had turned off the ignition long ago. I was in a hurry to get away from the plane as I was not sure it wouldn’t blow up. I heard soldiers shouting running towards me threatening me with shovels. ‘Hands Up!’ I put them up and could see an Army Captain approaching. I do not recall and how we agreed to speak English, but he was quite glad that I knew the language!’ Jochen had crash landed his fighter at Broom Hill just outside Lydd, Kent. It was an unsatisfactory end to what was his 196th operational flight of the war. In itself, quite an achievement. In the photograph he can be seen wearing the Operational Mission Clasp in Gold for Fighters over his left breast pocket for flying in excess of 110 operational flights.
TOP LEFT: Kettling’s Messerschmitt 110-D photographed shortly before the sortie when he was shot down on 15 August 1940. Note the long-range under belly fuel tank. ABOVE: Plt Off ‘Ted’ Shipman of 41 Squadron who was involved in shooting down Kettling’s Me 110. LEFT: Pilots of 54 Squadron, 1940. Plt Off Basil ‘Wonky’ Way is seated 2nd from right.
R
www.britainatwar.com 37
POSTCARD FROM BOWMANVILLE Luftwaffe Prisoners - 1940
10. OBERLEUTNANT ALBERT STRIBERNY
ABOVE: Plt Off Dennis Adams of 611 Squadron who shot down Oblt Rolf Book.
ABOVE: The wreckage of Oblt Albert Striberny’s Me 109 is dug out by an RAF salvage gang. FAR RIGHT: Hptm Hans-Ulrich Kettling, 1940. RIGHT: Hptm Joachim Schypek’s Me 109 comes to grief near Lydd on 25 October 1940.
38 www.britainatwar.com
Having survived the Battle of France without incident, fighter pilot Albert ‘Stribs’ Striberny of 3 (Jagd)/LG 2 didn’t make it to the ‘official’ period of the Battle of Britain. He was shot down by Flt Lt Basil Way of 54 Sqn whilst escorting a Dornier 17 during a reconnaissance mission on the evening of 8 July 1940. The day was almost over and Albert was about to head back from St Inglevert to his lodgings at Wissant when he and four other aircraft from his Staffel were told of their task. Popping in and out of clouds together with the Dornier, near to Dover, Albert spotted high above them Spitfires. He struggled to gain altitude, but to no avail. He recalled: “...in no time they were on us and the battle was short. Whilst I was behind a Spitfire, another was behind me. I heard the sounds as if one throws peas against a metal sheet and my cockpit was full of smoke. I felt splashes of fuel on my face so I switched off the electrical system, dived into cloud and threw off the cockpit roof. The only RAF pilot to make a claim that evening was Basil Way, who reported: “...I don’t think that the enemy aircraft could have seen me to the last moment of the attack. Glycol began to pour from his radiator with a certain amount of black smoke. I left this enemy aircraft and turned to attack the second. The second enemy aircraft dived straight down and I managed to get a long burst at 250 yds. Enemy aircraft continued to dive, skirting edge of cloud, 9,000 feet over the coast. It came below and at 5,000 feet, pilot baled-out...” Albert continued: “...The smoke disappeared and I could breathe freely and noticed that from the wings there came several streams of glycol. Whilst diving I tried several times to start the engine, switching on the electrical system, but in vain. When I came out of cloud, I decided to bale-out and undid my seat belt and was about to climb onto my seat and jump when I thought of the high speed of the aircraft and I was afraid I would be thrown against the tail plane, so I pulled back the stick and slowed the aircraft down. This took a matter of seconds; I did a half roll and fell out...” Albert’s Me 109 crashed at Buckland Farm, Sandwich, Kent, and was the second of its type to crash on British soil, the first being flown by Leutnant Johann Böhm of 4/JG 51, which crash-landed almost intact at Elham, Kent, around four hours earlier. For these ten airmen, the war was over. Many of their compatriots continued on to fight and to die. The lucky ones, though, were able to send a postcard home from Bowmanville, Canada.
FREE BOOK OR R A E Y 2 A T U EO WHEN YOU TAK SUBSCRIPTION TO DIREC T DEBIT
888/15
TH WO7R.99 £
CHOOSE ONE OF THESE GREAT BOOKS A DOCTOR’S WAR
SPITFIRE PILOT
“Spitfire Pilot” was written in 1940 in the heat of battle when the RAF stood alone against the might of Hitler’s Third Reich. It is a tremendous personal account of one of the fiercest and most idealised air conflicts the Battle of Britain - seen through the eyes of a pilot of the famous 609 Squadron, which shot down over 100 planes in that epic contest. Often hopelessly outnumbered, in their state of the art Spitfires, Flight Lieutenant David Crook and his colleagues committed acts of unimaginable bravery against the Messerschmidts and Junkers. Softback, 208 pages.
TH WO7R.99 £
As an RAF medical officer, Aidan McCarthy had served in France, survived Dunkirk, and was plunged into adventures in the Japanese-American arena comparable with those of famous war heroes. Interned by the Japanese in Java, he helped his fellow prisoners with amazing ingenuity in awful conditions. En route back to Japan in 1944, his ship was torpedoed but he was rescued by a whaling boat and re-interned in Japan. His life was literally saved by the dropping of the Nagasaki atom bomb. This is an almost incredible account written with humour and dignity. Softback, 260 pages.
3 EASY WAYS TO ORDER...THIS FANTASTIC SUBSCRIPTION OFFER!
ONLINE www.britainatwar.com
PHONE UK 01780 480404 OVERSEAS +44 1780 480404
FAX UK 01780 757812 OVERSEAS +44 1780 757812
POST COMPLETE THE FORM AND POST TO:
BRITAIN AT WAR, KEY PUBLISHING LTD, PO BOX 300, STAMFORD, LINCS, PE9 1NA, UNITED KINGDOM
K
MAKE HUGE SAVINGS when you pay by easy Direct Debit – just £9.99 every quarter plus FREE book.
YES, I would like to subscribe to 88815
MAGAZINES* 5 FREE WITH EVERY 2 YEAR SUBSCRIPTION
2 FREE WITH EVERY 1 YEAR SUBSCRIPTION
PAYER’S DETAILS Title Address
First name
Surname
Postcode Email address
Country
Please complete to receive news updates and offers from us by email.
DELIVERY DETAILS Title Address
(IF DIFFERENT)
First name
Surname
Postcode Email address Please send gift card
Country Please choose gift Spitfire Pilot Doctor’s War
SPECIAL OFFER
(PLEASE TICK)
12 FOR THE PRICE OF 10
24 ISSUES FOR THE PRICE OF 19
UK
12 issues
£45.00
24 issues
£84.99
Europe
12 issues
£55.00
24 issues
£99.99
USA
12 issues
$75.00
24 issues
$137.50
12 issues
£55.00
24 issues
£99.99
Rest of the World
PAYMENT DETAILS I enclose a cheque for £ / $ ................................. made payable to Key Publishing Ltd Please debit my Mastercard Visa for £ / $ ...............
Expiry date
Security Code (3 digit code on reverse of card) OFFER CLOSE DATE: 30 SEPTEMBER 2015 PLEASE QUOTE: BAW915
Signature .............................................................................................................Today’s date ...................................
INSTRUCTION TO YOUR BANK OR BUILDING SOCIETY TO PAY BY DIRECT DEBIT Please tick:
READERS IN THE USA
UK Direct Debit
Quarterly £9.99
6 5
8
9
6
0
MAY PLACE ORDERS BY: TELEPHONE TOLL-FREE: 800-428-3003 OR FAX: 757-428-6253 WRITE TO: Britain at War, 3330 Pacific Ave, Ste 500, Virginia Beach, VA 23451-9828 ALTERNATIVELY, ORDER ONLINE: www.imsnews.com/baw QUOTING/ENTERING CODE: BAW915
Direct Debit UK only. If paying by Direct Debit please send in form. Free gift available on UK Direct Debit orders only. Payments are accepted by Direct Debit, cheque, Postal Order, Credit Card and US Dollar check. Payments by credit or debit card will be shown on your statement as Key Publishing Ltd. Key Publishing will hold your details to process and fulfil your subscription order. Occasionally we may wish to contact you to notify you of special offers on products or events. If you do not wish to receive this information please tick here or mention when calling. Gift subject to change. Any alternative gift will be of equal or higher value. Please note: Free gift is only available on Direct Debit with a minimum 2 year subscription. Should you cancel your subscription earlier then an invoice will be raised for the full price of the gift.
GREMLINS AND MASTERDOM Britain’s Vietnam War FAR RIGHT: A shiny new Spitfire Mk. XIV of 273 Sqn at RAF Tan Son Nhut. The squadron began to receive these in November 1945.
I
N AUGUST 1945, the sudden outbreak of peace caught South East Asia Command completely by surprise. Plans were being laid for operations stretching far into 1946, including Operation Zipper, the amphibious invasion of Malaya. Extensive preparations had been made, including training and equipping RAF units and personnel for detached, expeditionary operations under field conditions, with adequate supplies and vehicles. This would prove invaluable as an urgent need suddenly arose to send smaller forces to targets all across the region to seize key points, free prisoners of war and take the official surrender of Japanese forces still in the field.
For French Indo-China, this led to Operation Masterdom. The Japanese had moved in Indo China in 1941 to secure their route to the oil and rubber reserves of Malaya, effectively taking over control of the country from the Vichy French. Throughout the war the country had been something of a sideshow. It fell between the Chinese Theatre of Operations and South East Asia Command, who clashed several times over who should take control of the area. Neither particularly wanted it for immediate strategic reasons, but rather for political reasons relating to post-war spheres of influence. In the end, at the Potsdam Conference, the country was split along the 16th Parallel, the north going to China and the south to SEAC.
BLURRED LINES
Inside the country chaos reigned. A tenuous French government had maintained power throughout the war, while a dizzying array of internal splinter groups agitated for independence in various political flavours. In March 1945 the Japanese officially toppled the French government and the country was declared to be the independent country of Vietnam. The Allies, particularly the Americans, had supported various groups regardless of ideology, looking instead for likely leaders of post-war regimes that they could control. (Famously, the Americans even convinced the Chinese to let Ho Chi Minh out of prison so that he could return to Indo China.) As the war neared an end, the activities of the
For most people, war in Vietnam means just one thing: the doomed US campaign of the 1960s and 70s. As Stuart Hadaway explains, there was a much earlier conflict involving the British and arising out of the post-war chaos in the region. Bizarrely, it also involved surrendered Japanese forces and aircraft in support of British operations.
42 www.britainatwar.com
GREMLINS AND MASTERDOM Britain’s Vietnam War
Americans became increasingly focused on not just removing the Japanese and their puppet government, but also the French. Their staunch anti-Imperialist stance meant that they wanted all of the European Powers to give up their possessions in the Far East, but they faced a tough resistance to this idea from the British. The French, however, were in less of a position to protest or resist. Soon, US-backed Indo Chinese groups were attacking not only the Japanese, but also the French who were attempting to regain control.
On the other hand, the British were equally determined to let the French keep the country, and a task force was sent to reinstall the French government in mid-September 1945. The 20th Indian Division was despatched under Major General Douglas Gracey, who was to have both military and political control in the country (although he reported militarily to Field Marshal Slim in Burma and politically to Lord Mountbatten at SEAC, who provided sometimes contradictory instructions).
To support these two separate missions, two RAF formations were also detailed for Indo-China. An RAF Element under Air Cdre Walter Cheshire was added to the Control Commission, again reporting to Mountbatten, while No. 908 Wing under Gp Capt F. C. Sturgiss was formed to support the Army, and was controlled via AHQ Burma by Sir Keith Park as Allied Air Commander at SEAC. The lines between these two formations was blurred from the start, and became more so when
MAIN PICTURE: Japanese officers prepare for the ‘Sword Ceremony’ marking the official surrender of the Japanese forces in French Indo China, 11 December 1945.
www.britainatwar.com 43
GREMLINS AND MASTERDOM Britain’s Vietnam War
BELOW: A Mosquito of 684 Sqn at RAF Tan Son Nhut, from where a detachment flew photographic sorties to aid with mapping the country.
doing, without worrying too much about the administrative distinctions.
DIVERSE GROUPS
ABOVE: Thousands of people gather at Saigon’s docks to welcome the arrival of the British led occupation forces. MIDDLE LEFT: Japanese soldiers salute French C.L.I. Commandos in Saigon, September 1945. The Corps Léger d’Intervention (Light Intervention Corps) was an interarm corps modelled on the Chindit brigades used successfully in the Burma Campaign by the British. MIDDLE RIGHT: A Spitfire Mk. VIII of 273 Sqn, with a Mosquito from 684 Sqn in the background.
No. 908 Wing was disbanded and Air Head Quarters French Indo China, under Cheshire, was formed at RAF Saigon, the airfield at Tan Son Nhut just outside the city. The two RAF headquarters were co-located, and nobody seemed entirely clear to which organisation they nominally belonged. Instead, the whole HQ staff simply pitched in and did the work that needed
If the members of the higher command structure were confused, this was even truer for those lower down the chain. The Spitfire Mk. VIIIs of 273 Sqn began to arrive at Tan Son Nhut on 19 September 1945, eight days after the army had begun landing, and found themselves occupying an airfield full of Japanese aircraft, still guarded and operated by the Japanese! Even a month later the Operations Record Book (ORB) would record: ‘The situation in Saigon is bewildering, though, when we have our former enemies now our allies against a foe of which nearly all the squadron never knew the existence.’ This view permeated all ranks, with the subtle shades of political allegiances and agendas being lost on most of the
incoming British. After the British and French mounted a coup to overthrown the new Vietnamese government and re-establish colonial rule, violence broke out around the capital and across the country. The diverse groups taking up arms against the French, and now the British, were a bewildering array – one intelligence report, slightly hysterical in tone, even talks about ‘Buddhist guerrillas’ – and for the most part the whole lot were lumped
THE DAWN OF A POST WAR WORLD Although the war was over, victory did not mean a reduction of commitments for the British military. In reality, victory brought fresh new challenges which would pressure the military well into the 1960s. For the first time in Britain peacetime conscription was maintained, but even National Service could not alleviate the manpower shortage in this new world, nor was it cheap. Garrisons in Europe and the Middle East would drain resources, as would financial difficulties – efforts in the Malayan Emergency were only sustainable because profits from the colony funded military action. However, in late 1945, there was a set of urgencies the British had to tackle in the Far East. Japanese forces had to be surrendered and repatriated – 70,000 in South Indo-China alone, and newly liberated colonies had to be administered until European governments returned. Operation Masterdom was one such case. Eager to go in, the British only arrived after the official surrender of Japan because of restrictions imposed by General Douglas MacArthur, as well as further delays due to bad weather. The delay not only meant those imprisoned in camps were denied access to aid, but local revolutionary groups filled the power vacuum. When British and Indian troops entered Indo-China to free prisoners and secure the country, they faced a new war. In one of history’s oddities, they utilised rearmed Japanese soldiers in a successful campaign just after imposing a painstakingly hard won victory upon them. Setting a precedent for the next half a century, a highly professional and experienced British force led by men well versed in internal security matters successfully completed their objectives and signed responsibility over to French authorities before withdrawing.
44 www.britainatwar.com
together as ‘Annamites’, after one of the country’s regions. The Spitfire pilots also found themselves in unfamiliar operational as well as geographic and political territory as strict rules of engagement were imposed by high authority. Only in certain areas, and under specific conditions, could they open fire on ground targets, and even then only after leaflets had been dropped. In effect, these rules meant that no action was possible at all – even on the rare occasions that all of the conditions were met, the pass to drop leaflets was enough to cause the enemy to melt away. For pilots fresh from the crucible of the Burma campaign, this was a
GREMLINS AND MASTERDOM Britain’s Vietnam War
deeply frustrating situation, especially as British and (more so) French units on the ground were coming under regular attack and they were impotent to help. When the first offensive strike operation was authorised on 16 October, the ORB records that there was ‘great excitement’, and that: ‘The team was selected by drawing out of a hat and then they were briefed. Then there was a great disappointment, the show was cancelled.’
SUCCESSFUL ATTACKS
Finally, on 11 December, it was recorded that: ‘At last the great day has arrived and permission has been given to strafe the Ammanites and give close support to French troops who are threatened by 1,000 Ammanites in the area MZ8086 northeast of Ban Me Thuot.’ Three Spitfire Mk. XIVs (which had begun arriving in late November) made successful attacks. To add to the momentousness of the day, that afternoon another highlight of the deployment occurred: the official surrender of the Japanese garrison: ‘At 1600 hours a very impressive
‘Sword Surrendering’ ceremony took place outside Station Headquarters, when seventy-three Japanese Air Force Officers surrendered their swords to a similar number of Royal Air Force officers being of the same rank or status. Sqn Ldr W. J. Hibbert, Flt Lts W. E. Steele, S. S. Shisho, Fg Offs R. K. Parry, W. Hayes, B. Hirst, J. B. Wingate, Plt Offs H. Keen, and E. Gaukroger were the officers of the squadron who received swords from their equivalent Japanese officers – and weren’t they delighted!’ No doubt the event was particularly satisfying for Flt Lt Shisho, a Burmese officer who had not seen his family since the Japanese invasion. While the Spitfires continued to fly regular reconnaissance sweeps and make ‘shows of force’ in support of land operations, the French had no such restrictions on their actions. Or rather, their only restrictions were with their equipment. There were not many French aircraft in the country; a few Moraine 500s (license built Fiesler Storchs), some Catalina flying boats, and a handful of salvaged Japanese fighters. Soon, the Catalinas were begin used in
a ground-attack role, surely a unique experience even for this versatile aircraft – and causing friction with Gracey by not bothering to drop leaflets first. The French Air Force was sending aircraft, Spitfire IXs, from France, but they would take months to arrive, and in the meantime the British were asked to loan them aircraft.
ABOVE: The radio control van, marked up for Operation ‘Masterdom’ at the end of the runway at RAF Tan Son Nhut.
908 WING RAF 273 Squadron (Spitfire Mk. VIII) 684 Squadron (Mosquito) (Detachment) 1307 Wing, RAF Regt. 2963 AA Squadron, RAF Regt. 2967 Field Squadron, RAF Regt. 98 Mobile Flying Control Unit 3209 Servicing Commando (Detachment) 99 Embarkation Unit (Detachment) Nos. 5803, 5804, 5820, 5847, 5876, 55647 & 55656 Mobile Signals Units 347 Wing Mobile Photographic Section 7273 Serving Echelon 2 Field Hygiene Section 2 Staging Post 717 Meteorological Forecast Section BELOW: Japanese ground crews working on a pair of Gremlin Task Force Mitsubishi Ki-46 ‘Dinahs’.
www.britainatwar.com 45
GREMLINS AND MASTERDOM Britain’s Vietnam War
THE BRITISH IN INDONESIA A particularly bloody episode was had in the Dutch East Indies. Following the Japanese occupation of the Dutch colonies, a republican government was installed, this government did not desire a Dutch return. However, the Dutch were keen to regain control post war, and despite a dislike of a European administered Far East, the US loaned $10m to the Dutch to facilitate their return. Weakened by German occupation, the Dutch had no real significant force until early 1946 and the British agreed, reluctantly, to administer the East Indies in their place. British troops arrived in late September 1945, tasked with restoring order and faced with the repatriation of some 300,000 Japanese as well having to free prisoners of war. While clashes occurred, the British had not the will nor resources to commit to a long struggle to regain Indonesia for the Dutch. In October 1945, the Japanese tried to regain the authority they relinquished to Indonesians. The cities of Pekalongan and Bandung were taken with ease, but Semarang was the scene of a bloody contest. By the time Japanese soldiers were repatriated, 500 Japanese and 2,000 Indonesians had been killed. A British led evacuation of Indo-Europeans and European internees followed as troops encountered stronger resistance. A brief ceasefire was arranged on 2 November 1945, but fighting soon resumed. Republican attacks against Allied and pro-Dutch civilians reached a peak in November and December, with 1,200 killed in Bandung alone. The Battle of Surabaya would be bloodiest battle of the revolution. 6,000 British and Indian troops landed in the city and there was hand-to-hand fighting in every street. Thousands perished as the fighting continued until 29 November. Defeat at Surabaya permanently disadvantaged Republican forces, yet the battle galvanised support for independence and reminded the Dutch that they faced a well organised and popular resistance. On Java and Sumatra, the Dutch enjoyed success in urban areas, but could not subdue rural areas. On outer islands Republican sentiment was not as strong and they were occupied with ease. Indonesian independence would eventually be achieved in 1949. 5,000 Dutch would die in the long campaign, as would tens of thousands of Indonesian combatants. Estimates of Indonesian civilian deaths vary between 25,000 and 100,000. The last British troops left Indonesia in November 1946 and in their shorter campaigns, 1,200 British and Indian soldiers would be killed, as would over 1,000 Japanese. RIGHT: A Japanese guard on the airfield. These troops were used at key points across Indo China to supplement British and French forces. BELOW: The control tower at RAF Tan Son Nhut.
This issue was passed all the way up to Mountbatten and Park, the latter of whom was emphatic that the RAF could not loan aircraft to foreign powers. A wave of political issues entered the equation, from the Air Ministry wanting to help the French so as to ease negotiations to keep using Tan Son Nhut as a transport base, the disapproval of the anti-French Americans. SEAC itself was not keen as the Americans were demanding their Lend-Lease aircraft back, leaving the Command short of aircraft across the theatre. In the end, some cast-off Spitfire VIIIs were reluctantly passed to the French in mid-November, on the strict understanding that they had the
46 www.britainatwar.com
personnel and equipment to operate and maintain them. As it turned out, they French did not. As a consequence, they would be plagued by high accident and unserviceability rates. In fact, the attack by 273 Sqn on 11 December had only been staged because the French had no serviceable Spitfires themselves.
GREMLIN TASK FORCE
While the Spitfires conducted patrols and occasional close air support, and a detachment of Mosquitos of No. 684 Sqn conducted a photographic survey of the country to aid map-making, an entirely different RAF force was also in the air over Indo China: Gremlin Task Force.
Saigon was ideally placed to form an important hub in the various air routes that criss-crossed South East Asia. However, transport aircraft, or even bombers that could be used as transports, were in short supply, with fuel for them even rarer. Or, at least, British and American aircraft and fuel was. What the RAF had access to at Tan Son Nhut, though, were plentiful Japanese aircraft, along with stores, aircrew and maintenance staff along with large stocks of fuel that could not be used on Allied aircraft. Japanese soldiers were already being used to supplement the British and Indian Army (and RAF Regiment) on the ground in defending key points, including the airfield, which was attacked by guerrillas several times. Air Cdre Cheshire therefore decided to conscript the Imperial Japanese Air Force as well, forming Gremlin Task Force under the command of Squadron
GREMLINS AND MASTERDOM Britain’s Vietnam War
Leader H. F. McNabb. RAF roundels were painted over the Japanese rising suns, and a handful of British officers and wireless operators were designated to the force which was then simply left to get on with it. The Japanese would report their readiness state each morning, and various operations and tasks would be allocated accordingly. Mostly, these were transport sorties within Indo China, although trips to neighbouring Siam and even to Singapore were also made. In this way, Cheshire added considerably to
among the controllers at their destinations, especially if they had not been warned in advance that ‘mute’ Japanese aircraft were about to descend on them. For the most part the system ran smoothly, and British and Japanese ground crew worked well together. To begin with they were not supposed to mix, but inevitably, and as working relations improved, so any tension between the erstwhile enemies cooled. LAC Stan Collinson recalled:
TOP: A visiting USAAF B-29 Superfortress. LEFT: An RAF airman poses with a Japanese guard. BELOW LEFT: The French dispersal area at Tan Son Nhut, with a mixture of Moraine 500s and Spitfire Mk. VIIIs, plus some cannibalised Japanese types.
HEIGTENED CIRCUMSTANCES
On the other hand, there was distinct friction between the British and the French authorities, even if among the civilian population relations were good. After months or years living in the jungle, the ORB for 273 Sqn records that ‘morale was high and everybody was delighted to see the well dressed French women in Saigon… [as well as at] the novelty and proximity of a practically European town with the transport assets available to the RAF, and for very little cost. Problems did occur, not least because of the equipment and with language problems involved in air traffic control. One controller recalled that: ‘The first we would know is when a Japanese aircraft presented itself at the end of the runway, because we had no R/T communication with them. They were just flying by Mk 1 eyeball. They’d appear on the end of the runway, get a green light, and they’d be off.’ Doubtless these same problems caused alarm and despondency
BOTTOM RIGHT: The main terminal building at RAF Tan Son Nhut. Note the two flagpoles…
‘The one thing that really annoyed us was that there was an edict from above that there was to be no fraternising in any conceivable way. Of course, it’s like all these rules, they’re all open to interpretation, and it becomes a necessity if you are working on these jobs, you have to talk with them… The people who were actually there [in Saigon] were what you might call the draftees, not the gung-ho types we’d had out in Burma or anything like that they were a load of nutters, them.’ www.britainatwar.com 47
GREMLINS AND MASTERDOM Britain’s Vietnam War
TOP LEFT: Under seemingly relaxed British supervision, surrendered Japanese soldiers work to repair the taxi strip at Saigon’s airfield, December 1945. TOP RIGHT: RAF airmen enjoying the local brew, Christmas 1945. BELOW: Kawasaki Ki-48 ‘Lilly’ showing the RAF markings.
plenty of things to buy’. However, over time the interaction with the local populations decreased as the level of violence increased, and the amenities on the airfield improved to include a cinema and a canteen. For many the only French that they came into contact with, albeit indirectly, were the authorities – military and political - who were doing their best to re-impose colonial control. In these heightened circumstances their actions were, at times, heavy handed. At RAF Tan Son Nhut, a symbol of this was the saga of the flagpole on the terminal building. When the French Air Force returned to the station, they insisted on taking the Union Flag down from the flagpole and putting up the French Tricolour. The author’s source, who claimed to have had nothing to do with the episode yet was strangely well-informed, recalled that the consensus among the RAF staff was: ‘…that was an obvious insult, wasn’t it?’ So, at night, the Tricolour mysteriously disappeared and the British flag went back up. During the day, the French insisted that the flags be swapped again, and they were.
48 www.britainatwar.com
This time a group of RAF personnel, who had carefully worked out that the flagpole outside the Governor’s Palace in Saigon was the tallest in the country, ‘borrowed’ the pole and placed it next to the existing one on the terminal. Come dawn, there was the British flag alongside but above the tricolour. In fairness to the French, no effort was made to remove the new pole even though they were clearly less than impressed. The local RAF opinion was that, as a consequence, the French suffered something of a ‘sense of humour failure’.
TIGHT RULES OF ENGAGEMENT
At the end of 1945, RAF operations began to wind down. Their surveys finished, 684 Sqn withdrew their Mosquito detachment in January, 1946, moving it to Bangkok. Gremlin Task Force supported this move as one of their last tasks, standing down soon afterwards after having clocked up over 2,000 sorties. Partly this was a logical progression as the French strength in Indo China grew, but it was also due to an increasing shortage of spares for the
Japanese aircraft. On the other hand, 273 Sqn were notified they would be disbanded at the end of that month. In mid-January, the first personnel were being withdrawn to Burma, and on 31 January the squadron stood down. Two weeks later RAF Saigon was also closed, although a small staging post remained at Tan Son Nhut. The RAF contribution to the liberation and re-colonisation of French Indo China had been small but important. It had also been shackled by tight rules of engagement and other limitations imposed by the French, Americans and by the British themselves. While this may have been frustrating at times, particularly to the Spitfire pilots, it did at least keep Britain largely disengaged from the problems within the country, and avoided an escalation of involvement in a shootingwar that was none of their concern. Unlike other operations, such as that to liberate the Netherlands East Indies, the British were able to do their job and get out without getting bogged down. The French and the Americans would not be so lucky. In that respect, Operation Masterdom was a complete success.
Military collectables bought and sold
SINGLE ITEMS & COLLECTIONS WANTED
BEST CASH PRICES PAID
for campaign souvenirs from all countries including Britain, America, Germany, France, Japan, Falklands, Iraq and Afghanistan.
FREE VALUATIONS
We will travel to view collections within the UK. All enquiries handled in the strictest confidence. Discretion guaranteed.
We buy, sell or part/ex: Deactivated small arms and accessories Antique & obsolete calibre rifles & pistols Air rifles & pistols Inert ordnance - shells, grenades, mortar rounds Edged weapons Medals, badges, insignia Uniforms, headgear Field gear & equipment WWI & II Home Front ●
●
● ●
● ● ● ● ●
Our extensive website is updated regularly - click on now
www.jcmilitaria.com JC MILITARIA Ltd.
t: 0161 476 0436 m: 07786 707 191 e:
[email protected] Design by
[email protected]
Eagle Relics
Your Best Source For Original 3rd Reich Militaria
WE WILL BE ATTENDING SHOWS IN THE UK ON A REGULAR BASIS THROUGHOUT THE YEAR MAINLY LEEDS AND BIRMINGHAM.
THE WEBSITE IS CONSTANTLY BEING UPDATED, SO BE SURE TO CHECK ON A REGULAR BASIS PLEASE VISIT:
www.eaglerelics.com
WE WILL GIVE YOU THE VERY BEST PRICES FOR YOUR COMPLETE COLLECTION OR SINGLE ITEMS If you would like to be notified on future updates to the site. Please drop us a line, and we will add you to our mailing list.
[email protected]
www.london-medals.co.uk 020 7836 8877 • BUY & VIEW ALL AVAILABLE STOCK ONLINE
With over 35 years hands on experience, my aim is to bring you the collector, established or novice, original pre 1945 construction German Militaria. With a price to suit everyone, you will find a mixture of readily available items, together with the more desirable items from that period. You will find a good selection of Daggers, Helmets, Headgear, Medals, Combat Awards, Equipment, Badges, Documents, and much much more. Please take the time to browse through the items in my on-line shop, I am sure you will not be disappointed. Each item is guaranteed original from the 1933 -1945 3rd Reich period, unless otherwise stated.
FOR GALLANTRY Home Front Heroes
O
n Tuesday, 20 May 1941, Thomas Alderson stood before King George VI at Buckingham Palace. Alderson was from Bridlington on the north Yorkshire coast which, eight months earlier, suffered five days of intense bombardment by the Luftwaffe, raids which caused widespread damage. As an ARP Rescue Leader he had gone to where a pair of semi-detached houses in St. Alban Road had been totally wrecked, trapping a Miss Machon alive in the debris. Alderson tunnelled his way through the rubble and managed to bring the woman safely into the open. It was because of this and other selfless acts that Thomas Alderson stood before the King. Those other acts included freeing six people trapped in a cellar after digging his way under fourteen feet of debris for three-and-a-half hours. As Thomas Alderson was presented to the monarch, King George pinned a medal on the man’s chest, remarking, ‘you are the first recipient of the George Cross. It gives me very great pleasure to hand it to you.’ Since the days of the Crimean War the Victoria Cross had been granted to acts of valour in the face of the enemy. The award had been the most valued and soughtafter decoration that any man or woman could wish to receive. The VC, though, was limited in its scope, for courage is not confined to actions in combat. This had become particularly evident during the Blitz when many brave individuals had taken enormous risks to help save
BOTTOM LEFT: The George Cross. A cross with four almost equal limbs, the medal is suspended from a suspension bar decorated with laurel wreaths. The Royal Warrant states that the obverse shall have ‘in the centre a circular medallion bearing a design showing St George and the Dragon, that the inscription “For Gallantry” shall appear round this medallion, and in the angle of each limb of the Cross the Royal Cypher “G.VI” forming a circle concentric with the medallion’.
(ALL IMAGES HISTORIC MILITARY PRESS UNLESS STATED OTHERWISE)
FOR
50 www.britainatwar.com
GALLAN
FOR GALLANTRY
Home Front Heroes
MAIN PICTURE: Personnel of a bomb disposal unit at work in London in September 1940. The original caption, dated 1 October, states: “Royal Engineers digging out a one-ton time bomb, half of which is still embedded more than twenty feet, near a hospital. All patients had been evacuated and there were no casualties.” BOTTOM RIGHT: The George Medal. Awarded to civilians for acts of great bravery, but not so outstanding as to merit consideration for the George Cross.
the lives of others – individuals such as Thomas Alderson. These brave people could not be granted the Victoria Cross because the heroic tasks they undertook were not in the face of the enemy.
UNREWARDED COURAGE
The King and Queen Elizabeth had been moved by the scenes they had witnessed first-hand as they toured London during the Blitz and heard the remarkable stories of the exceptional efforts undertaken by some people under extraordinary circumstances. In particular the King was frustrated by the strict terms of reference associated with the Victoria Cross which meant that what he perceived as deserving cases were not being suitably recognised or rewarded. ‘The King is very angry that the War Office will not recognise bomb disposal officers as being eligible for military decorations on the ground that they are not ‘working in the face of the enemy’, Euan Wallace, the Senior Regional Commissioner for Civil Defence in London, wrote in his diary. ‘He wanted to give Lt Davies the VC and said some things about the generals at the War Office which would have surprised them.’ The Lieutenant Davies that the King felt should have been granted the Victoria Cross, was Temporary Lieutenant Robert ‘Jock’ Davies, the Commanding Officer of 16/17 Section, No.5 Bomb Disposal Company Royal Engineers, who was sent to deal with an incident at St Paul’s Cathedral. In the early hours of
To mark the 75th anniversary of the George Cross and George Medal, Tony Gledhill GC examines the institution of the two medals.
ANTRY
www.britainatwar.com 51
FOR GALLANTRY Home Front Heroes
ABOVE: The damage to the Britannia Hotel in Prince Street, Bridlington, which was caused by a single high explosive bomb which fell during a Luftwaffe attack on Wednesday, 21 August 1940. One soldier and a civilian, 25-year-old Esther Shaw, were killed in the explosion. This was a location attended by Thomas Alderson in the course of his ARP duties. (COURTESY OF FRED WALKINGTON MBE)
RIGHT: Damage caused to the Woolworth’s store in Prince Street, Bridlington that was caused during an air raid on 23 August 1940 – a scene that was again attended by Thomas Alderson and his team. COURTESY OF FRED WALKINGTON MBE)
12 September 1940, a 1,000kg bomb had fallen close to the steps below the south-west tower and slammed into the roadway of Dean’s Yard. This bomb had enough destructive power to demolish the whole façade of the cathedral – but it failed to explode. Where the bomb had landed, however, was close both to the foundations of the cathedral as well as the entire trunk telephone network to the north of England. If the bomb was fitted with a Type 17 series long-delay fuze then it had a maximum delay of about eighty hours. By the time that Davies began his investigation, twelve hours had already passed. Speed was therefore of great importance if St Paul’s was to be saved. It must be remembered that St Paul’s was not just another building. It had survived the early German attacks of the Blitz, almost miraculously, and became a symbol of London’s determination not to be broken by the bombs of the enemy. The six sappers with Davies jumped into the crater and began to remove the rubble that had fallen in on top of the bomb. Almost immediately the men collapsed unconscious! The bomb had fractured a six-inch gas main and the soldiers had been overcome by fumes in the crater. A party of gas workers from the Gas Light & Coke Company were working nearby and they came to the assistance of the sappers. The soldiers were taken to hospital, though
52 www.britainatwar.com
they soon recovered and returned to help Davies. The gas workers cut off the mains supply but not before a fire broke out and the Fire Brigade had to flood the main pipe with water. Most of the day had passed before the sappers could recommence digging. Time was slipping away. They continued digging throughout the night but soon after dawn on Friday three of the men were burned when a spark accidentally ignited another gas leak. Everyone threw themselves to the ground – except Davies who stood seemingly unruffled on the rim of the crater. The three
men were treated at nearby St Bartholomew’s Hospital and were back at work that same day. At last, when they had dug down about twelve feet, the sappers located the unexploded bomb. A hawser was passed round it but as the men tried to dig the bomb free, it slipped from the hawser and fell even further down. It slithered another twelve-and-a-half feet down into the ground. There was simply nothing for it but for the men to keep on digging. Davies and his team worked on with no sleep and barely a break digging through the London clay, their endeavours punctuated by the
FOR GALLANTRY
Home Front Heroes
occasional dash for cover when further bombs fell close by. They worked on throughout Saturday and Sunday. At last, at a depth of twenty-seven-and-a-half feet down Sapper George Wylie touched metal – they had located the bomb again. Davies examined the bomb and found that it was indeed fitted with a Type 17 long-delay fuze protected by a ZusZ 40 anti-withdrawal device. This type of device had been identified just ten days earlier on a bomb that had dropped on Swansea. No remedy had yet been devised to deal with this new threat and so the instructions that had been issued were for all of these bombs to be destroyed in situ. This was simply not an option for Davies. Somehow he would have to remove the bomb intact without disturbing it to the extent that it would detonate.
Davies ordered the streets to be cleared from St Paul’s to Hackney where unexploded bombs were being taken for safe disposal well away from any houses at what became known as the ‘bomb cemetery’ on Hackney Marshes. Sapper Wylie and his section gently eased a half-inch thick wire rope round the bomb, the other end of which went through pulleys attached to a lorry. Slowly they winched the bomb from the ground but the strain proved too much and the line snapped. Undaunted, the sappers cautiously repeated the operation, only for the wire to snap yet again. By this time it was almost midday and everyone was becoming
extremely nervous. The bomb had long passed its ‘safe’ time. In what was described as ‘almost frantic haste’ another lorry was paired in tandem with the first. The wires were reattached and together the two vehicles pulled the huge bomb clear of the clinging clay. It was tightly lashed to a cradle and gently placed onto the flat bed of a waiting Army lorry. Davies dismissed his men to save them from any further danger and all alone he drove four-and-a-half miles through the empty streets of East London, cleared of people by the police, to Hackney Marshes preceded by police motorcycles. The bomb was unloaded and exploded in a controlled detonation. The resulting crater was more than 100 feet wide and eight feet deep.
‘THE BRAVEST MAN I EVER MET’
The risk that Davies had taken had been shown earlier on 27 August when, after a German raid on Biggin Hill, two unexploded bombs were found. A technical intelligence officer at the aerodrome, Acting Squadron Leader Eric Moxey, immediately volunteered to deal with the two bombs. He had been dealing with unexploded bombs since the beginning of the Battle of Britain and he had invented a device for extracting fuzes, which he called a ‘Freddie’. Unfortunately one of the bombs exploded, killing him instantly. ‘In my opinion,’ his
commanding officer is reported to have said, ‘Moxey was the bravest man I ever met’. The King simply could not understandwhypeoplelikeAlderson, Davies and Moxey could not be granted the highest possible award for their courage and perseverance. The definition of what constituted being in the face of the enemy also appeared ill-formed. Such men were dealing with enemy weapons, and in the case of Moxey he was killed by an enemy weapon just as a soldier might be killed by a shell delivered from more than a mile away whilst rescuing a comrade from a dangerous position. In neither case would there have been direct contact the enemy yet one might qualify for the Victoria Cross but not the other. The King was determined to put right what he saw as an obvious wrong.
THE KING’S SPEECH
On 23 September 1940, the King recorded one of his rare radio broadcasts at Buckingham Palace. ‘In this battle for Britain, London the mighty capital of the Empire, occupies the forefront,’ he began. ‘Others of our cities are being subjected to the barbarous attacks of the enemy. Our sympathy goes out to them all. But it is London that is for the time being bearing the brunt of the enemy’s spite.
ABOVE: A portrait of Thomas Alderson GC in Civil Defence uniform, wearing both his George Cross and Silver Issue RSPCA Gallantry Medal. (COURTESY OF
MRS J.P. WILSON)
LEFT: King George VI and Queen Elizabeth standing in a bombdamaged part of Buckingham Palace following an air raid in 1940. (The black circle and line appear on the original print and are probaby the mark of a photo editor.)
www.britainatwar.com 53
FOR GALLANTRY Home Front Heroes
POSTHUMOUS AWARDS
AS IS well known the island of Malta was awarded the George Cross, but some of the people serving there also received the medal. One such was Leading Aircraftman Albert ‘Matt’ Osborne, whose list of courageous actions is outstanding. In his GC citation no less than seven instances are stated. On one occasion he managed to extinguish a burning aircraft in the middle of a heavy bombing raid. On another occasion he tried again to save an aircraft that was on fire and removed two torpedoes that were nearby and in danger of being ignited. Again, during a raid a shelter was hit, trapping a number of airmen inside. Osborne worked unceasingly for six hours to rescue the men, despite bombs, and rubble, falling all around. Another attack left two aircraft on fire. One of those aircraft had been hit by a parachute flare and Osborne managed to pull the flare off the plane, enabling the pilot to taxi clear. He then ran to the other aircraft and put the fire out before much damage had been done. The last incident referred to in Osborne’s citation occurred on 1 April 1942 when he was in charge of a party trying to save a burning aircraft when one of the petrol tanks exploded, and Osborne was overcome by fumes. The remarkable forty-four-year-old picked himself up and returned to fight the fire but was killed by a second explosion. Another who was awarded the George Cross posthumously was forty-two-year-old Squadron Leader Reverend Herbert Pugh. He was on board SS Anselm, a converted troopship sailing to Freetown, with approximately 1,200 naval, army and air force personnel. On 5 July 1941 Anselm was some 300 nautical miles north of the Azores when she was torpedoed. The ship began to sink but when Reverend Pugh was told that some of the injured were trapped in the hold and could not be saved, he insisted on being lowered into the hold to join the trapped men. He remained there as the ship went down to give comfort and spiritual support to the doomed men. The original Warrant for the George Medal did not allow for posthumous awards. This was changed in November 1977, since when several have been made. One of the most recent examples is the award of the George Medal to Lieutenant Commander Ian Molyneux, announced in March 2012. Lieutenant Commander Molyneux was killed as he tried to disarm a fellow crew member on the submarine HMS Astute when it was docked in Southampton in April 2011. BELOW: Another view of the damage to the Woolworth’s store in Prince Street, Bridlington. (COURTESY OF FRED WALKINGTON MBE)
54 www.britainatwar.com
‘I am speaking to you now from Buckingham Palace, with its honourable scars, to Londoners first of all, though of course my words apply equally to all the British cities, towns and hamlets who are enduring the same dangers. The Queen and I have seen many of the places here which have been most heavily bombed and many of the people who have suffered and are suffering most. Our hearts are with them tonight. ‘Their courage and cheerfulness, their faith in their country’s cause and final victory are an inspiration to the rest of us. To the men and women who carry on the work of the A.R.P. services I should like to say a special word of gratitude. ‘The devotion of these civilian workers, firemen, salvage men, and many others in the face of grave and constant danger has won a new renown for the British name. These men and women are worthy partners of our Armed Forces and our police of the Navy, once more as so often before our sure shield, and the Merchant Navy, of the Army and the Home Guard, alert and eager to repel any invader, and of the Air Force, whose exploits are the wonder of the world. Tonight, indeed, we are a nation on guard and in the line.’ Elsewhere in his speech, King George spoke for the first time of his new gallantry awards: ‘Many and glorious are the deeds of gallantry done during these perilous but famous days. In order that they should be worthily and promptly recognized I have decided to create at
once a new mark of honour for men and women in all walks of civilian life. I propose to give my name to this new distinction, which will consist of the George Cross, which will rank next to Victoria Cross, and the George Medal for wider distribution.’ Both medals were officially instituted on 24 September 1940 – though the Royal Warrants themselves were not published in The London Gazette until 31 January the following year. The Warrant for the George Cross included the following statement: ‘Whereas we have taken into Our Royal consideration the many acts of heroism performed both by male and by female persons, especially during the present war: And whereas We are desirous of honouring those who perform such deeds: We do by these presents for Us, Our Heirs and Successors institute and create a new Decoration which we desire should be highly prized and eagerly sought after … It is ordained that the Decoration shall be designated and styled “The George Cross”.’
THE FIRST AWARDS
The first announcements of awards of the two new medals were published in The London Gazette on Monday, 30 September 1940. The three George Crosses listed were those of Alderson,
FOR GALLANTRY
Home Front Heroes
Cox of Coventry who submitted the pattern approved by the King. Unfortunately their works were stopped by the air-raids on Coventry and though we had an encouraging reply from them a month ago, no supplies have yet been furnished. We have written them again saying that the matter is urgent, and pressing for an immediate supply.’ The same also contained an update on the progress of the George Cross: ‘The die for the George cross is a much more complicated tool to make than that for the medal, but I hope to be able to submit a sample cross in about a week’s time.’ Davies and Sapper George Wylie. There were also sixteen George Medals announced. One of the latter related to the actions of Patrick King, of Shiremoor, Northumberland. King was employed as a guard by the Backworth Colliery Company, and was also an ARP Warden. King had been in the habit of carrying a blind woman, Miss Wilson, from her home to a shelter when an air raid warning was given. On 26 August a bomb fell on the house before he could reach Miss Wilson, and she was buried in the rubble. Though bombs continued to fall, King at once started trying to free her and was wounded in the process. In due course, the rescue squad arrived, and with their assistance he got her out. What is interesting, however, is that whilst the first awards of the two medals were being gazetted, the actual designs of the medals, particularly the GC, were still being debated. Towards the end of 1940, the first images of how the medals might look were released. The issue of The War Illustrated published on 6 December included these pictures. The accompanying editorial began by confirming that ‘King George has chosen the design for the George Cross and the George Medal’, before adding that the ‘the Cross was designed and modelled by Mr Percy Metcalfe CVO, RDI, the artist responsible for the King’s Coronation Medal’. Of the GM, the report noted the following: ‘The obverse shows the crowned effigy of the King … and is identical with that of service medals in general. The reverse depicts St George slaying the Dragon, a design
LEFT: A group photograph of members of the ARP Rescue and Demolition Teams from Brigham, Middlesbrough and Bridlington taken on 9 October 1940. Detachment Leader Thomas Alderson GC is in civilian clothes sitting on the Mayor’s right. Wilf Smith can also be seen sat on Alderson’s right. (COURTESY OF FRED WALKINGTON MBE)
LEFT: St Paul’s did not escape the attentions of the Luftwaffe completely unscathed during the Blitz. This is the view, dated 28 April 1941, looking down into the crypt through a hole caused by a bomb falling on the north transept roof and which penetrated the Cathedral floor. BELOW: A symbol of London during the Blitz – St Paul’s (COURTESY
OF THE AUSTRALIAN WAR MEMORIAL)
adapted by Mr George Kruger Gray CBE, ARCA, FSA, after the bookplate designed by Mr Stephen Gooden ARA for the Royal Library at Windsor Castle.’ Despite such stories in the press, the design of the George Cross had not yet been finalised. The picture in The War Illustrated, for example, shows a small cross beneath the design of St George and the Dragon, whilst in the final design this is replaced by a different motif. There were other problems in the initial design process, not least of which were the effects of the Blitz itself. On 31 December 1940, the Royal Mint submitted a sample strike of the George Medal to the King’s Private Secretary, Sir Alexander Hardinge. The ribbon, however, was missing: “I regret to say that it has not been possible to obtain supplies of the ribbon up to the present. We ordered supplies six weeks ago from Messrs. Oakey and www.britainatwar.com 55
FOR GALLANTRY Home Front Heroes RIGHT: An early recipient of the George Medal, John Thomas ‘Buster’ Cain (right), is pictured wearing his award on the way home from his investiture in June 1941. A 15-year-old costermonger of Dalston, London, Cain was awarded the George Medal for helping rescue thirty-six people from a bombed and blazing paint factory. MIDDLE: Locations of main high explosive bombs around St Paul’s Cathedral during the Blitz. The bomb that fell on 12 September 1940, dealt with by Davies and his unit, is at ‘A’. The buildings in the green shaded area were generally still standing at the end of the Blitz. The brown areas denote spaces where every building of note had been destroyed. It is impossible to indicate the many thousands of incendiary bombs that fell on and around the cathedral. BOTTOM LEFT: King George inspects bomb damage in London’s East End, 10 September 1940.
By 10 January 1941, the sample GC had not yet reached the King for his approval, the reasons being explained in a letter from J.H. Craig, the Deputy-Master and Comptroller of the Royal Mint, to Hardinge at Buckingham Palace: ‘I had hoped to submit a specimen of the George Cross by to-day, but the trial strike is to my mind not entirely satisfactory. It is essential to work over the dies again and alter the method of striking; all possible expedition will be used, but I am afraid that it will be the 21st or 22nd before the improved specimen can be ready … I do hope that the delay will not cause serious inconvenience, but we have had three men killed, one building down, practically all roofs and windows demolished and power, gas and water, cut off, at intervals.’ Sir Alexander duly replied to Mr Craig in a letter dated 14 January 1941: ‘The King quite appreciates the reasons for the delay in producing the specimen of the George Cross, and it will be quite time enough if it can be produced on the 21st or 22nd, as you A anticipate. The King sympathises with you in the misfortunes that have overtaken you and made this delay inevitable.’
the Royal Navy, Army and Royal Air Force respectively. The first direct naval George Cross went to Lieutenant-Commander Robert Armitage of HMS Vernon. He was serving in the Royal Naval Reserve and found himself disabling enemy mines. On one occasion a parachute mine was hanging from a tree in Orpington, Kent. The only way Armitage could get close enough to disable the bomb was by ladder. Undaunted, Armitage tackled the mine even though if the fuze was activated there was no chance of him being able to run for cover. This time he successfully disabled the mine, but on another occasion
Sadly Walters died of his injuries as did the pilot. The navigator, Sergeant Byron was the only survivor.
‘THERE WILL ALWAYS BE AN ENGLAND’
THE FIRST INVESTITURE
In time, the King finally approved the design of the two medals and their ribbons and within weeks Thomas Alderson was standing before His Majesty to be formally invested. He was one of four GC recipients present that day – the other three were from
56 www.britainatwar.com
he was just thirty yards away from a bomb when it exploded. Nevertheless, the thirty-five-year-old went back to his dangerous work the following day. The other recipients of the George Cross that day were Major Herbert Barefoot, Royal Engineers, and Wing Commander Laurence Sinclair RAF. Whilst Barefoot’s award was the result of his bomb disposal work, Sinclair’s related to events at RAF Wattisham on 30 September 1940. A Blenheim bomber was taking off when one engine suddenly stopped, and the bomber crashed in flames. Wing Commander Laurence Sinclair of 110 Squadron immediately rushed over to the aircraft but two 250lb bombs exploded before he reached it. Even though he knew that there were two more bombs on board which might be ignited at any moment, he continued to run towards the Blenheim. He ‘dashed’ into the wreckage and flames, dragging the air gunner, Sergeant Sidney Walters, out of the burning bomber.
The George Cross, and the George Medal, was not the first civilian gallantry award. So, in order to bring due recognition to those that had received other medals and to simplify the system of awards, those living recipients that had been granted the Empire Gallantry Medal (officially the Medal of the Order of the British Empire for Gallantry) were instructed to exchange their medals for a George Cross. Thirty years later, in 1971, the surviving recipients of the Albert Medal and the Edward Medal were also invited to exchange their award for the GC. A total of 112 EGM holders, sixty-five Albert medallists and sixty-eight Edwards medallists who were eligible to exchange their awards have brought the total number of GCs issued to 406. The two Collective Awards were to the Island of Malta and the Royal Ulster Constabulary. That said, not all of those that had the opportunity to exchange their medals did so, preferring to keep their original awards, despite the moving words of the King when he concluded his BBC broadcast on 27 September 1940: ‘The walls of London may be battered, but the spirit of the Londoner stands resolute and undismayed. As in London, so throughout Great Britain, buildings rich in beauty and historic interest may be wantonly attacked, humbler houses, no less dear and familiar, may be destroyed. But “there’ll always be an England” to stand before the world as the symbol and citadel of freedom, and to be our own dear home.’
For a great selection of aviation and transport books, DVDs, magazines and models visit: www.keypublishing.com/shop 183/14
FIRST WORLD WAR DIARY SEPTEMBER SEES a number of major offensives on both the Eastern and Western Fronts as the British and French attempt to breach the German lines. The Russians are forced out of much of Eastern Europe in a large German offensive and operations begin to scale back at Gallipoli. At home, London is on the receiving end of the most successful German raid on Britain of the war, while in the Middle East progress is made in Mesopotamia.
HOME FRONT
8 September In arguably the most successful air raid on Britain throughout the entire war, Zeppelin L 13, commanded by the highly regarded Heinrich Mathy, raids London. He drops 70 bombs, including the largest dropped on Britain at the time – at 660lb. 22 die in the raid and a further 87 are injured. 14 September Compulsory National Service discussed in the House of Commons. 25th September General Sir James Wolfe Murray resigns from his role as Chief of the Imperial General Staff. Seen as ineffectual and criticised by Winston Churchill, he is soon replaced by Lieutenant General Sir Archibald James Murray.
WAR AT SEA
1 September First Battle of the Atlantic: Germany suspends its policy of unrestricted submarine warfare.
WESTERN FRONT
15 September French commander in chief, Joffre, tries for the last time to exploit Allied superiority in numbers at the Third Battle of Artois – part of a wider series of attacks along the length of the Western Front, his ambitious moves fail. 25 September The largest British Western Front offensive of 1915, the Battle of Loos begins. The battle is the first large scale use of New Army units in battle and the first use of poison gas by the British. Despite a marked improvement in method and equipment, the attack was contained. Part of the series of offensives planned by Joffre, Lord Kitchener ordered Sir John French and Sir Douglas Haig to attack at Loos, despite the areas unsuitability. 25 September The French gain some ground in the Second Battle of Champagne, a costly operation, which together with the Third Battle of Artois also exhausted the supply of shells for French Artillery (over 3 million fired at Champagne alone), but any breakthrough is not properly exploited and the Germans hold. A lack of German troop strength made a major counterattack impossible, but smaller operations did enjoy success.
58 www.britainatwar.com
WEST AFRICA
8 September Following a long artillery barrage, the Allies launch their second major attack on the long besieged fort at Mora, which was repulsed. The fort would be the last German fort in Cameroon to surrender in early 1916 – over a year after the rest of the German army left the country.
WAR AT SEA
22 September North Sea: The Dutch liner Koningin Emma, sailing to Amsterdam from Singapore, hits a mine and eventually sinks off Harwich. Her crew and passengers were rescued.
SEPTEMBER 1915 WORLD MAP EASTERN FRONT
19 September Lithuania: The Sventiany Offensive draws to a close. Six German cavalry divisions, without support, are unable to maintain the momentum of their breakthrough and are stopped.
EASTERN FRONT 5 September Tsar Nicholas II takes direct control of Russian Armies.
19 September Lithuania: German forces occupy Vilnius, starving, battle weary, understrength, and having sustained many casualties, German forces would soon be halted after a long period of success.
DARDANELLES
4 September British submarine HMS E7 is forced to surface and scuttled by her crew after becoming entangled in Turkish antisubmarine netting and being subject to multiple attacks.
GALLIPOLI
25th September Lord Kitchener demands three British and French divisions for the Salonika campaign, marking the beginning of the end of the Gallipoli Campaign.
WAR AT SEA
19 September British transport steamer/ troopship Ramazan is sunk by the German submarine SM U-35 in the Aegean. U-35 would end the war being the most successful U-boat – sinking over half a million tonnes of shipping.
SYRIA
1 September Ile Rouad (Arwad Island), a small island off the Syrian coast, is occupied by French forces who hold it until 1920. The Island serves as a staging area and as a centre for gathering intelligence.
NEW ZEALAND
4 September News breaks in New Zealand of terrible casualties sustained at the Battle of Sari Bair. The article in the New Zealand Herald tells of the gallant role of New Zealand and Australian troops in their most ferocious battle to date, in which generals and colonels fought within the ranks as they and other Allied troops battled on in a pitched struggle against the Turks, one which saw them survive potential envolopment and reach the highest point yet attained on the peninsula.
MESOPOTAMIA
28th September Mesopotamian Campaign: The British inflict extraordinarily heavy casualties on Ottoman forces at the Battle of Es Sinn, south of Kut-al-Amarah, although the battle facilitated the capture of Kut, the Ottomans still withdrew in good order and proved themselves effective.
INDIA
5 September North West Frontier: Operations against the Mohmands, Bunerwals, and Swatis continue in the northern half of the Peshawar province. 10,000 tribesmen are defeated at Hafiz Kor.
www.britainatwar.com 59
Bofattle Britain
75th ANNIVERSARY 1940-2015
TANGMERE’S
‘FEW’
To commemorate the 75th Anniversary of the Battle of Britain we take a detailed look at the casualties at one of the most famous airfields of Fighter Command during 1940, RAF Tangmere, and the devastating attack by Junkers 87 ‘Stuka’ dive bombers on 16 August 1940. www.britainatwar.com 65
TANGMERE'S 'FEW' Battle of Britain - 1940 BELOW: Smoke rises from RAF Tangmere after the Stuka divebombing attack on 16 August 1940.
The Casualties V
ISITORS TO the picturesque church of St Andrew’s, Tangmere, might well expect that of the thirtynine British and Commonwealth World War Two air force burials in the churchyard, many would be casualties of the Battle of Britain given the proximity to nearby RAF Tangmere and its prominent role in that battle. In fact, only eight of the burials are pilots or aircrew associated with the official period of the Battle of Britain and nine of the others are ground crew killed during that same period. Of the latter group, all nine were casualties of the devastating raid by Ju 87 Stukas against Tangmere on 16 August 1940 although two other ground crew casualties from that raid are buried elsewhere and away from Tangmere. In fact, many of the RAF pilots and aircrew killed
66 www.britainatwar.com
in 1940 and buried at St Andrew’s have no connection whatsoever with the RAF stations at Tangmere, its satellite at nearby Westhampnett or any of their squadrons. So why are they buried here? Equally, the RAF burials are side-by-side with a row of Luftwaffe burials, many from the Battle of Britain, and when most of the German burials in Britain were removed to Cannock Chase German Military Cemetery during the 1960s, those at Tangmere remained. In this special Battle of Britain supplement we examine the background to the RAF and German burials at St Andrew’s Churchyard and look at the human stories behind the Battle of Britain period grave markers, thus putting faces and stories to the names on the stones. When personnel with British and Commonwealth forces lost their lives on active service (whether through combat, accident, illness or natural
causes etc.) within the British Isles it was policy to offer next-of-kin the opportunity to have the body of the deceased returned home for burial. However, this was not an option in the case of Commonwealth nationals who had died on active service in the British Isles and, equally, it was not an option to have the bodies of British nationals returned home if they had died overseas. Clearly, a rigid policy of non-repatriation had to be adhered to and it is against this background that we look in some detail at the Tangmere burials.
CASUALTIES ON THE GROUND
Alphabetically, the first two casualties in the Tangmere war burial register are LAC Percy Clarence Anscombe and AC2 Richard Ernest Austin. Both men were killed on the ground at RAF Tangmere on 16 August 1940 and whilst they have a direct link to
TANGMERE'S 'FEW' Battle of Britain - 1940 BELOW: An Army officer surveys the scene as smoke rises from burning and wrecked hangars after the 16 August 1940 attack.
(ALL PHOTOGRAPHS VIA ANDY SAUNDERS & ROBYN SAUNDERS UNLESS CREDITED OTHERWISE)
the RAF station they have no local links whatsoever - although Percy Anscombe did hail from Henfield in West Sussex, not very many miles distant. Of the other seven ground crew casualties from 16 August 1940 buried at Tangmere none of them had any local family connections either. However, and whilst all of the families concerned would have had an option to have their loved ones returned home, the majority of those affected by that raid chose to have them buried together near their base. Having served together and died together the families clearly felt that they should be buried together and thus all nine were interred in adjacent graves and given funerals with full military honours. The other two, AC2 Arthur William Collins and AC2 Jonathan Sheasby, were taken to their home towns for burial. Whilst dealing with the casualties from this attack, however, it would be wrong to ignore the civilian deaths that also resulted; Henry Ayling, Alfred Quinnell and Alfred Softley were all non-service personnel killed that day at Tangmere although none are buried at St Andrew’s.
www.britainatwar.com 67
war. Commissioned as a Pilot Officer on 26 September 1939, Burton was eventually posted to 249 Sqn on 20 July 1940 and it was whilst with that squadron that he lost his life in action over East Sussex on 27 September. In hot pursuit of a Me 110 of V(Z)./LG1, flown by the Gruppen Kommodore Hauptmann Horst Liensberger, Burton’s Hurricane collided with the Messerschmitt at low level and both aircraft crashed resulting in the deaths of the two German crew and Percy Burton. Exactly what happened in those final moments of combat is unclear, although local evidence pointed to a deliberate act of ramming on the part
PILOT OFFICER
PERCIVAL ROSS-FRAMES FRAMES BURTON F BELOW: Pilot Officer Burton's wings.
LYING OFFICER Percival Ross-Frames Burton was killed in action as a Hurricane pilot with 249 Sqn on 27 September 1940. A native of South Africa, Burton could clearly not be returned home for burial after his death in a mid-air collision with a Messerschmitt 110 above Hailsham in East Sussex, and whilst Tangmere had no connection at all with 249 Sqn this was the nearest RAF service burial plot he could be taken to. Hence, his grave here. (Note: The Commonwealth War Graves Commission incorrectly name him as Ross-Frances Burton) Percy Burton had been born in Cape Town on 6 June 1917 and had served with the South African Coast Garrison from 1935 to 1937 but had left by 1938 to travel to Britain to study at Oxford University. Here, he joined the Oxford University Air Squadron and it was only natural that he should enlist in the Royal Air Force upon the outbreak of
68 www.britainatwar.com
of the South African pilot who was evidently determined to bring down his foe. Certainly, the local Civil Defence chief felt there to be sufficient evidence for a deliberate and heroic act and duly wrote to the Air Officer Commanding 11 Group
(Air Marshal Keith Park) with witness statements and duly received a reply stating that the young pilot would be recommended for a posthumous gallantry decoration. Given that the only option for a posthumous gallantry decoration is the Victoria Cross it would not be unreasonable to suppose that, initially at least, Burton had been recommended for the supreme award for valour. Whatever the intentions of the AOC 11 Group may have been, Burton’s gallantry went unrecognised despite written assurances at the time. Maybe there was insufficient evidence to ultimately warrant any such award, or maybe it was the case that the award of a Victoria Cross to Burton’s squadron colleague, Flt Lt James Nicolson, made the option of a second such award to the same squadron almost within a month simply too problematic. Either way, Percy Burton was a hero of the Battle of Britain who now lies in the company of other heroes.
FLYING OFFICER
IVOR BENISON DIFFORD F
ELLOW SOUTH African, Flying Officer Ivor Benison Difford, is the next name we come to in our tribute to ‘Tangmere’s Few’ and in the case of Difford we do indeed find a direct Tangmere connection. Briefly, the Operations Record Book for the Tangmere based 607 Squadron tells the story:
‘7 October 1940. (Fourth sortie) Eleven aircraft led by Flt Lt Bazin. 15.30 to 16.55 hours. Nothing seen. Plt Off [sic] Difford and Plt Off Scott collided in mid air. Plt Off Scott baled out and returned to base from Slindon. Plt Off Difford was killed.’ By coincidence, both Ivor Difford and Percy Burton had attended the same school (Bishops, at Rondebosch in South Africa) and it is inevitable that their paths must have crossed during their pre air force days. The pair were little over nine months apart in age (Ivor being born on 7 September 1916) and although they could not have known each other during their RAF service both men now lie buried almost side by side, thousands of miles from home, and both having died as the result of mid air collisions over Sussex. Having been commissioned on 5 July 1937, Difford was initially posted overseas to 4 Flying Training School, Habaniya, and from here to the Station Flight, Kai-Tak, Hong Kong. With war looming he returned to Britain and sent to No 1 RAF
Depot, Uxbridge, on 31 July 1940 before posting to 6 Operational Training Unit at Sutton Bridge on 11 September 1940. From here he joined 85 Squadron as a Hurricane pilot at Church Fenton on 21 September but was transferred to 607 Squadron at Tangmere with a posting effective on 1 October. Just one week later Ivor Difford was killed on active service. Exactly what the circumstances of Difford’s death were it is now difficult to ascertain and some confusion exists in contemporary records (not least the incorrect rank for Difford entered in the squadron records) although local police air raid reports state that the collision happened at 15.45 with Difford’s aeroplane falling at Hodsleigh Meadow, Eartham, and Scott’s aeroplane at Leas Farm, Slindon. Although other published sources state that Ivor Difford was flying L1728 and Scott P3860, the police records indicate that the aircraft serial numbers have been transposed with Difford in P3860 and vice-versa. Equally, records from the local undertaker state that Ivor Difford died in the Sussex County Hospital, Chichester, whilst his death certificate states the place of death to be Eartham. To add yet more confusion, his Death Certificate quotes 9 October 1940 as the date of death although we know it was certainly the 7th. Quite possibly Difford was at first taken to the hospital mortuary by the First Aid Party and ambulance that we know had been dispatched from Chichester and this may well explain why the undertakers
thought that he had died there. As if all of this is not confusion enough, the undertaker further states that Ivor Difford was then taken to Brighton Crematorium for cremation. If this is correct then we can only conclude that his cremated remains were then returned to Tangmere for burial. On balance, we are able to conclude that Ivor Difford died on 7 October 1940, certainly in the parish of Eartham, and (probably) whilst flying Hurricane P3860. Sometimes, establishing the true facts when there is a mass of conflicting evidence can be somewhat challenging. This is one such case. Today, he lies buried in Row 2, Grave 449, at St Andrew’s, Tangmere.
BELOW: Hurricane L1728 photographed after a landing mishap with 43 Sqn in May 1940 when flown by Plt Off Oelofse (see also page 84) was transferred to 607 Sqn and was involved in the mid-air collision on 7 October which claimed Ivor Difford’s life.
www.britainatwar.com 69
and killed on the Isle of Wight and Sgt Little (Green 1) and Plt Off Harrison (Red 3) being posted missing. Whilst the sea never gave up the body of Ronald Little, the body of Harrison was washed ashore at Brighton on 10 October 1940. Born on 10 June 1911 at Sidcup in Kent David Harrison had only been an operational pilot since 12 September as the squadron record noted: ‘Plt Off D S Harrison had been with the squadron only since 12 September. He was a VR who had graduated through the rank from Sgt Pilot. His quiet and equable temperament gave promise of sound and useful performance to come and his loss is greatly to be deplored.’ Recorded as the son of Gerald and Lizzie Harrison of St Leonards-onSea, Sussex, the 29 year old pilot now rests in Row 1, Grave 482, Tangmere Churchyard.
TOP LEFT: This wallet with its poignant and water damaged contents and identity disc were found in David Harrison’s pocket when his body was washed ashore at Brighton on 10 October 1940.
F
OR VISITORS to St Andrew’s Churchyard, the grave of Pilot Officer David Stewart Harrison stands out amongst all of the other war graves at Tangmere in that it is the only one with a private headstone of grey granite rather than the uniform CWGC marker of Portland Stone. Again, Harrison is a Battle of Britain pilot with no Tangmere or local connection and was serving as a Hurricane pilot with 238 Squadron at Middle Wallop at the time of his death on 28 September 1940.
PILOT OFFICER
Once again, we can turn to the operational records for 238 Squadron for details concerning his death. Here, we discover that Squadron Leader Harold Fenton led twelve aircraft off at 14.23 hours to patrol Southampton at 15,000ft when twenty five Me 110s were seen at 22,000ft east of the Isle of Wight. As the squadron closed to attack the Me 110s they were ‘bounced’ by fifteen Me 109s that had been about three hundred feet higher and attacked the Hurricanes out of the sun. Driven away from the Me 110s, and forced to split up, the Hurricanes fared badly in the assault with Sgt Bann (Yellow 3) being shot down
DAVID STEWART HARRISON 70 www.britainatwar.com
SGT
CHARLES JULIUS HOLLAND W 'he might HILST SGT Charles Julius Holland was not technically one of Churchill’s 'Few’ he was nonetheless a casualty during the official period of the Battle of Britain and was flying as Observer on board Blenheim L9414 of 107 Squadron (RAF Bomber Command) which had taken off from RAF Wattisham at 21.45 on 23 July 1940 as part of a force of nine aircraft tasked to attack French aerodromes. Quite what it was that caused the loss of L9414 and her crew is not known, save to say that the aircraft crashed into the English Channel. Of the crew comprising Plt Off B G A Watson, Sgt W P Heney and Sgt C J Holland only the body of the latter was recovered with Watson and Heney remaining unaccounted for and commemorated by name on the Runnymede Memorial. It must be concluded that the aircraft went down in the English Channel as the body of Charles Holland was eventually washed up on the beach at Littlehampton and he was taken for burial at Tangmere. Just nineteen years old, Charles Holland was a native of Bangor, Northern Island, and had been a friend and contemporary of one Ian Paisley, famous in the more recent years of Northern Ireland’s troubled history. Had he survived the war, who knows what similar fame might have lain
have made a name for himself in literary circles if his life had not been cut short.’
in store for Charles Holland? Indeed, a newspaper obituary noted: ‘The deceased airman was gifted with a distinct literary ability and it is possible that he might have made a name for himself in literary circles if his life had not been cut short.’ Sgt Charles Holland was not one of that elite band of fighter pilots and aircrew who were recognised as participants in the Battle of Britain – a distinction reserved solely for the qualifying aircrew of RAF Fighter Command. Thus, he was not a recipient of the Battle of Britain Clasp to the 1939 – 45 Star. And yet Charles Holland did serve and make the supreme sacrifice during the official period of the Battle of Britain as one of
‘the other few’. Worth remembering, though, that in his famous “Never in the field of human conflict…” speech Winston Churchill heaped praise upon the airmen of Fighter and Bomber Command alike. It was not just Fighter Command who were singled out for praise, and in fact it is worthy of note that in that famous speech to the House of Commons on 20 August 1940, Churchill heaped more speciic praise on the efforts of Bomber Command than he did on the RAF’s fighter pilots. To the latter, of course, went the glory. But men like Charles Holland played an equally vital part in the desperate efforts to thwart German invasion plans and often paid a terribly heavy price.
LEFT: The inscription on Sgt Holland's grave reads 'He wrote: What greater cause is there than that of right, freedom and God.'
www.britainatwar.com 71
SQUADRON LEADER
CAESAR BARRAND HULL I TOP RIGHT: This photo was taken at Tangmere just hours before Hull (seated far right) was killed in action on 7 September 1940 together with Flt Lt ‘Dickie’ Reynell, seated next to him.
BOTTOM LEFT: A 1940 scrapbook cutting relating to Caesar Hull.
T IS yet another South African whom we find next on the list; Sqn Ldr Caesar Barrand Hull, DFC, Commanding Officer of 43 Squadron ‘The Fighting Cocks’ and a pilot with very definite Tangmere connections. Caesar Hull was born in Shangani, Southern Rhodesia (now Zimbabwe) on 23 February 1913 although the family had moved to Transvaal, South Africa, by 1918 and Caesar had become a citizen of that country. Since he did not speak Afrikaans, Hull was not accepted by the South African Air Force and so travelled to Britain to join the RAF. After completion of training, Hull joined 43 Squadron at Tangmere on 5 August 1936 as a Pilot Officer flying Hawker Furies and he remained with that squadron up until 9 May 1940 (by now flying Hurricanes) when he was posted to 263 Squadron
and sent to Norway as a Gladiator pilot. Collecting a ‘bag’ of damaged, probably destroyed and destroyed enemy aircraft in Norway he was wounded in action on 27 May and sent home to Britain on a Sunderland flying-boat to recover, being awarded the DFC on 21 June 1940. When the CO of 43 Squadron, Sqn Ldr J V C ‘Tubby’ Badger, was shot down and grievously wounded on 30 August 1940, Hull was posted back to his old squadron to take command on 31 August. Still a Flight Lieutenant, Hull continued to run up an impressive tally of victories and a few days later he wrote home: ‘I got my first Me 109 yesterday morning, as you will probably have heard by now. I got his engine, and followed him down until he crashed in a small field. The machine broke up completely, but I saw the pilot being helped away by a couple of farm hands. I don’t know how he got out of it, but he did.’ The lucky pilot was Uffz von Stein of 4./JG2 who put his crippled Messerschmitt down near West Hythe, Kent, on 2 September 1940, although by the time Hull’s family were reading of the event he was already dead. Leading 43 Squadron on 7 September 1940 he took the Hurricanes in to attack a formation of Dornier 17s escorted by Me 109s to the south of London in what were the first mass attacks against the capital and the start of ‘The Blitz’. Somewhere near Croydon he was attacked and shot down by the escorting Messerschmitts and his Hurricane dived into the ground at Purley High School, impacting close by the entrance to an air raid shelter. So intense was the fire, and so badly shattered was the wreckage, that Hull’s body could only be identified from the numbers on his aircraft’s machine guns. Today, he lies buried in Row 1, Grave 477 at St Andrew’s.
72 www.britainatwar.com
PILOT OFFICER
RICHARD RALPH HUTLEY T HE GRAVE of Pilot Officer Richard Ralph Hutley is also that of a Tangmere pilot and it hides the story of yet another airman blessed with literary skills. Battle of Britain pilot Duncan Smith (father of Government Minister Ian Duncan Smith) was a special friend of Dick Hutley and he wrote fondly about the 27 year old pilot: ‘Ralph Hutley was a particular friend. Clever, he wrote poetry and possessed a sharp sense of humour that tended at times to be sardonic if the company was not to his liking. He rather despised the middle-class to which he owed
his upbringing and education, believing that war, with its wanton loss of life, to be an offence to common sense. ‘We’ll be at war in weeks rather than months’ he had said, ‘Let’s become fighter pilots, learn skills to engage in man-to-man combat – clean honest-to-goodness stuff. Kill the other fellow or be killed but, pray God, not as a bomber pilot working out how to blast unseen people to smithereens on the ground. I couldn’t live with that. No thank you. I will fly Hurricanes or Spitfires.’ In the event, Dick Hutley (Ralph to his fellow pilots) was posted to 32 Squadron at Acklington, flying Hurricanes, direct from 6 Operational Training Unit on 21 September 1940. By 26 October he had been posted south to 213 Squadron (another Hurricane squadron) at RAF Tangmere and it was from here, on 29 October, that he was shot down during an engagement over Selsey Bill at around 14.20 hours, his aircraft falling to earth at North Common Farm, Selsey, while Hutley himself drifted down to land in the sea. He was eventually rescued by the Selsey lifeboat and brought ashore there later that afternoon where he was taken to “Redhatch”, the Selsey Bill home of
Vera Buxton-Knight the local ARP Casualty Officer. Hutley was dressed in warm dry clothes by Vera’s fire as desperate attempts were made to revive him – sadly to no avail. When Duncan Smith was told the news he wrote: ‘When I heard of his death I felt a great emptiness. By then I had learned many things, except how to bear the first personal scar of war.’ For the Hutley family, too, the scars were deep. After the blow of the dreadful official telegram announcing his death came the shock of getting a letter from Richard which dropped onto his parent’s doormat the very next day. It was post-marked Chichester, and had been posted at 11.45 am on the morning of 29 October – the day he had been killed. In what was a chatty and newsy kind of letter he spoke of taking a WAAF out to the cinema the previous evening. Sadly, there was no second date. Laid to rest by his fellow officers, Dick Hutley was the last casualty from the Battle of Britain period to be buried in St Andrew’s churchyard.
TOP RIGHT: The touching letter from the ARP worker who tended Dick Hutley at his death. ABOVE: The telegram informing his parents he had been killed.
www.britainatwar.com 73
SGT
MERVYN SPRAGUE O MAIN PICTURE: Sgt Pilot Mervyn Sprague marries his sweetheart, Mollie, on 15 June 1940. She hardly saw him again before being widowed on 11 September.
BOTTOM LEFT: A Spitfire of 602 Sqn awaits the next ‘Scramble’ at RAF West Westhampmett, Autumn 1940.
LDER THAN most of his fellow pilots, and born in Richmond, Surrey, on 27 May 1910, Mervyn Sprague had been in the RAF Volunteer Reserve since 1935, learnt to fly in 1938 and was called to full time service on 1 September 1939 before eventually joining 602 Squadron on 18 June 1940. Three days earlier, and no doubt mindful of the fragility of life during wartime, Mervyn married his fiancé, Mary (Mollie) Cumming, who was destined to be a tragic widow inside of four short months. Sent south from RAF Drem in Scotland, to Tangmere’s satellite airfield at Westhampnett on 13 August, 1940, 602 Squadron were literally flying into the thick of it and, a few days later, Mervyn was writing home to his Mollie with what would be his last letter home on 17 August 1940. In it, Mervyn told of the attacks on Tangmere the previous day. Although he had not flown in that action, he had a colourful tale to tell: ‘RAF Westhampnett, Chichester, Sussex. My Dearest Mollie, I am writing this in case I do not manage to get home tomorrow. The above is my correct address. Well Darling, we had lots of fun down here yesterday. It started at about 12.45. We of course knew there was a raid coming in but our squadron had not then received orders to take off. The order came through for all personnel to take cover and about thirty seconds later there was a big bang from the direction of Tangmere. We looked up and the
74 www.britainatwar.com
whole sky over the aerodrome there seemed to be full of dive bombers. Our fellows then had orders to take off. Then followed a very hectic two minutes while the bombers unloaded their cargo and made off out to sea. By this time there were clouds of smoke and flame coming from Tangmere and the sky was simply full of Hurricanes and Spitfires. We saw one or two scraps with apparently no decisive result and then most of them were out of sight. We heard the machine guns going all above the clouds. One of our Spits came back with a long trail of smoke behind it and managed to land on our field. A few seconds later
it was blazing away fiercely. The pilot got out as soon as he landed and was quite unhurt. [Pilot Oicer H W Moody of 602 Sqn in Spitire P9463: Editor] A few minutes later a Junkers 87 came diving through the clouds. I think he had been hit by one of our blokes up above. When below clouds he levelled out, but there were about a dozen Hurricanes after him in full cry. The leader got in a short burst at him and he went into an almost vertical dive and hit the ground with a tremendous crash about two miles away. Then a Dornier [sic.] came spinning through the clouds just behind us. The Hurricanes patrolling Tangmere then seemed to be after vsomething but we
could not be sure from where we were what it was. However it came down in a spiral with ever increasing velocity and hit the ground with a terrific explosion and a sheet of flame. The excitement lasted over two hours and as soon as our fellows landed they refuelled and rearmed and took off again because there were hundreds of bombers proceeding northwards above cloud. As we are equipped with Spitfires we have to do the high altitude stuff and tackle the escorting fighters. We accounted for about ten all told today. Two of our machines were written off without injury to the pilots, another had a shell hole in a wing which will need a lot of patching up. One was damaged badly over at Tangmere where it had gone with two others for some maintenance work. Two others were slightly damaged. So we lost quite a lot yesterday. I was wakened at 5 o’clock this morning and had to go over to Tangmere to fetch a new Spitfire. I imagined the place to have been pretty well smashed up but what I saw amazed me. Nearly all the hangars were completely wrecked
and the whole place is in a terrible state. Don’t let this go any further, by the way. I am now going to have dinner (if it is edible, which I very much doubt) and hope to be flying in a section this afternoon. I am hoping that I will have told you all of this news darling before this letter reaches you, but I am not counting on it too much. I love you so very much my darling, and I always shall. Mervyn.’ (Writing of those times in 1987, Mollie said: ‘After the day Tangmere was bombed there was a rumour his squadron would return to Drem and he hoped for ive days of. But that was not to be. I heard from him
on the phone about being shot down the irst time, but I didn’t see him again. I was an ARP ambulance driver at Northwood, Middlesex, and I wish I had chucked the ARP once I got married. I didn’t like to have any extra time of, but life was very serious then. I wish I’d seen him again. It is hard not to be illed with remorse.’) By 11 September the squadron only had available eight serviceable Spitfires when they were scrambled from Westhampnett at 15.42 hours to intercept a formation of 20 to 30 Dornier 17s escorted by similar numbers of Me 110s and Me 109s. Albeit that the eight Spitfires engaged the enemy formations along with the Hurricanes of 213 Squadron, the odds were still heavily stacked against the RAF fighters. Shortly after encountering the enemy off the Sussex coast Sgt Sprague’s Spitfire, N3282, was sent plunging into the English Channel. Although Mervyn was reported missing, Mollie remained ever hopeful of his safe return. After all, he had once before been shot down into the sea off Portland on 25 August and was rescued that time, unharmed. In any case, she could not believe that anything would
happen to him and each day she waited in vain at Westhampnett for news of his safe return. Squadron Leader A V R “Sandy” Johnstone, 602 Squadron’s CO, recalled her anguish in his diary on 4 October 1940: ‘Mrs Sprague. The poor soul sits in her car for hours just gazing towards the ‘B’ Flight huts as if willing her husband to walk through the door. It is really tragic for all of us, for there is still no news of her husband. We fear he must have come down in the sea. Alas, I cannot offer much comfort and I find the whole thing deeply distressing.’ Sgt Sprague had indeed been shot down into the sea as Johnstone feared, and, a few days after his CO’s harrowing diary entry, Mervyn’s body was washed up onto the beach at Brighton on 9 October. The young pilot could finally be buried by his squadron comrades who laid him to rest in Row 2, Grave 481 at Tangmere Churchyard on 14 October at a ceremony officiated over by Padre Hearn. Broken by grief, Mollie could still not believe it. Her last attendance at church had been for her own wedding. Now, she was attending her husband’s funeral.
TOP LEFT: Plt Off Nigel Rose of 602 Sqn was wounded in the battle in which Mervyn Sprague was killed, although went on to survive the war. TOP RIGHT: Sgt Douglas Elcome in his Spitfire 'Goofy'. ABOVE: No.5 Course, 14 Flying Training School, Cranfield. Sgt Sprague, 3rd from right, back row. On his right is his friend Sgt D W Elcome, who was killed with 602 Sqn on 26 October 1940.
www.britainatwar.com 75
MAIN IMAGE: Pilot Officer ‘Billy’ Fiske, 601 Sqn, 1940. CENTRE: ‘Billy’ Fiske’s US Passport with its endorsement instructing there to be no authority to join foreign military forces.
A
LTHOUGH NOT one of the casualties buried at St Andrew’s, Pilot Officer ‘Billy’ Fiske is, arguably, one of Tangmere’s most famous casualties and no account of ‘Tangmere’s Few’ would be complete without his story which is inextricably linked to exceptional bravery on the ground by RAF personnel that would see the award of two Military Medals and one Military Cross. Despite the outstanding behaviour of two airmen and one officer, this all proved sadly
insufficient to save the life of Billy Fiske who became the first American to die in the service of the RAF. William Meade Lindsley Fiske III was born in Chicago, Illinois, on 4 June, 1911, to financier William Fiske and his wife Beulah. The Fiske family had emigrated from Suffolk in the 17th century and thus had strong links with England. A privileged childhood saw him schooled privately in the USA and France where Billy grew to love the European winters and all they could offer and before long he was a
PLAYBOY IMAGE
fearless, worldclass skier. Before long, though, he had progressed to bob-sleighing. At sixteen he drove one of the two American bobs in the winter Olympics at St Moritz, and took his team on to win as the youngest Winter Olympic contestant to win Gold. After schooling, Fiske won a place at Trinity College, Cambridge, to read history and economics.
After university, Fiske worked in banking but sports on the slopes still called, although he flatly refused to enter the 1936 winter Olympics in Germany. Billy soon acquired his pilots ‘A’ Licence after learning to fly in the Home Countries, and is said to have been a natural pilot. Speed remained the drug that Fiske craved, and he raced his Stutz car in the 1930 Le Mans 24-Hour event to complete the playboy image that had inevitably grown up around him. Certainly, Fiske had it all: good looks, money, fame, fast cars, girls, and an infectious personality. In 1938 he met Rose Bingham, the former Countess of Warwick, and in September of that same year they were married in Maidenhead before returning to America. Not wishing to be left out of the war, Fiske investigated how he might get to England to join up but was discovered that, upon declaration of war, it would be impossible to obtain a visa for England. Impulsively, he left at once
PILOT OFFICER
‘BILLY’ FISKE AND THE ATTACK ON TANGMERE 76 www.britainatwar.com
‘He was the best pilot I’ve ever known. It was unbelievable how good he was, and how fast he picked it up.’ and arrived in Britain on 9 September, just six days after the war had begun. In his diary, Fiske wrote of his new adventure and of his burning desire to join the RAF. ‘I believe I can lay claim to being the first US citizen to join the RAF in England after the outbreak of hostilities. I don’t say this with any particular pride, except perhaps insofar as my conscience is clear, but only because it probably has some bearing on my course of my career. The reasons for joining the fray are my own.’
and, suffice to say, strings were pulled and wheels oiled to enable Fiske to enlist on 18 September. At this period, the official view in England was that it was not yet in the interests of the RAF to enlist American citizens and the oicial American viewpoint was that it was strictly illegal. Posted to No 10 Elementary Flying Training School (EFTS) at Calne, Wiltshire, for training on Tiger Moths, already with ninety hours of flying time to his credit. From 10 EFTS he went to No 2 Flying Training School (FTS), Brize Norton, STRINGS PULLED Oxfordshire, on 20 March, 1940, and His connections in high places paid off three days later he was granted his almost at once and he was invited to commission as Acting Pilot Officer. At lunch at the Savoy with the son of Lord Brize Norton he flew Harvards, gaining Bledisloe where he found that his lunch experience for the first time on highcompanion was an AAF pilot who had performance aircraft. also brought along a friend from the Air By 10 July, 1940, the Battle of Britain Ministry. He was soon fixed up with was underway, and on the 12th Billy had completed his training. That day he an interview with someone he would rang his friend Flt Lt Archibald Hope, describe as ‘a very senior RAF Officer’. There is a reason to suppose that Billy’s commanding ‘A’ Flight of 601 Sqn at RAF Tangmere, flying Hurricanes. contact was a Gp Capt William Elliot
He could not endure the prospect of waiting further time at an OTU. ‘Stay where you are’, Hope told him. ‘Say nothing to anybody about postings. We’ll fly up and get you!’ Later that day, Plt Off William Fiske 78092 formally became part of the establishment of 601 Sqn in what may well have been the most unorthodox posting of a RAF officer ever undertaken. With no experience on Hurricanes, it might be thought that Billy’s impetuosity could only spell disaster. The life expectancy of properly trained and experienced pilots was not high, and so the odds were stacked against him. Later, Sir Archibald Hope, Bt, recalled: ‘He was the best pilot I’ve ever known. It was unbelievable how good he was, and how fast he picked it up.’ Billy felt that he had been infused with the lifeblood he needed; speed, danger, purpose and his friends around him. To his wife Rose, he said: ‘Life has never seemed so good’. Sadly, life would also be very short.
ABOVE: A Hurricane of 601 Sqn at RAF Tangmere, summer 1940. BELOW: At RAF Brize Norton, 'Billy' Fiske first got his hands on a highperformance aircraft, the North American Harvard.
www.britainatwar.com 77
TOP LEFT: HRH The Duke of Kent visits 601 Sqn's dispersal hut on 22 August 1940 to express his condolences. With him is the Station CO, Gp Capt J A Boret OBE MC AFC. ABOVE: Hurricanes of 601 Sqn being refuelled at Tangmere, 1940.
The day after his arrival at RAF Tangmere he had his first flight in a Hurricane, but managed to burst a tyre on landing. From 14 to 19 July he made nine practice flights before flying his first operational patrol on the 20th. Up for a mere 20 minutes in Hurricane UF-M on July 20, he wrote in his logbook: ‘Saw men picking teeth in Cherbourg!’ This, then, was the colourful character who would lose his life after being caught up in the attack on RAF Tangmere.
ATTACK ON TANGMERE
Long before the Junkers 87 formation was plotted in-bound to the south coast at lunchtime on 16 August 1940, the Hurricanes of 601 Squadron had
78 www.britainatwar.com
already been airborne and busy that day, but at 12.25 hrs the squadron was scrambled to patrol base and then ordered to climb to around 20,000ft, apparently with Archie Hope leading. Fiske was again in UF-H, P3358. After being airborne for a while the squadron was vectored towards Bembridge before being given a steer back to Tangmere again. As they approached they saw large numbers of Ju 87s below them to the south at 12,000ft and heading toward their home airfield. However, the Controller warned of the danger of fighters above and told the unit to maintain height. After the war, Archie Hope recalled this sortie and said: ‘Although the Controller ordered otherwise I decided to go down to attack the Stukas when I saw them go into their dives, but we were by then too late to do anything about it. The bombs were falling already, and it was impossible to get the Stukas in their dive. I recall seeing a bomb burst very close to my car on the ground at Tangmere, and this made me feel even more justified in my decision to defy the Controller!’
hits from their defensive fire. All we know for sure is that Fiske’s aircraft caught fire in the air; we do not know how. Was it simply that an in-flight accidental fire, unrelated to any combat action, had done the damage? The truth will probably remain unknown, but the timings seem to show that Fiske was actually on the ground before the Stuka bombs began to fall just a few moments after 13.00 hrs. A couple of minutes before that, the telephone had rung at the sick bay with the operations room requesting an ambulance to be sent at once onto the airfield for a pilot who had landed and needed assistance. At the double, Nursing Orderlies Cpl George Jones and AC2 Cyril Faulkner ran to their Albion ambulance and with ‘Bill’, their trusty civilian driver, made off around the eastern perimeter and then along the southern boundary. There, all hell broke loose. Faulkner takes up the story: ‘Suddenly, and without any warning at all, the airfield came under a divebombing attack and one of the bombs fell just twenty-five yards away from
Of the raiders, one bullet-riddled Stuka, with its dying crew on board, was sent crashing through trees at Bowley Farm, South Mundham. Another of the Tangmere raiders ended up in a road-side hedge at Selsey, and a funeral pyre rose for yet another wreck at Pagham.
us. A bit shaken, we pulled up for a few moments but then decided to carry on anyway to the Hurricane that was up against the western boundary. When we got there the pilot was still in the cockpit. It was Billy Fiske. For the life of me I cannot recall if the aeroplane was on its wheels or its belly, but the airfield was under attack and we got on the wing and managed to lift the pilot out on to the grass. The aeroplane was not burning, but the cockpit was badly damaged by the fire and the pilot was very seriously burned. We managed to get his flying helmet and his jacket off and covered him over. I can recall that he was conscious and talking to us, but not terribly coherently, although as we put him in the ambulance he looked
FIRE IN THE AIR
Meanwhile, Fiske was in serious trouble and heading back for the airfield. If the timings of events are accurate then it would seem likely that Fiske’s problems began before the squadron had got anywhere near to Stukas to engage them and it seems unlikely that he could have yet got sufficiently close the Stukas to take
back at his Hurricane and muttered ‘Goddam thing!’ - or something like that. When we returned to the sick bay we found that it had taken a direct hit, although Fg Off Willey, the Medical Officer (MO), was still there. He examined our injured pilot and said there was nothing he could do for him and told us to get him to hospital in Chichester at once, which we did. He died the next day. Afterwards, a personal wreath for Billy Fiske arrived at Tangmere from Prime Minister Winston Churchill.’
DIRECT HIT
Courtney Willey, the medical officer for 601 Sqn , also recalled the events of that dramatic day; ‘At about 13.00 hrs we got the order to take cover. I was the only MO in
the sick bay, and Jones and Faulkner had already gone off in the ambulance to collect an injured pilot. I suppose there were about twelve patients in the sick bay and I managed to get all of them into bomb-proof shelter we had, but unfortunately we also had the Airfield Defence Officer in. He was an ex-First World War chap and suffering from the DTs, and was prone to violence - so I couldn’t put him with the others. Instead, I stayed with him back in the sick bay. Suddenly the building got a direct hit from a 500lb bomb and was completely wrecked. The chap with the DTs was OK, but had had most of his clothes blown off. In fact, I think it sobered him up a little bit! I was buried up to my waist in rubble, but after a bit of a struggle I managed to scramble out.
Just then the ambulance arrived back at the demolished sick bay with Billy Fiske. I got in the back of the ambulance and lifted off the blanket and found he was charred black from the waist down. He was conscious and talking, but I gave a shot of morphine although I realised we had to get him to hospital. In any case, the sick bay was no longer there! Unfortunately, because of the bombing, all of the roads on the airfield were blocked and covered in debris so we couldn’t get him away for at least twenty minutes or so. I can remember a woman, a civilian not a WAAF, was sitting in the ambulance with him but I don’t know who she was or where she came from. Later, I heard that he had died in hospital. From a medical point of view, I was not entirely surprised.’
ABOVE: This Stuka, one of the Tangmere attackers, was shot down at Bowley Farm, South Mundham, by 601 Sqn. BELOW: Tangmere's hangars wrecked and ablaze on 16 August 1940. Fiske's Hurricane would been to the right of the photographer.
‘I can remember a woman, a civilian not a WAAF, was sitting in the ambulance with him but I don’t know who she was or where she came from.’
www.britainatwar.com 79
locally to meet in the Officer’s Mess at lunchtimes. Coincidentally, this was lunchtime. Either way, Fiske’s wife was certainly at his bedside in St Richard’s Hospital, Chichester, as he succumbed to his mortal wounds. In an adjacent ward was Billy Fiske’s good friend on the Squadron, ‘Mouse’ Cleaver, who had been shot down and blinded just the previous day. He recalled later. ‘On August 17 Rosie Fiske was brought to my room. My head was completely bandaged and I could see nothing. She came to my bedside and took my hand, and I could feel drops of some kind hitting my hand. She told me Billy was dead. I then realised that what I was feeling dropping onto my hand were her tears.’
‘AS PERKY AS HELL!’ ABOVE LEFT: Fg Off Courtney Willey MC. ABOVE RIGHT: AC2 Cyril Faulkner MM.
RESCUED DURING THE ATTACK
For their actions that day both Jones and Faulkner were awarded the Military Medal, a Military Cross going to Willey for staying at his post and rendering first aid despite having been injured, buried in rubble and suffering from shock. The testimonies of both Faulkner and Willey are significant in that they place Fiske already on the ground before the attack started, whereas all previously published accounts have him landing during or after the raid, which certainly does not appear to
80 www.britainatwar.com
be the case. Similarly, accounts of Fiske landing his ‘blazing aeroplane’ and then taxying into a bomb crater and the aircraft exploding are patently untrue.
MYSTERY WOMAN
Mystery also surrounds the identity of the woman that Willey recalls sitting with Fiske in the ambulance, but since Billy’s wife, Rose, lived very close to the airfield it is entirely likely that someone had called her there when it was known he was injured. Additionally, it was not uncommon for the officer’s wives who lived
Shock and disbelief gripped the remnants of 601 Sqn when they heard of Billy’s demise, for although the personal prognosis of MO Willey had not been good the pilots had clearly not expected his death. According to the death certificate, issued to 601 Sqn’s adjutant, Fg Off T.G. Waterlow, the cause was ‘Due to War Operations’. More specifically, thought, he died of medical shock arising from his severe burns, and Willey also recalled that he had suffered extensively from the inhalation of smoke and hot fumes. Nonetheless, the disbelief on the squadron was compounded by the fact that Archie Hope who visited Billy in
hospital on the evening of August 16 found him ‘…sitting up in bed and as perky as hell!’ Fiske was laid to rest in the churchyard of Sts. Mary & Blaise, Boxgrove Priory, just to the north of RAF Tangmere, at 14.30 hrs on Wednesday 20 August, 1940. The funeral, with an RAF band in the cortege, was attended by most of the pilots from the squadron who, with Billy’s widow, followed the coffin draped with the Union flag and Stars and Stripes into the ancient church. Listed prominently among the chief mourners was Gp Capt William Elliot; the same officer who had done so much to smooth Billy’s passage into the RAF. Appropriately, and just as the coffin was being lowered into the Sussex clay, a section of Hurricanes returned overhead to nearby RAF Westhampnett and Prime Minister Winston Churchill was getting to his feet in the House of Commons to deliver his famous speech, which included the immortal lines: “The gratitude of every home in our island, in our Empire, and indeed throughout the world, except in the abodes of the guilty, goes out to the British airmen who, undaunted by odds, un-wearied in their constant challenge and mortal danger, are turning the tide of war by their devotion. Never in the field of human conflict was so much owed by so many to so few.” That same day, the following obituary notice was posted in The Times by Lt-Col J.T.C. MooreBrabazon, MP, one of Billy’s pals from their St Moritz days: ‘A very gallant gentleman – ‘Billy’
Fiske – has given his life for us. As a racing motorist, as a bobsleigh rider, as a flyer he was well known, but as a ‘Cresta’ rider he was supreme. Taking some years to become first class, his fame eventually was legendary. No record he did not break, no race he did not win, he was the supreme artist of the run; never did he have a fall – he was in a class by himself. An American citizen, blessed with this world’s goods, of a family beloved by all who knew them, with a personal charm that made all worship him, he elected to join the Royal Air Force and fight our battles. We thank America for sending us the perfect sportsman. Many of us would have given our lives for ‘Billy’, instead he has given his for us. The memory of him will live long in the Alps, where he had his greatest success; in the hearts of his friends it will endure forever.’
HONOURS FOR BILLY
On 4 July, 1941, in the Crypt of St Paul’s Cathedral, a plaque in his memory was unveiled by Sir Archibald Sinclair, Minister for Air, in the presence of American Ambassador to London, Mr J.G. Winant. It was, indeed, a rare honour. Placed alongside the bust of George Washington it bore the inscription: ‘An American citizen who died that England might live’. Unfortunately, it incorrectly records his date of death as 18 August 1940, although he certainly died just the day after being injured. Aside from the plaque in St Paul’s Cathedral, the grass at Tangmere where Billy’s Hurricane slid to a halt is now covered by acres of greenhouses with no hint of what once happened
TOP LEFT: Boxgrove Priory decorated in 2002 for the dedication of 'Billy' Fiske's new headstone. LEFT: A magnificent stained glass window erected in recent years at Boxgrove Priory in 'Billy' Fiske's memory.
here. Just up the road at Boxgrove Priory his gravestone had been in a poor and rapidly deteriorating condition. A private headstone, as opposed to a Commonwealth War Graves Commission marker, it was replaced by an exact copy paid for by public subscription and re-dedicated in a ceremony on 23 September, 2002. Additionally, a magnificent stained glass window in his honour was erected in the Priory. As for Billy‘s Hurricane that day (P3358), author Tom Molson in ‘The Flying Sword’ (MacDonald, 1964), states that ‘within days’ it was repaired and back in service. Other published sources say it was repaired as a kind of ‘memorial’ to Fiske. Neither account is true; P3358 was immediately declared Category 3 (damaged beyond repair) and struck off charge. Truly, it may be said of Billy Fiske: ‘He died that England might live.’
BOTTOM LEFT (OPPOSITE PAGE): The funeral cortege for ‘Billy’ Fiske arrives at the gate of Boxgrove Priory, his Stars-andStripes draped coffin followed by fellow 601 Sqn pilots.
www.britainatwar.com 81
PILOT OFFICER TOP RIGHT: Pilots of 249 Sqn relax at their dispersal hut, summer 1940, with Plt Off Percy Burton standing with his back to the camera.
JAMES REGINALD BRYAN MEAKER I NEXTRICABLY LINKED to Plt Off P R-F Burton who lies buried at Tangmere, Plt Off Bryan Meaker is not interred here but, instead, lies buried a few miles to the north of Tangmere in the village of West Dean. Given his connection with Percy Burton, and his appearance on the cover of this special supplement, it is entirely appropriate to include him in these tribute pages. Additionally, and whilst he had no direct flying connection with Tangmere, he was a local man with his family living in the Chichester area. James Reginald Bryan Meaker was born in Kinsale, County Cork, on 19th January 1919. The family moved back to the UK when Eire became independent in 1922. After schooling at the Chichester High School, ‘Bryan’, as he preferred to be called, joined the editorial staff of the Chichester Observer and was in charge of their Midhurst district before joining the RAF on 26th June 1939 on a short service commission. By virtue of the fact that he had been born in what was a neutral country, he could have excused himself from service. Bryan was first posted to 46 Sqn and then to 263 Sqn on 4th May 1940. Shortly afterwards, the squadron sailed to Norway on HMS Furious. It was in Norway that Bryan Meaker received his
82 www.britainatwar.com
first award, the Caterpillar Badge, awarded for having his life saved by a parachute made by the Irvin Parachute Company. This occurred when he was flying a Gloster Gladiator and as the result of a mid-air collision. The squadron was withdrawn and Bryan returned to Britain by sea before joining 249 Sqn at Leconfield in June 1940. Plt Off Meaker was shot down at 10.50 hrs. on 27 September 1940 by return fire from a Junkers Ju 88 over Dallington, Sussex. As he baled-out of his stricken fighter he
struck the tailplane and tragically fell to his death. Police Constable 120 Phillip Latter of the East Sussex Constabulary wrote his report on 28 September as to the circumstances: ‘I beg to state that at 10.50 hrs. on the 27th September 1940, as a result of enemy action an RAF Hurricane plane bearing the following number, P3834, Hurricane PA15, dated 23.5.40, crashed in the Brake Field, Giffords Farm, Dallington and was completely smashed and burnt out. Upon my arrival I ascertained that the pilot was missing. I then instructed two Special Constables to guard the wreck and called out all the other available Special Constables and with the assistance of PC Marshall organised a search in fields and woods
in the vicinity. At 19.45 hrs. the same day we found the dead body of Pilot Officer J. R. Bryan MEAKER in the Warren Field, Brightling Park which is a distance of about 2 miles north of where Hurricane crashed. A few yards from the body I found an unopened parachute.’ ‘After obtaining permission from Mr T. P. Tew of Brightling Park we conveyed the body to Brightling Park stables and removed clothing etc. Deceased was carrying a leather wallet which contained identity discs with the following inscription thereon JRB. MEAKER, RAF 42514,OFFR, CofE.
Also an identity card with photograph attached which described him as Pilot Officer J R Bryan MEAKER of 249 Squadron, Leconfield. Also contained in wallet £4-10 in Bank of England notes, letters and various papers and photographs. The above described property was forwarded to Battle Police Station on 27.09.40 together with key to stable where body was placed. Further action regarding giving information to RAF etc. done from Battle Divisional Headquarters.’ He was twenty-one years old at the time of his death and had achieved ‘ace’ status as a fighter pilot. He is buried in West Dean Cemetery, West Sussex. Bryan’ Meaker was awarded the DFC on 25 September 1940. The citation read: ‘Pilot Officer Meaker has shot down at least five enemy aircraft and damaged others. Resolute in attack, with a calm determined temperament, his leadership has been an example to his squadron.’ In total, at the time of his death, Bryan Meaker was credited with seven enemy aircraft destroyed, one and a half probably destroyed and two damaged. He was photographed with his friend Plt Off Percy Burton by Royal photographer Cecil Beaton in what is now an iconic image of the Battle of Britain. Both men were killed in action just a few miles apart on 27 September 1940 and, brothers in arms, both lie buried just a few miles apart.
MIDDLE: Plt Off Meaker swigs Ginger Beer as he relaxes between sorties during the summer of 1940 with squadron Hurricanes in the background. TOP RIGHT: A painting by George Campbell of the iconic image taken by Cecil Beaton (see front cover of this supplement) depicting Bryan Meaker and Percy Burton. BELOW: The etched blade of Bryan Meaker’s RAF officer’s sword.
www.britainatwar.com 83
PILOT OFFICER
JOHANNES ROELEF STEPHANUS OELOFSE
TOP RIGHT: Johannes Oelofse’s old Potchefstroom School badge and letter to his old schoolmaster from his mother informing him that her son was still missing.
RIGHT Johannes Oelofse (seated right) balancing beer bottles at 43 Sqn's dispersal, Tangmere, August 1940.
A
S HIS name suggests, Pilot Officer Johannes Roelof Stephanus Oelofse was another South African, a pilot who served with 43 Squadron at Tangmere having joined the RAF on a short service commission during June 1939. Posted to the squadron on 8 February 1940 when they were based at Wick, Oelofse eventually moved south with ‘The Fighting Cocks’ when they were transferred to Tangmere. It was from here during actions over Convoy CW9 ‘Peewit’ that he was shot down into the sea off the Isle of Wight. Eventually, the body of Johannes Oelofse (‘Boet’ to friends and family) was washed up onto the beach at Worthing and although he was actually the first to die from amongst the group of South Africans who are buried at Tangmere, he was the last of them to be buried there. Writing on 19 October 1940 to his old schoolmaster, Mr J S T McGregor, his mother Hester made it clear that he had not yet been found and was then still missing in action.
84 www.britainatwar.com
Not long after his mother had written stating that no trace of him had been found, the sea delivered up his body well over two months after being shot down in the furious battles over the Channel on 8 August. In his short time on the squadron he had made his mark as 'likeable and fun loving boy, but one determined to get at the enemy.
BELOW: The Junkers 88 of 4./LG1 shot down at Great Ham Farm, Sidlesham, on 15 August 1940 and resulting in the death of Gefr. Wilhelm Rimek.
THE LUFTWAFFE CASUALTIES W
HILST THE foregoing are the stories of the Battle of Britain RAF casualties buried at Tangmere, they are only a percentage of the total number of airmen interred there. However, separated from the RAF casualties by just a narrow strip of turf are buried thirteen of their enemies – Luftwaffe airmen. They too have their own stories. Details relating to these thirteen airmen are known in varying degrees although one of them, buried here on 25 August 1940, remains unidentified. Of the other twelve, nine were casualties of the Battle of Britain whilst three others were crewmen from a Dornier 217 shot down at nearby Lagness on 10 February 1943.
LEFT: The He 111 of 2./KG55 shot down near Selsey on 11 July 1940 burns itself out on East Beach. Two of the crew lost their lives. Signed by captain of the aircraft, Oblt. Siegfried Schweinhagen.
UFFZ WILLI MÜLLER
The first enemy aircraft brought down in the county of Sussex was a He 111 of 2./KG55 which was shot down onto East Beach, Selsey, by Hurricanes of Westhampnett based 145 Squadron during the late afternoon of 11 July 1940 – the day after the official commencement of the battle. Two of the crew, Uffz Willi Müller and Oberfw Hans Schlüter, both died as a result of the crash and became the first enemy airmen to be buried at Tangmere. Müller had been killed in the air, but Schlüter was seriously wounded and died on the way to hospital. Both men were buried with full military honours by the RAF under swastika flag draped coffins.
ABOVE: One of the two casualties in the bomber was Uffz Willi Muller. One of his flying gloves was picked up on the beach later that day.
www.britainatwar.com 85
TOP LEFT: A German airman's last smoke. This cigarette packet with a single cigarette was picked up at Sidlesham after a Junkers 88 was shot down there on 13 August 1940. RIGHT: Hptm Alfons Scheuplein.
(TANGMERE MILITARY AVIATION MUSEUM)
BELOW: The original grave marker for Lt zur See Karl-Wilhelm Brikbaumer at Tangmere.
MASS OF FLAMES
The shooting down of another Junkers 88 on 13 August, this time from 8./ LG1, resulted in the deaths of all four crew members as the aircraft tore itself apart across several fields following attacks by Hurricanes of 257 Squadron whose Sgt A G Girdwood described “…as it touched the ground it exploded into a mass of flames.” Hptm Alfons Scheuplein, Lt-zur-See Karl-Wilhelm Brinkbaumer, Gefr Josef Dietl and Gefr Otto Roger were all laid to rest, side by side as a complete crew, in St Andrew’s churchyard. Post war, it emerged that Alfons Scheuplein had been a close personal friend of Count von Stauffenberg and Scheuplein’s widow, speaking in 1990, described how that her husband had been “antiNazi” to the extent she is sure that he would have
86 www.britainatwar.com
joined von Stauffenberg in his illfated plot to assassinate Hitler – a plot which resulted in the execution of von Stauffenberg. This surprising twist to the background of just one Battle of Britain casualty is a graphic illustration of the often incredible stories behind the individual names engraved on these headstones. Hptm Scheuplein’s widow, Frau Lore Scheuplein-Ley, later arranged for her ashes to be interred with her husband in his grave at Tangmere. As she explained in 1990, this was not just so that she could rest with her late husband but, she said, in recognition of her ‘solidarity with the British cause in 1940 and its spirit of determination to defeat the evil of Hitler.’ If Frau Scheuplein-Ley had cause to recognise her husband’s former enemies in this way, so too did the family of another of his crew, KarlWilhelm Brinkbaumer, a naval flier attached to the Luftwaffe. His family, like all the other Germans buried at Tangmere, received a photo card via the Red Cross during wartime enclosing a picture of his grave. Postwar, the family established close links with Tangmere church and some of the villagers to the extent that on his birthday, the anniversary of his death and at Christmas fresh flowers were placed on his grave.
FW WALTER BICKEL & HPTM AUGUST STRAUCH
The dramatic crash of a Junkers 88 of Stab.II./KG54 into Swanbourne Lake, Arundel, on 13 August 1940 after it had been engaged by Hurricanes of Tangmere’s 43 Squadron resulted in the horrible deaths of two of its crew of four with the wireless operator, Fw Walter Bickel, being entangled by his parachute on the tail-plane as he baled out and was then dragged to his death by the crashing bomber. His body, buried head first in the mud of the lake, was retrieved later that same day. The observer, Hptm August Strauch, baled out apparently at low altitude and suffered terrible injuries when he became impaled on a broken tree bough and he died in hospital two days later. Both men joined the crew of the Selsey Heinkel in being buried at Tangmere churchyard, although five other Luftwaffe airmen who had also died on 13 and 15 August were buried with them.
THE LAST
Last of the Battle of Britain casualties buried at Tangmere was Gefr Wilhelm Rimek, who had been killed in the air after an attack by Flt Lt S D Connors of 111 Squadron on 15 August. The aircraft, a Junkers 88 of 4./LG1, made an otherwise good belly landing at Great Ham Farm, Sidlesham, just yards away from where the Junkers 88 crash of 13 August 1940 had happened. All three of the other crew members were taken POW, although they could only say farewell to Wilhelm at the crash site and had to leave it to their enemies to afford him his funeral rites at Tangmere.
TOP LEFT: A box of confectionary recovered from one of the crew of the Junkers 88 downed at Sidlesham on 13 August. TOP RIGHT: A searchlight unit's 'scoreboard' with a tally of downed aircraft in the Tangmere area, including several of the Junkers 87 Stukas that attacked the airfield. LEFT: An unexploded bomb recovered from the wreckage of the Junkers 88 which fell in Swanbourne Lake, Arundel, on 13 August 1940. (TANGMERE
MILITARY AVIATION MUSEUM)
MIDDLE LEFT: Soldiers pick amongst the wreckage of the Junkers 88 at Swanbourne Lake. Two of the crew are buried at Tangmere.
www.britainatwar.com 87
ABOVE: The immaculately kept RAF and Commonwealth Air Forces graves at Tangmere Churchyard. RIGHT: 'Known Unto God' is the inscription on the grave of an unknown RAF airman at St Andrew's, Tangmere. BELOW: Between the British and the German graves stands this memorial to those whose only grave is '... the restless and eternal sea.'
V
ISITORS TO St Andrew’s, Tangmere, will not fail to be impressed by the immaculate way in which all of these graves are kept and the frequent appearance of flowers or wreaths on the graves – British and German. As regards to the German graves, it is important to note that the vast majority of such burials in the UK were moved during the 1960s to Cannock Chase German Military Cemetery. However, exceptions were made when such burials were within cemeteries or plots already maintained by the Commonwealth War Graves Commission as is the situation at Tangmere.
88 www.britainatwar.com
Finally, we must comment on the other RAF burials at Tangmere and in this plot thirty five (including one unidentified) are from the RAF, one from the RCAF and three from the RNZAF. However, there are also several post-war RAF graves including a number of more recent private burials of veterans who once served at Tangmere. Like their fallen comrades they have finally come home to rest here. The beautiful churchyard of St Andrew's, Tangmere, and the church itself, both provide a powerful and tangible reminder of the human cost of war and, specifically, the price of victory during the Battle of Britain.
THE ATTACK ON GPT RIDGE The Norfolks at Kohima, 1944 MAIN IMAGE: British soldiers search for Japanese snipers and bunkers in the long grass in July 1944, under the watchful eye of a covering Bren Gun team. (IWM IND 3479)
A
FTER SUFFERING the dreadful massacre at the hands of the SS at Le Paradis on 27 May 1940 (see Britain at War, Issue 97), the 2nd Royal Norfolks were rebuilt before undergoing more than three years of training. In 1944, they were in India as part of 4th Brigade, 2nd Division, when the Japanese launched their audacious assault on that jewel in the Imperial crown. After diversionary operations in the Arakan in February, the main Japanese Fifteenth Army attacks began in early March. Their 33rd Division attacked towards Tildum, the 15th Division thrust towards Imphal, while the 31st Division commanded by Lieutenant General Kotuku Sato was given the task of capturing Kohima and the major supply centre of Dimapur. The commander of the British Fourteenth Army, General Sir William Slim, ordered the creation of a defensive block around Imphal. However, he had not realised the serious nature of the Japanese threat to Kohima, which was only held by a scratch garrison force. The original defensive positions were located in several places: on IGH Ridge, Garrison Hill, the environs of the District Commissioner’s Bungalow, Kuki Picquet, FSD Hill, DIS Ridge, Jail Hill and GPT Ridge. First contacts came in the area of Aradura Spur on the evening of 3 April, but by 6 April the Japanese had already grasped control of GPT Ridge and Jail Hill. The situation was serious, and the British 2nd Division (4th, 5th and 6th Brigades) was ordered up to Kohima. With them went the 2nd Norfolks, who rushed to Dimapur, which they reached on 10 April 1944.
In the 1990s, the veterans of a fierce May 1944 jungle encounter with the Japanese described their experiences to IWM oral historian, Peter Hart. It is a visceral tale of close-quarter conflict in conditions that cruelly sapped both mind and body.
THE ATTACK O 90 www.britainatwar.com
THE ATTACK ON GPT RIDGE
The Norfolks at Kohima, 1944
ON GPT RIDGE www.britainatwar.com 91
THE ATTACK ON GPT RIDGE The Norfolks at Kohima, 1944
ABOVE: Naga villagers came into British positions away from the invading Japanese, later, many would assist Allied forces in their campaign. MIDDLE: An annotated photograph depiciting the lay of the land around GPT Ridge, which can be located in the centre of the photograph.
THE BRITISH TACTICS
By this time the situation on Kohima Ridge had further deteriorated. The Japanese had not only invested the Kohima garrison – such as it was – but also cut off 161st Brigade box centred on Jotsoma. Major-General John Grover, commanding the 2nd Division, despatched 5th Brigade to open the road to Jotsoma which it eventually succeeded in doing on 15 April. Meanwhile, on Kohima Ridge the Japanese had captured DIS Ridge, Kuki Picquet and FSD Hill. All that remained was Garrison Hill, the hotly disputed area around the DC’s bungalow, and IGH Spur. Although some British reinforcements from 6th Brigade managed to get through, the situation remained desperate. However the Japanese also had their problems because Lieutenant General Kotuku Sato was being pressed to send reinforcements to assist in the main battle for Imphal. After the failure of a final all-out attack on 23 April, the Japanese priority changed from capturing the rest of the Kohima Ridge to trying to preserve what they already had. Sato now considered it his primary role to prevent any Allied advance along the Kohima road to relieve the Imphal box. The initiative had clearly passed to the British. But was the 2nd Division strong enough to seize it? Grover reasoned that given the Japanese skill in constructing defensive positions, a frontal attack would be
92 www.britainatwar.com
suicidal. Instead he sought to move round the Japanese southern flank. The 4th Brigade, commanded by Brigadier William Goschen, were to launch a right hook via the Pulebadze Ridge, down on to Aradura Spur to cut the road linking Kohima to Imphal – directly across the Japanese lines of communication. Leading the way would be the 143rd Special Service Company, followed by the 2nd Norfolks and with the 1st Royal Scots bringing up the rear. The risks of this manoeuvre were obvious. The country was mountainous in the extreme with the Pulebadze Ridge rising to some 7,522 feet, its slopes slashed by steep gullies covered in thick jungle. It was hoped that the very unfeasibility of the operation would provide its own protection. Lieutenant Colonel Robert Scott, who would be commanding the 2nd Norfolks, was an intimidating character. He had served in the Great War and was a bull of a man, well over 6-foot tall, loud and abrasive, with a choleric temper. Yet for all that his men still found him an inspirational figure. Certainly the sudden orders to march “into the green” did not seem to faze him – as his signal officer, Lieutenant Sam Hornor, recalled: ‘Robert Scott called an ‘O’ Group. He said, “The 4th Brigade, less the Lancashire Fusiliers, so we’re only a two battalion brigade, we’re going to do a right hook and try and come in behind the Japs, get on to the road that
led from Kohima to Imphal, cut the road and shoot them up the arse!” Because the starting point was under Japanese observation the Norfolks set off on the march at about 17.00 on 25 April – just as it started to get dark. Smoking was forbidden and every effort was taken to keep noise to a minimum. Everything the men needed had to be carried with them. Sergeant Fred Hazell of D Company found himself laden like a packhorse: ‘We were issued with 100 rounds of ammunition in addition to what we already had. This we dangled round our necks in two bandoliers. Blankets were cut in half, we rolled half up and put it on the back of our pack. Every third man was given a shovel, every third man was given a pick, and the
THE ATTACK ON GPT RIDGE
The Norfolks at Kohima, 1944
For three days the column moved mainly by day, shielded from prying Japanese eyes by the precipitous jungle ravines and ridges. Ahead of them the men of the 143 Special Service Company were fanned out to try to prevent possible ambush.
THE WORLD’S HEAVIEST RAINFALL
As they climbed higher Lieutenant Sam Hornor found the terrain only got worse and at intervals the rain poured down on the heaving, struggling column. The conditions were such that Private Dick Fiddament was driven to his limits: ‘I’m told that that part of the world has the heaviest rainfall in the world. I would never dispute that! It comes down in an absolute solid sheet. You think to yourself, “If it doesn’t stop soon, beating against my poor skull, I’ll go insane!” The whole area becomes a quagmire. Combined with the rain you got the humidity and you’re sweating. The straps of your pack, your rifle sling and anything else you’re carrying tends to chafe and rub; your skin becomes sore and raw. Your feet are saturated and become sore with constant rubbing, however well your boots fit.’ After three days the column rested up in what was worryingly known as ‘Death Valley’. The troops were relieved, but were distinctly unimpressed by their surroundings or the creatures who welcomed them with open jaws.
other third were given two carriers of mortar bombs.’ Naga villagers had been formed into carrying parties and they took much of the heavier equipment for the struggling Norfolks. Sergeant Ben Macrae was impressed by the Naga porters: ‘They grunted. They had a sort of rhythm to them, “Grumm, brumm, Grumm, brumm”, all the way up the hills. Funnily enough that stopped you getting out of breath, it was their expression of expelling their lungs. For us it was something new carrying all that weight – they’d go on forever and ever! They didn’t like us stopping, they couldn’t understand us stopping for 10 minutes every hour. We were on our chin straps!’
ABOVE: The legendary and popular General Sir William Slim. Slim succeeded in completely turning around a campaign with a fraction of the resources avalable to British troops elsewhere, such as in Normandy, or Italy, by comparision.
While the Norfolks rested, they received orders to change their target from Aradura Spur to GPT Ridge, which would allow them to make contact with British troops in the Jotsoma and Punjab Ridge area. There was considerable angst over the slow rate of progress, but the men could not go any faster. It was only around seven miles on the map, but as Lieutenant Sam Hornor could testify, miles had little value as a unit of human measurement in the Assam jungle and the column could only progress at its own speed.
AT THE RIDGE
On 1 May, after a further horrendous climb up precipitous slopes, the column reached the Pullebadze Ridge above the Aradura and GPT Ridges. On the afternoon of 2 May they descended into the upper reaches of the Aradura Valley, crossed it and climbed again to the spur above GPT Ridge. Although the Japanese had discovered the presence of the Royal Scots, marching behind them, it appeared that the Norfolks’ progress had gone unnoticed.
LEFT: Major, later Lieutenant Colonel. Robert Scott. Scott, a veteran of the last war, was distintively unforgetable, and lovimgly described by Sam Horner as 'a most dreadful fellow when he wasn't being shot at!' Scott prefered to use as his weapon a sawnoff Lee Enfield, christened 'Little Willie'.
BOTTOM LEFT: Major General John Grover, commader of 2nd Division.
www.britainatwar.com 93
THE ATTACK ON GPT RIDGE The Norfolks at Kohima, 1944 RIGHT: Lieutenant Sam Hornor, taken in Fairford, April 1942. FAR RIGHT: An annotated photograph showing the lower slopes of GPT Ridge. Jail Hill is to the bottom left, and DIS Hill to the bottom right. BELOW: 'B' Company Sergeant Bert Fitt and his platoon taken in the Kohima area. Fitt is third from the right at the front, marked by an arrow. The fate of these men was in his hands.
There was some confusion as to their precise location and Brigadier William Goschen took out a reconnaissance patrol to determine where they were and to allow the proper planning of an assault on GPT Ridge next day. When they reached the edge of the jungle on GPT Ridge, they were to inform Divisional HQ, who would then unleash an artillery barrage prior to the final assault on the lower ridge. Meanwhile the Royal Scots would guard the Norfolks’ rear and then act as brigade reserve to be used in an exploitation attack on the hillock at the end of GPT Ridge if required. Unfortunately, as Howard recalled, these plans were immediately disrupted.
94 www.britainatwar.com
‘While the brigadier was giving these orders, a patrol led by Roger Bostock reported that there was a Japanese position between us and the proposed start line. Our faces fell. The brigadier questioned Roger as to whether he was certain that it was a defended locality and not just a patrol. Roger was quite certain. The brigadier scratched the back of his neck, chewed his straggling moustache and made
up his mind quickly. His plan would not be altered in its main outline. If the Japanese were still there in the morning, the position, which appeared to be isolated, would be contained and bypassed.’ In turn, Colonel Robert Scott called his Norfolks ‘O’ group together. The 4th Platoon of the dismounted Carrier Company was to move forward before dawn to be in position on a feature known as Oaks Hill by 05.30 on 4 May. They were to cover the main body of the battalion as it moved down. In the lead would be A Company (Major Swainson), then D Company (Major Hatch), HQ Company (Major Boldero), C Coy (Major Murray-Brown) and finally in reserve would be B Company (Major Twidle). This would be the culmination of their years of training. Private Dick Fiddament was, not surprisingly, still distinctly nervous. As A Coy covered the Japanese bunker, the rest of the battalion moved round to the right to avoid the obstacle. D Company now took over the lead role. They moved through the thick jungle with the men only a couple of yards apart. Sergeant Fred Hazell became aware of the almost invisible Japanese snipers in the trees. ‘We hadn’t gone 50 yards before we came under fire. The Japs had moved towards us and positioned themselves up in the trees, strapped up in the trees, so that when you fired they didn’t fall out when they got hit. We
THE ATTACK ON GPT RIDGE
The Norfolks at Kohima, 1944
advanced through them so that we were being shot at from both the front and the back. A shot whistled past my head and I thought to myself, “Jesus!”’ Major Hatch, the D Company commander, reported the situation back to Scott who ordered them to bear left up the side of the ridge to get as high as possible. Still the attack stalled until Lieutenant Sam Hornor saw Scott intervene directly. ‘We’d been told time and time again in training, “Don’t shoot your rifle unless you’ve got a target, it’s no good just blazing off, ammunition is precious, don’t waste it – always go for a target.” So we got stuck, we were obeying all our training orders and we weren’t shooting at all, we couldn’t see anything. Robert Scott realized at once what was happening and just shouted in all directions, “Start blasting them and advance. Shoot up in the trees, get shooting!” Once he’d given the order away we went!’ The pace of the advance increased as the men sprayed the undergrowth and trees all around them, throwing grenades with enthusiasm. D Company ran into a clearing on the top of the ridge where Hazell was confronted by a Japanese bunker.
ABOVE: D' Company Sergeant Fred Hazell.
‘We went from the forming-up place, got on to the start line. I remember seeing some of them laying, in particular, poor old ‘Micky’ Fulton, Captain Fulton, he had been hit through the top of his head and the scalp was laying open. You could see his brain actually moving and he had a pleading look in his eye, more or less asking you with appearance to put a bullet through him and finish him off. Well, you couldn’t do that.’
LEADING FROM THE FRONT
‘There were four, five or six Japs. I imagine they must have run out of ammunition, they suddenly leapt out of their holes and raced at us with their bayonets. They held them up in the air. Of course they didn’t get very far because the lads’ machine guns just went “BZZZZTTT”. It was evident that D Company had done sterling work in clearing GPT Ridge up to the fringe of the jungle by 12.30. As Sergeant Bert Fitt led his platoon forward he passed by some of the wounded.
The battalion closed up on the start line ready for the next stage of the attack on the lower ridge, to be undertaken by platoons from A and B Companies. Colonel Scott decided that if they were to maintain any kind of momentum they could not afford any more time waiting for the artillery. Lieutenant Sam Hornor watched Scott take the decision. ‘According to the orders, there should have been a pause. The 99th Field Regiment was all ready for the word, “Fire!” to put down heavy fire on our objective. Robert Scott decided, absolutely rightly, that the momentum was going and he kept it going. The battery commander said, “What about the guns?” “No! No! Forget it, we’ll just get straight on through.” He went right on as far as it was possible to get.’ It was also evident to Hornor that his colonel was itching to be at the
sharp end of the battle. Finally, Scott dashed off to take personal charge of the assault. Horner recalled: ‘That’s what Robert Scott was doing. He was leading the attack from the front where he could see what was going on.’ Sergeant William Robinson of A Company was with Scott when they finally launched the attack at around 14.35. ‘Bob Scott lined us up with Bren guns, we’d got a sling over your shoulder, taking the weight, with a man behind us with extra ammunition. His words were, “Right-ho boys, let’s go!” The instructions were to fire at everything, spraying some down, some up and forward of course, because there was a bunker there. Up to that time I had not seen a Japanese at all. But hidden in this semi-clearing, low bushes, that sort of thing, several got up and started running away. They didn’t run far because the amount of fire power was terrific, about 12 Bren guns.’ Sergeant Bert Fitt was leading the right hand platoon of the attack. ‘We attacked, we went straight in with the bayonet, with what we’d got and we took the position. I used this Bren gun for the remainder of that attack, running with it using it from the hip. The Japanese positions were facing outwards. So they had to come out into the open if they wanted to fight us and that suited us.
LEFT: A captured Japanese bunker in the Kohima area. Often expertly hidden and perfectly sited, Japanese bunkers such as this could prove to be more than a thorn in the side. BOTTOM LEFT: 'D' Company second in command Captian Michael 'Micky' Fulton. Unfortunately, Fulton was struck by a snipers bullet.
www.britainatwar.com 95
THE ATTACK ON GPT RIDGE The Norfolks at Kohima, 1944 RIGHT: The 70mm Type 92 Battalion Gun captured by Fitt and his men. Introduced in 1932, this effective little howitzer replaced the Type 11 37mm Infantry Gun, and the Type 11 70mm Mortar as both weapons were lacking. BOTTOM: Always a fearsome prospect, a Japanese bunker at Kohima. BELOW: The ubiquitous and accurate Bren Gun replaced the heavier Lewis Gun as the infantryman’s standard Light Machine Gun. (LIBRARY AND
ARCHIVES CANADA)
We wanted them in the open so that we could see what was going on. We tore down GPT Ridge as fast as we could go. We were coming into the open. You’d got some places that were thick, other places were more open and then there was more of a track going down. About half way down, leading my right-hand platoon, I saw what looked like to me like a piece of flat ground and I thought perhaps that was a bunker, facing the opposite way. I jumped on to this parapet and when I looked down I was looking down the muzzle of a mountain field gun. I threw a grenade in because I knew there were people still there. Three got out and my runner – a chap named Swinscoe – came up on his shoulder with his rifle and he shot the first one that was running away from us over the valley. He twizzled him like a rabbit – a marvellous shot. He got him all right. We’d then got two prisoners.’ The 70mm gun captured by Fitt and his men stands guard today at the entrance of the Royal Norfolk Regiment Museum at Castle Hill in Norwich. ‘I said, “Search them before you bring them.” Colonel Scott came up. I told him we’d got these prisoners and he said, “Where are they?” Well,
This article is taken from interviews carried out in the 1990s by Peter Hart with the surviving veterans of the 2nd Norfolks for the Imperial War Museum. Sadly, since then the years have taken their toll. Most have died, but their voices live on in the IWM archives.
96 www.britainatwar.com
up came this fellow with no prisoners, so I asked him where they were. He said, “Back there, up the track!” I said, “What do you mean? They’re going to be gone!” He said, “Never, they won’t go anywhere! Remember my brother got bayoneted in a hospital bed. When I searched them I took these badges off them – these are the Territorial Army badges that they had. Well, I bayoneted them, both of them, I killed them!” So I had to go and tell the CO. Colonel Scott said, “That’s saved me cutting their bloody throats!”’ The objective was gained and the signal officer, Sam Hornor was witness to the wireless exchanges with Divisional Headquarters. There is no doubt that Robert
Scott was a difficult subordinate. ‘Everybody got as far as they could, so the word went round, “Dig in!” We dug in there and it was the top of GPT Ridge. Divisional Headquarters started coming through to the brigadier saying, “What about the fire plan, you haven’t had the fire plan yet?” He just said, “Well, Robert wouldn’t have it, he just didn’t want it and they went straight on through to the objective without it!” Then Robert got on and sent a message to the divisional commander, “If you don’t believe me, come and bloody well look!”’ The total casualties suffered by the battalion in capturing GPT Ridge consisted of 22 killed and 55 wounded. Yet the battle was not over. On a hillock at the far end of GPT Ridge lay a system of bunkers. Many more would die trying to capture what would come to be known as Norfolk Bunker.
RESCUE AGAINST THE ODDS RNLI Rescue August 1941 MAIN PICTURE: To the rescue: The Cromer No 1 Lifeboat, the H F Bailey, heading towards the wrecks of the Oxshott and Gallois on the storm-tossed morning of August 6, 1941. A painting by the marine artist Mick Bensley, with permission of the artist. TOP RIGHT: The greatest lifeboatman: Henry Blogg (1876-1954) was 65 at the time of his service to Convoy FS 559.
I
N EARLY August 1941, Convoy FS 559 was just another East Coast convoy making the coal-run from Methil in Scotland to the Essex port of Southend. By the time it reached Sunderland, the polyglot armada made up of ships from Estonia, France and the Netherlands as well as Britain had grown to more than 40 colliers and escorts under the overall command of Lieutenant Commander R J Stephens, RNR. They faced a daunting passage in home waters menaced by mines, E-boats and enemy aircraft and made worse by the natural hazards of weather and shallow water. Cold winds were the norm and gales frequent leading to dangers peculiar to this stretch of sea which were vividly evoked by Nicholas Monsarrat, novelist and veteran of
98 www.britainatwar.com
the East Coast convoys. ‘In rough weather,’ he wrote, ‘you feel the lack of sea-room more than ever: if things get too bad in the Atlantic you can always heave-to and drift gently for as long as you like, but here half an hour off your course might mean shipwreck. Nor can you afford bad steering or careless handling, when ships are so close together and the margin of safety on both sides is so narrow. ‘To coastal convoys, rough weather is a challenge which must be met by ceaseless vigilance and attention to detail, at a time when physically and mentally you may be near exhaustion.’ He might almost have been describing the conditions faced by Convoy FS 559. Forecasts of galeforce winds and unseasonably rough seas all the way down to the Thames Estuary were proving all too accurate as the slow-moving coasters plodded southwards in two columns along narrow, buoymarked mine-swept channels
which were notoriously easy to miss in even the most benign conditions. By the time an additional force of escorts joined the convoy off the Yorkshire coast on the afternoon of August 5 a rainstorm of ‘tropical intensity’ was falling that continued long into the night. The storm which followed broke with a fearful ferocity. ‘By nightfall,’ wrote Tony Ditcham, a young midshipman aboard the destroyer HMS Holderness, ‘the forecast gale was blowing and by midnight when we were in shallow water off Cromer the seas had become short and steep.’ The sky was lit by jagged forks of lightning and, as the ships pitched and rolled drunkenly, cracks of thunder reverberated like gunfire across the wild sea. At the height of the electrical storm, a lightning strike tore one of the ship’s defensive balloons from its cables and it vanished burning into the night sky. And still the wind grew in intensity.
RESCUE AGAINST THE ODDS
RNLI Rescue August 1941
CATASTROPHIC ERROR
By the time the storm peaked at around 0100 normal stationkeeping had gone to pot. In the rainlashed smother ships temporarily lost sight of one another and while larger vessels forged on, smaller ones fell back until Convoy FS 559 was scattered across more than six miles of dangerous water off the north-eastern coast of Norfolk. A bad situation, however, was about to get far worse. At the head of the port column, the convoy commodore, sailing aboard the large Dutch vessel SS Kentar, strayed off course, a straggle of galebattered colliers following blindly in his wretched wake. Precisely what went wrong was never satisfactorily explained. Having followed the correct track as far as Buoy 8B, Lieutenant
Commander Stephens either inadvertently read off the course from the next buoy or the Dutch crew mistakenly steered southeast by east rather than south-east by south. Whatever the truth, the consequences were fatal: Stephens and his charges were set on a course away from the relative safety of the swept channel and straight for the deadly slither of sand known as the Middle Haisborough. Even then disaster might have been averted. But the commodore’s catastrophic error was compounded by further command failures. For by the time Stephens and the escort commander, Lieutenant
Henry Blogg knew enough to expect something exceptional, perhaps even something extraordinary. But for all his long experience even Britain’s most distinguished lifeboatman was unprepared for the full extent of the disaster awaiting him. Steve Snelling charts an epic rescue mission.
RESCUE RESCUE AGAINST AGAINST THE THE ODDS ODDS
www.britainatwar.com w ww.britainatwar.com 99
RESCUE AGAINST THE ODDS RNLI Rescue August 1941
ABOVE: The crew of HMS Vimiera, including Leading Seaman Stanley Adams, seated front row far right, and Able Seaman Robert Briggs, fifth from left in front row, who were among five members of the ship’s whaler crew awarded British Empire Medals for their life-saving feats on August 6, 1941. Of the ship’s company of 110 men all but 14 were killed when the Vimiera struck a mine and sank in the Thames Estuary during another East Coast convoy on January 9, 1942. The dead included Briggs. (COURTESY PAUL ADAMS)
MIDDLE LEFT: Midshipman Tony Ditcham considered conditions on the Haisborough Sands on August 6, 1941 as 'extreme and appalling'
Commander Colin Campbell, realised their mistake and altered course at around 0330, the gap between Kentar and the next vessel had stretched to almost two miles. Beyond the commodore ordering one long warning blast on the ship’s whistle when altering course, neither he nor Campbell, according to an Admiralty report, ‘took any steps whatever to warn the ships astern of them’. Being so far ahead, the change of course was ‘not observed’ and the warning went ‘unheard’ with the result that the first any of the ships following knew of the danger they were in was when, to their astonishment, they sighted ‘breakers’. By then, it was already too late for seven of them.
CHAOS AND CARNAGE
One of the first to ground was the 2,684-ton French collier SS Gallois. Second Officer M Belcher had just emerged from the chart-room when he heard the Chief Officer call out ‘Hard aport’ and then ‘Full speed astern’. Gallois, her holds filled with 3,600 tons of coal, had barely started to turn when she struck sand. In those desperate moments, Belcher noticed ‘a ship ahead going round to port, but she was ashore within a couple of minutes’. Almost simultaneously with the Chief Officer blowing three warning blasts, another ship slew round on the port quarter and grounded
100 www.britainatwar.com
within sight of the Frenchman. This was the 1,241-ton Oxshott with a crew of 18 and 1,900 tons of coal on board. At 0400, Chief Officer Robert Pickering was just starting the morning watch when breakers were seen ‘very close’ dead ahead. The master, Captain William Howat, ordered ‘Full astern’, but almost immediately the ship struck. For 10 minutes, she struggled to wriggle clear before her engines failed. ‘The steamer drove further on to the sands,’ noted Pickering, ‘took a list to starboard and, with the heavy sea, started to break up right away. It was much the same story for the SS Deerwood, SS Aberhill and SS Afon Towy. Only the Estonian-registered SS Taara and the SS Betty Hindley, on her maiden voyage, had the slightest chance of escaping the fate of the others. In the case of the Taara the master’s caution may have contributed to her grinding ashore. Seeing a ship, almost certainly the Gallois, looming ahead, Chief Officer V Einborn urged his captain to go ‘hard a starboard, hard a starboard’, but he insisted ‘not yet, not yet’.
ABOVE RIGHT: Able Seaman, later Leading Seaman, Stanley Aylmer Adams (19202011). A Kentish lad from Bromley and former ‘Shotley boy’, he was 21-year-old regular seaman of five years’ service, at the time of Convoy FS 559. His bravery as a member of Vimiera’s whaler crew earned him a British Empire Medal.
(COURTESY PAUL ADAMS)
RESCUE AGAINST THE ODDS
RNLI Rescue August 1941
‘We slowed down,’ said Einborn, ‘but I guessed she was ashore because we were overtaking her so quickly.’ Without deviating, Taara steamed steadily on and, five minutes after seeing ‘breakers’, drove on to the eastern edge of the Middle Haisborough, a little to the north and on the opposite side of the sands from the brand new Betty Hindley.
In the course of her final desperate manoeuvres, the master of the Betty Hindley twice had to narrowly dodge other vessels before riding up on the southern half of the sandbank. The time was 0420 and the chaos and carnage of a little more than 20 minutes had reduced seven fullyladen ships to wrecks with terrible consequences for their marooned crews. But the tragedy of Convoy FS 559 had not yet run its full course.
‘TERRIBLE LIST’
Some 10 minutes after the last of the colliers grounded, Lieutenant Commander Campbell received the first intimation of the calamitous events taking place astern of him. It was a signal from the armed trawler HMT Agate saying ‘she was ashore’. The last movements of Agate are from uncertain. From her station outside the starboard column, she had been battling the elements and struggling to keep the merchantmen which, in the words of coxswain Leading Seaman J T Perkin, were ‘all over the shop’, on a steady course. Then, around 0330, things became more confused. From
the scant evidence available, it appears Agate captain, Lieutenant Leslie that Agate’s Cline, became aware of the looming disaster and made frantic efforts to warn the ships which were then closing the Sands. Ordering the helm hard over, he crossed from starboard to port, but even as he did so the first of the colliers struck. Moments later Agate, her efforts all in vain, hit the sand. ‘She touched three times,’ recalled Perkin, ‘twice lightly and the third time she bumped heavily and stuck.’ The driving wind and sea pushed them further onto the bank. ‘We swung round until we got the wind on the port beam and had the sea breaking over us,’ said Perkin. With the ship already beginning to tilt under the battering, Cline shouted: ‘Stand by the Carley Float.’ But the two men who went to ‘let it go’ were immediately washed overboard along with it. ‘The sea was coming over all round,’ said Perkin, ‘so I went into the wireless cabin with the captain, engineer and two lieutenants, to have a smoke and the telegraphist sent out the SOS…’
ABOVE: HMS Vimiera battling through rough seas during her regular convoy escort duties from Scotland to Sheerness. During Convoy FS 559, she was shepherding stragglers prior to playing a prominent role in the rescue operation. (COURTESY PAUL ADAMS)
BELOW: HM Trawler Agate: Of a crew of 27, 19 men were lost including all of the ship’s officers.
www.britainatwar.com 101
RESCUE AGAINST THE ODDS RNLI Rescue August 1941
TOP LEFT: In the words of one of the survivors of the Deerwood, they jumped two by two, like the animals going into the ark, to reach the lifeboat.
(WITH PERMISSION OF THE ARTIST)
TOP RIGHT: The H F Bailey takes the plunge during a rescue mission.
Agate’s plight was mirrored by that of the Cardiff-registered Afon Towy which lay trapped close by. At 684 tons, she was the smallest of the grounded colliers and the most vulnerable to the smashing waves. Her crew of 13 took what shelter they could, but it was only a matter of time before she bowed to the inevitable. Finally, at about 0545, a big sea struck with such violence she rolled over to port and capsized, hurling most of the crew and a single lifeboat into the wildly pitching sea. Kept afloat by his lifejacket, Chief Officer J Knowles drifted until he found a floating hatch and scrambled on board with three others who included an 18-year-old gunner, Able Seaman J M Chattaway. For what seemed like hours, they drifted, bobbing like a cork, half under water with the sea washing over them, until they were found by HMT Basset. By then, Knowles was close to death
102 www.britainatwar.com
and was saved only by Chattaway’s selfless bravery. ‘I had given up hope,’ Knowles later reported. ‘I did not want to live. My strength had gone and I could not swim and then that young fellow held me up and kept telling me not to give up and I felt that he was there supporting me. I do not remember anything after that, but I am told that he secured a line round my body and I was hauled on board.’ In the hours that followed, Basset rescued 15 men, including three Estonians from the Taara and Perkin of the Agate whose survival was little short of miraculous. The little trawler withstood the sea’s fearful pounding for more than an hour until the first grey streaks of dawn revealed the approach of Basset. Then, with help almost at hand, the Agate suddenly took ‘a terrible list’. Somebody shouted, ‘It’s going to capsize’ almost as two men were swept
away. Perkin just had time to free the port Carley Float and, with four others, jumped for it. For a few heart-stopping moments their effort appeared doomed. ‘A big sea took us back on top of the ‘fiddley’ [the steel framework around a hatchway] and then took us out again,’ said Perkin, ‘and the next time she got on top of the ‘davit head’ and capsized and we were all in the water… ‘When the others saw it capsize they were petrified. Then we swam for the Carley Float and the next sea took us round the bow and we were only two or three yards away when the Agate turned right over to port.’ About an hour later, the five men were picked up by Basset. They were among only eight survivors from the gallant little trawler. The men of Afon Towy who had managed to scramble into a lifeboat were less fortunate. As Basset closed to rescue them in the appallingly rough sea her wash tipped them over and although a number of the trawler’s crew, including her captain, leapt overboard, only one was saved. It was now a race against time to save as many men as possible from the remaining stranded colliers which lay at the mercy of the cruellest of seas.
RESCUE AGAINST THE ODDS
RNLI Rescue August 1941
‘GRIM SIGHT’
Morning on the edges of the windblasted and sea-lashed Haisborough Sands presented a scene of abject misery that was fast turning into a fullscale tragedy. Five out of the six ships that were grounded were, in the words of one of the escort commanders, ‘awash to the level of the boat deck’ with ‘terrific seas’ breaking over them. All that could be seen above the surface blown spray were the masts, funnels and central superstructures which had become the survivors’ islands that and were being battered and buffeted by every destructive wave. To Lieutenant Kirkwood of the Puin, ‘the scene of these ships Puin
stranded on the sands was the most grim sight I have ever seen’. By then, Puin had been joined by the Basset and the destroyer HMS Vimiera, both of which had been diverted from shepherding stragglers at the rear of the convoy to go to the aid of Agate. Too late to help the stricken trawler, they turned their attentions to trying to help the trapped merchantmen. Having assessed the situation and realising the impossibility of approaching the wrecks without endangering more lives, the captain of Vimiera, Lieutenant Commander Angus Mackenzie, signalled for shore-
based RNLI lifeboats to be launched while moving in as close as he dared in order to try and veer a Carley Float to the nearest ship, the Gallois. From there, he tried the eastern edge of the Middle Haisborough where he sighted, around 0730, the remains of the Taara, her hull broken in two, with some of her crew visible in the water and others clinging to her masts. Mackenzie was in a quandary. The only way to reach them was by a ship’s boat, but to launch and row across the sands in such wild seas appeared ‘almost impossible’. Out of humanity, however, he decided an attempt. It was little more than a forlorn hope, but it had to be made and he asked for a volunteer crew. All the officers, including the ship’s doctor, offered to go and Mackenzie selected Sub-Lieutenant David O’Sullivan to take charge of a whaler with a crew of five consisting of Petty Officer James Errington, Acting Petty
Officer Edmund Archer, Able Seamen Stanley Adams, Victor Benningfield DSM and Robert Briggs. ‘Personally,’ Mackenzie later admitted, ‘I did not think that they would be able to live in that sea let alone save anybody.’ In fact, they exceeded all expectations, confounding their captain’s gloomy forecast by hauling themselves across a sea described by witnesses from the other ships ‘as making boat work suicidal’ no fewer than three times. Towed each time to windward by a boat-hook from Vimiera, they succeeded by dint of their heroic and Herculean feat in rescuing 20 men clinging to a line trailing from the stern of the collier. In the course of what Mackenzie called their ‘exceptional’ achievement spanning more than three exhausting hours more men from another of the grounded colliers were picked up by Vimiera as they floated past.
TOP RIGHT: An early wartime postcard photograph of the Cromer lifeboat crew with Blogg, wearing his distinctive flat cap, standing third from the right. MIDDLE LEFT: Lieutenant Commander Angus Mackenzie RNR (1905-1975) was awarded a ‘mention in despatches’ for his actions. A former apprentice serving with the Cairn Line, he survived the sinking of Vimiera in 1942.
www.britainatwar.com 103
RIGHT: Mick Bensley’s graphic painting of the Harriet Dixon’s rescue of the last survivors from the shattered hulk of the Taara which earned Second Coxswain John James Davies a Silver Medal and Stand-by Coxswain Leslie Harrison and Mechanic Harold Linder Bronze Medals.
(WITH PERMISSION OF THE ARTIST)
BOTTOM LEFT: Convoy saviour: a contemporary picture postcard of the Gorleston lifeboat Louise Stephens which rescued 23 men from the wreck of the Aberhill. A shallow draught lifeboat specifically designed for use on the East Coast sandbanks, she took part in the Dunkirk evacuations and in over 30 years service was launched 305 times and credited with saving 177 lives. Her service to Convoy FS 559 was recognised by awards of the Silver Medal to Coxswain Charles Johnson and Bronze Medal to Mechanic George Mobbs.
But for all their gallantry there were still over a hundred Merchant Navy crew men whose fate now hinged on the skill and speed of the lifeboatmen - and one man in particular - who were heading to the rescue.
‘MARVELLOUS WORK’
Few men better understood the dangers posed by the Haisborough Sands than Henry Blogg. At 65 and with 47 years lifeboat service behind him, 33 of them as coxswain, he was already a legend within the RNLI, his reputation founded on a myriad of daring rescues in these same narrow waters. Those exploits in war and peace had earned him an unprecedented array of honours that included two
104 www.britainatwar.com
RNLI Gold Medals, three Silver Medals and an Empire Gallantry Medal that would shortly be exchanged for the newly-instituted George Cross, the nation’s highest civilian gallantry award. A taciturn, strong-willed man, he possessed a formidable determination that bordered on obstinacy and combined sound judgment with audacious action. As Henry ‘Shrimp’ Davies, a future Cromer lifeboat coxswain and one of seven members of the same fishing family aboard the H F Bailey that day, later recalled:: ‘He was a very clear-thinking man. He took risks but they were always calculated risks.’ Never more so than on the morning of August 6, 1941.
Leaving the No 2 Cromer boat under Leslie Harrison to follow an hour later when the tide had dropped, Blogg set off at 0815, spearheading a rescue operation that would eventually involve the lifeboats from Gorleston, Lowestoft and Sheringham. But of all those boats launched that day none would play a greater role than the 46ft twin screw motor lifeboat H F Bailey and her stout-hearted crew of 11. Once, that is, they had overcome their initial shock at the number of ships that had come to grief. ‘Conditions were very rough, very rough indeed,’ recalled Davies. It was still blowing hard and, through the smother, Blogg counted six ships ashore. ‘We could see the hull of one and the masts of five others,’ he said. Quickly assessing the situation, he decided to head for the nearest of the two northernmost wrecks. Making first for the Gallois, he ignored Oxshott believing no one could possibly be still aboard her as ‘she was under water’. It was only when they drew nearer to Gallois that the waves and shouts of her captain directed the lifeboatmen back towards the sunken remains of her neighbour. Even then, recalled Davies, they could not see anybody. ‘Then, suddenly, a sea broke over her,’ he said, ‘and someone spotted the men. They were wrapped round the funnel, all holding on to one another to stop themselves being washed away.’
RESCUE AGAINST THE ODDS
RNLI Rescue August 1941
Among the 16 men clinging on for dear life was Chief Officer Pickering. In the six hours since the Oxshott ran aground she had been battered to smithereens. ‘Everything was carried away,’ wrote Pickering. ‘Lifeboats, rafts, hatches - everything had gone.’ Around daylight two violent seas smashed first the wheelhouse and then, in the process, five men, including the captain, were swept to their death, leaving the remainder hanging on to a single funnel guy. Their grip on life was the most precarious of all the survivors, with every sea washing them off and then back on to the exposed deck. ‘There was just enough time to get your breath back,’ observed Pickering, ‘when the next sea came.’ Rescuing them, even for a lifeboatman of Blogg’s experience, was no easy task. With the decks submerged and so little of the vessel showing above the water, there was nowhere to secure a line. Blogg’s solution was as unorthodox as it was dangerous. ‘Henry just drove us straight ahead on to the boat deck,’ recalled Davies, ‘and my father, standing in the bows, threw out the grapnel rope and held her there, while the ship’s crew ran across what was left of the deck and jumped across to us. ‘Considering how bad it was and what they’d been through it was amazing how quick they could move.’ Time and again the lifeboat, its bows splintered by hidden obstructions, was pushed off only for Blogg to drive her back, risking self-destruction as he bumped over the deck towards a crack in the ship’s upper works.
An awed Pickering recorded: ‘I don’t know how he got alongside because at that time it was all white water - nothing more or less’. What he called ‘a marvellous piece of work’ was quickly followed by the rescue of all 31 men aboard the stranded Gallois, the crew leaping or scrambling down ropes as Blogg expertly laid the H F Bailey alongside.
‘JUMP IN PAIRS’
Having delivered 47 survivors to the Puin – no mean feat in itself – Blogg met up with Lewis Harrison who had just arrived aboard the Harriet Dixon. Putting his own second coxswain aboard to give the benefit of his experience, Blogg ordered them after the Taara and what appeared ‘no more than half a ship’ while he made for the Deerwood lying on the north-western edge of the Sands. By then, noted Blogg, ‘both ends of the ship were under water’ with only the bridge showing. From there, 19 survivors watched their approach with a mixture of astonishment and hope. ‘To say she was a sight for sore eyes would be an understatement,’ wrote Dick Harman, who was a gunner on the collier. Once again Blogg faced a struggle to hold the H F Bailey alongside, with the lifeboat rising and falling with the waves ‘at terrifying speed’. As Harman looked on, the boat was thrown against Deerwood’s shattered bulwarks tearing off more chunks of wood. ‘The coxswain then told us that he intended to heave-to as close as possible to leeward,’ wrote Harman. ‘We were then to jump in pairs when he gave the word. When he had got into position,
he gave the order and, like the animals into the Ark, two by two, we jumped! ‘He timed the jumps to coincide with a big wave hitting the ship. In this way, the force of the wave helped us to swim clear enough to avoid the backwash dashing us against the ship’s side.’ In this way every one of the 19 men were pulled to safety and with them all aboard Blogg moved on to the next ship. Reaching the Aberhill, he found the Gorleston lifeboat, the Louise Stephens, under her coxswain Charles Johnson, already standing alongside in a heavy sea, taking off 23 survivors from ‘midships aft of funnel’.
ABOVE: H F Bailey displaying her damaged bows while undergoing repairs. BELOW: Ill-fated: one of the seven merchant vessels lost on the Middle Haisborough Sands, the SS Betty Hindley was carrying 2492 tons of coal on her maiden voyage. All 23 members of her crew were saved by the H F Bailey, although they came close to disaster when the lifeboat briefly grounded.
www.britainatwar.com105
RESCUE AGAINST THE ODDS RNLI Rescue August 1941
dropped her into open water. It was around 1300. Blogg’s crew had been working ceaselessly for more than three hours during which they had achieved the seemingly impossible. Of the 119 men saved from the six ships, no fewer than 88 owed their lives to the skill and daring of Blogg and his crew. Incredibly, in the circumstances, only 37 men had been lost, slightly more than half of them from the Agate.
‘100 PER CENT MEN’ ABOVE: The Duchess of Kent, president of the RNLI, meets a medalcovered Henry Blogg during a visit to Cromer a fortnight after VE-Day. It was a rare display. Usually his myriad honours were kept hidden away in a small cardboard box at the back of a drawer in his cottage. TOP RIGHT: Lasting tribute: the memorial bust to Henry Blogg, ‘one of the bravest men who ever lived’, was unveiled on Cromer’s East Cliff in May, 1962, proudly looking out to sea.
Pushing on across the Middle Haisborough, Blogg came to the Taara where he found Harriet Dixon in the process of rescuing the eight remaining members of her crew. He, therefore, back-tracked over the sands to reach the sixth and last steamer. As a new ship, the Betty Hindley had stood up to the sea’s battering better than any other and Blogg was able to lay alongside the wreck and, with his engines working and head to wind and sea, hold position while the 22 crewmen sheltering on the bridge jumped aboard. The drama, however, was not quite over yet. As the lifeboat, weighed down by 41 extra bodies, drew away she bumped onto the sands twice before grounding. It was the dangerous moment. Any second any one of the heavy seas could have overwhelmed her. Survivors and lifeboatmen crammed aboard watched with alarm as a big sea reared up and rolled towards them. What might have spelled their destruction actually proved their salvation. Rather than swamping them, the huge wave lifted the lifeboat like a giant hand and
Naval officers who witnessed the lifeboats’ rescue operation were unstinting in their praise. ‘Conditions were so extreme and appalling,’ wrote Midshipman Ditcham, ‘that none of us present would have thought it possible to save anyone at all.’ Lieutenant Kirkwood, referring to Blogg’s daring manoeuvre to reach the Oxshott’s survivors, called it ‘the finest piece of seamanship I have ever seen’. As for Blogg’s crew, he reckoned they were all ‘100 per cent men’. In admonishing the convoy commodore, the escort commander and a number of the officers of the merchant vessels involved, an Admiralty inquiry commended in the highest possible terms the ‘skill, courage and perseverance’ exhibited by lifeboat and naval rescuers alike. Official recognition duly followed. Among a flood of honours were a gallantry OBE for Sub-Lieutenant O’Sullivan and British Empire Medals for every member of the crew of Vimiera’s whaler. There were also seven awards from the RNLI to the lifeboat crews involved in one of the most gallant and prolonged ‘services’ of the Second World War. They were headed by a recordequalling third Gold Medal to the
redoubtable Henry Blogg whose bravery and resource were also marked by the King with a BEM to add to his George Cross. Heroic though it was, his epic mission had been a close-run thing. A damage assessment following H F Bailey’s return to base revealed multiple ‘wounds’. As well as holes to her port bow and buoyancy air cases, the Cromer No 1 boat’s stem had been torn off along with a 20ft stretch of fender and bow padding. But such things didn’t bother Blogg one jot. According to ‘Shrimp’ Davies, ‘he never ever worried about damaging the lifeboat. It was getting the people that mattered. That was all that mattered.’
ABOVE: Convoy saviour: a postcard photograph of the Cromer No 2 Lifeboat, the Harriet Dixon, which shared in the rescue of crewmen from the Estonian-registered Taara. The crew and shore helpers pictured include no fewer than 11 men who took part in the 1941 rescue, including Henry Blogg, seventh from the right, and Second Coxswain Jack Davies, seventh from the left, who was awarded a Silver Medal for his part in the convoy rescue.
106 www.britainatwar.com
NEW!
SPECIAL
For more than 20 years Europe had been torn apart by war. Dynasties had crumbled, new states had been created and a generation had lost its young men. When it seemed that peace might at last settle across the Continent, the terrible news was received – Napoleon had escaped from exile and was marching upon Paris. Europe braced itself once again for war. The Allied nations agreed to combine against Napoleon and in June 1815 they began to mass on France’s frontiers. The scene was set for the greatest battle the world had yet seen.
JUST *
£6.99 Features include: THE ROAD TO WATERLOO The background to the campaign
In this 100-page special from the team behind Britain at War magazine, we explore the many controversies and myths surrounding the battle, and the key decisions and actions which brought about the defeat of the Emperor Napoleon and the end of one of history’s most turbulent eras.
‘THE GREAT MISTAKE’ Napoleon was certain that Wellington’s choice of battlefield was a fatal error. Was he right?
COUNTDOWN TO VICTORY A timeline of events, day by day, hour by hour
THE BRAVEST MAN AT WATERLOO How and why one man was given a unique honour thanks to a grateful vicar
‘HUMBUGGED, BY GOD’ How Napoleon, the master strategist and tactician, almost caught Wellington napping
THE LAST REDCOAT Behind the recent discovery and excavation of a skeleton from the Waterloo battlefield
AVAILABLE UNTIL 17 SEPTEMBER from
and all other leading newsagents
ALTERNATIVELY, ORDER DIRECT
JUST £6.99 FREE P&P* *Free 2nd class P&P on all UK & BFPO orders. Overseas charges apply.
Free P&P* when you order online at www.keypublishing.com/shop
OR
Call UK: 01780 480404 Overseas: +44 1780 480404 Monday to Friday 9am-5:30pm
S U B S C R I B E R S C A L L F O R Y O U R £ 1. 0 0 D I S C O U N T !
922/15
order your copy of and the dawn came up like thunder at a special price!
Published in September 2015 with 152 full colour paintings and drawings this quality 250-page book will be the largest collection of colour paintings of the Far East Prisoner of War experience in print.
more wwii memoirs from myrmidon Please send me, with free postage and packing: ....... copies of And the Dawn Came Up Like Thunder by Leo Rawlings at £20 each (RRP £25) ....... copies of Railroad of Death by John Coast at £10 each (RRP £12.99) ....... copies of Nell and the Girls by Jeanne Gask at £6 each (RRP £7.99) I enclose a cheque for £.......... made payable to Mymidon Books Ltd. Post to Myrmidon Books Ltd, Rotterdam House, 116 Quayside, Newcastle upon Tyne NE1 3DY
The true story of a British family trapped in Occupied France
Name: . . . . . . . . . . . . . . . . . . . . . . . . . . . . . . . . . . . . . . . . . . . . . Address: . . . . . . . . . . . . . . . . . . . . . . . . . . . . . . . . . . . . . . . . . . ................................................... ................................................... . . . . . . . . . . . . . . . . . . . . . . . . . Postcode: . . . . . . . . . . . . . . . . Tel: . . . . . . . . . . . . . . . . . . . . . . . . . . . . . . . . . . . . . . . . . . . . . . .
The classic FEPOW memoir republished with a brand new introduction
Email: . . . . . . . . . . . . . . . . . . . . . . . . . . . . . . . . . . . . . . . . . . . . .
Myrmidon F_P.indd 108
12/08/2015 10:18
The Britain at War team scout out the latest items of interest
| RECONNAISSANCE REPORT
Battle of Britain Sketchbook Dennis Knight
Every so often a book drops onto our desk at Britain at War magazine with a quality that is hard to define, save to say that it is unique and difficult to put down! Into this category falls the wonderful Battle of Britain Sketchbook by Dennis Knight. Coincidentally, the book also dropped onto our desk as we were preparing our Battle of Britain Special Edition and the editorial team had no hesitation in deciding to award it ‘Book of The Month’.
Dennis Knight has been recording and researching aircraft losses during the Battle of Britain since he was a young lad in 1940 and made meticulous notes and truly amazing sketches of incidents that he either witnessed or, later, that he researched. The majority fell into the latter category, when he assembled sketches of the events he was recording with his unique drawings created from eye witness testimony. Much of this work was done during the late 1950s and 60s when memory of such events was relatively fresh and when farms, landmarks and even trees and hedgerows still remained much as they were in 1940. Historically, Dennis produced an important record of what exactly happened in each incident and he was able to record the flightpath, angle of approach, fate of the crew and the aftermath of each episodes he covered. Alongside his drawings, some of them turned into watercolour representations of the event, he also recorded what the witnesses saw and remembered and subsequently added in his own researches when he discovered the essential facts such as the date and time, units and personnel involved along with the camouflage and
markings of the specific aircraft. Consequently, this is much more than just a record of various events during the Battle of Britain but a very personal and in-depth examination of the events covered and is dealt with in a manner that is certainly a one-off. Whilst it might be argued that Dennis’ sketchbook adds nothing to the sum total of our knowledge of the Battle of Britain, save for that battle’s minutiae, then that would be an entirely incorrect assumption. Here we have a contemporary record presented in an engaging and compelling
BOO OF T K MON HE TH
manner, and providing the reader with a unique insight into littleknown episodes of the battle that are now preserved for both the sake of posterity and history. Of itself, it is a valuable piece of social history. Very highly recommended, especially to those with a thirst for knowledge and information concerning the Battle of Britain. REVIEWED BY ANDY SAUNDERS
Publisher: Red Kite ISBN: 978 1 906592 26 4 Softback 160 pages RRP: £25.00
Illustrations References/Notes Appendices Index
www.britainatwar.com 109
RECONNAISSANCE REPORT |
The Britain at War team scout out the latest items of interest
HAWKER HURRICANE MK I R4118, UP – W
Pewter Model by Diverse Images
APPROPRIATELY CONTINUING this month’s Battle of Britain theme we were delighted to be asked to undertake a product review of this truly stunning limited edition 1/48th scale pewter model of Hurricane Mk I. Produced in a limited run of just fifty models, the accompanying certificate informs that this is handcrafted in Pewter by English craftsmen from an original master created by Sera Staples. And, without any doubt, this is certainly produced by craftsmen!
OCTOBER 2015 ISSUE ON SALE 24 SEPTEMBER 2015
much better. Truly, the attention to detail is stunning and with even the tiny cockpit fully detailed with instruments, control column and seat harness straps. And with a wing span of around ten inches, then that represents astonishingly detailed craftsmanship. Each model comes packed in its own transit-box, along with its individually signed and numbered certificate and a double-page fact sheet giving the story of the Hurricane it is modelled on, the history of its service in 1940 and beyond as well as its subsequent restoration to flight and, today. This lovely model cannot be
THE BRAVEST AND THE BEST
Confronted by hidden bunkers and the threat of suicide bombers, a young Sikh officer displayed self-sacrificial courage of the highest order as he spearheaded a combined armoured and infantry assault on a tenaciously defended Japanese position in Burma. Steve Snelling tells the heroic story of Karamjeet Singh Judge.
DOWN – NOT OUT! As a wonderful collectable representing RAF Fighter Command’s famed fighter of the Battle of Britain, this is a truly lovely piece. As a historic object in its own right, the addition of a signature by the pilot of the original aircraft, Plt Off Bob Foster, makes it doubly desirable and will doubtless enhance its value in future years. And as just a nice piece of art that looks good on any bookcase, any aviation ‘den’ or in any boardroom, then it doesn’t get
commended highly enough. It is truly a treasure that will certainly only appreciate in value. A lovely collectible, it would also make a fine and unique gift. The basic model comes at £179.00, although the small figurines are an optional extra at £15.00 each, thus working out at £209.00 with the figures. The model is available direct from Diverse Images at www.diverseimages via mail order, and with £11.00 P&P charged in the UK.
1945: The Second World War in Photographs
such as the atomic bombs, images of
A Brave New World
images of the Buchenwald camp stand
John Christopher and Campbell McCutcheon
out amongst many as this pictorial timeline of the war concludes, marking
surrendered German military assets, the dismantling of British beach defences, and harrowing full colour
final Allied victories and introducing the
YET AGAIN a fantastic assembly which capitalises on a superb range of 250 photographs, many of which, as we have come to expect from this series, being rare, unpublished, or in colour. Alongside recognisable icons
110 www.britainatwar.com
reader to the new era that followed. Publisher: Amberley Publishing www.amberley-books.com ISBN: 978 1 4456 2215 6 176 Pages RRP: 15.99
Marking the final month of the Battle of Britain 75th anniversary commemorations, Andy Saunders takes a look at some remarkable tales from a number of RAF fighter pilots, in their own words, telling how they were shot down during 1940 but survived to fight another day.
FOUR DAYS THAT SAVED THE BEF
It was called the ‘Race to the Sea’ as the Germans sought to outflank the British army and cut it off from the Channel ports. The Germans would have succeeded had it not been for Winston Churchill and the Royal Naval Division which held Antwerp for four vital days in October 1914. John Grehan tells the story.
SMALL BUT DEADLY Kent’s Armoured Railway
SMALL BUT DEADLY Rob Langham tells the story of the Smallest Armoured Train In The World
MAIN PICTURE: The armoured train at Dymchurch station. A full complement of Lewis Guns and Boys AntiTank Rifles are fitted.
A
LESS warlike railway could scarcely be imagined than the pint-sized Romney, Hythe & Dymchurch. Thirteen and a half miles long, it runs between the Kent coastal market town of Hythe and the Lighthouse on the headland at Dungeness (today known for its nuclear power station). This miniature track, with just fifteen inches of space between the rails
112 www.britainatwar.com
compared to Britain’s standard gauge of four feet and eight and a half inches, opened in 1927. It was the brainchild of miniature railway enthusiasts and racing drivers Captain JEP Howey and Count Louis Zborowski. The scaled-down locomotives were based on the large Pacific-type locomotives in mainline use at the time and it was designed from the outset to haul tourists who would travel on
‘the world’s smallest public railway’. (Separately, the founders hoped that ancillary revenue might be earned from selling shingle as ballast, but this did not materialise until just before the war.)
LOCATION, LOCATION, LOCATION
Had the railway been situated anywhere else in the British Isles it is likely that the Second World War’s only effect on the line would have
SMALL BUT DEADLY
Kent’s Armoured Railway
been a drastic reduction in traffic and possible closure until the end of hostilities. But this railway had an advantage: as the crisis of 1940 unfolded, the entire length of the line became an increasingly important strategic location. Given the proximity of Dover and Folkestone and the natural protection of the White Cliffs, the beaches and the flat land that lay behind them made the area extremely vulnerable to German invasion. It
was the perfect site on the map for an attacking force, particularly as the distance across the English Channel was so short at that point. To make things easier for the invaders, the area was sparsely populated and there were not many buildings available to fortify, while there was just a single battalion of infantry, the 6th Battalion Somerset Light Infantry, protecting the six-mile stretch of coast from Hythe to Littlestone.
The first military employment of the railway by the Somersets was to take over a bogie hopper wagon (used for ballast) to make a roadblock at Hythe. Meanwhile, the railway continued to operate despite the possibility of invasion until, on 15 July, 1940 the stretch of railway that ran through the battalion’s area was requisitioned. Captain WR Ellis, of 6th Battalion Somerset Light Infantry, then planned to construct an armoured train.
TOP RIGHT: Overhead view of the Boys anti-tank rifle and Lewis gun on anti-aircraft mounting. The objects on the right hand side of the image appear to be anti-invasion obstacles.
www.britainatwar.com 113
SMALL BUT DEADLY Kent’s Armoured Railway
TOP LEFT: ‘Hercules’ at Hythe after its overhaul at Ashford. TOP RIGHT: The armoured train under the overall roof at Dymchurch. BELOW: The armoured train passes a bomb crater north of Dymchurch. A German aircraft had attempted to bomb No 9 ‘Doctor Syn’ as it was pulling a train, the attacker presumably thinking it was a full-size railway. One of the stick of bombs hit the line ahead of the train, the locomotive running into the crater and suffering slight damage. After the war No 9 was renamed ‘Winston Churchill’. Today, the water-filled crater still exists alongside the track.
He intended to use the railway’s unusual Rolls Royce locomotive (a 1914 Rolls Royce Silver Ghost that had been converted into a locomotive and was reportedly still capable of sixty miles per hour whilst hauling passenger carriages!) and three twentytwo foot long bogie hopper wagons, two to be armed with Lewis light machine guns and one with a Boys anti-tank rifle. The use of armoured trains by British forces was not unusual. Perhaps their best known and arguably their most successful employment by the British Army was during the Second Boer War (1899-1902), while two standard gauge armoured trains were used for home defence in the First World War and twelve in the Second World War.
SELECTING THE STOCK
On 16 July, just one day after the line had been requisitioned, the Rolls Royce locomotive and wagons were
114 www.britainatwar.com
already in the railway’s workshops at New Romney and 259 Field Company, Royal Engineers started work on armouring the Rolls Royce. They soon found that its springs clearly could not take the strain of armour plating so one of the steam locomotives was selected instead. With further advice and assistance coming from men at Ashford Works on the Southern Railway, the most powerful steam locomotive on the line was chosen. This was Number 5 ‘Hercules’, one of two ‘Mountain’ type 4-8-2 tender engines originally built for the planned freight trains. Their eight coupled powered wheels gave more adhesion than the six ‘Pacific’ type passenger locomotives, but the ‘Mountain’ also had a longer wheelbase and derailed in certain places on the line with the result that ‘Hercules’ and classmate ‘Samson’ were underemployed because the derailment tendency made them unsuitable for passenger transport. ‘Hercules’ was
rebuilt in 1936 as demand for ballast finally emerged in quantity. The armouring of the locomotive was very impressive – it ran the full length of the boiler and smokebox with hinged areas enabling access to vital parts requiring lubrication or other maintenance. Most of the locomotive below the footplate (or what would have been the footplate on the full size locomotives on which ‘Hercules’ was based) was left open, but a large plate was used to cover the cylinders and valve gear. A sizeable flat plate also covered the fore part of the tender where the driver sat; this partially covered the cab, but otherwise the cab and tender was unarmoured. Only two of the hopper wagons were used, plated on the sides (the ends do not appear to have been armoured) and also given a roof of armour, in addition to two fighting compartments. The armour on the sides of the wagons looked very thick,
SMALL BUT DEADLY
Kent’s Armoured Railway
BELOW: No 5 ‘Hercules’ was the most powerful steam locomotive on the Romney, Hythe and Dymchurch Railway and was requisitioned for the armoured train. It is seen in new condition at New Romney in 1927.
was a serious business, and the men working on it through the summer needed no reminders. The Battle of Britain was being fought in the skies above them on a daily basis and the infantry units in the area frequently fired at low flying enemy aircraft (which would often attack the soldiers with unused bombs and bullets on their way home). Indeed, the Lewis and Bren guns of the 6th Battalion Somerset Light Infantry were in heavy use, with around 12,000 rounds of ammunition a day fired during the Battle of Britain. Men with railway experience from the 6th Battalion Somerset Light Infantry were sourced to work on and with the train, the crew consisting of a commander, driver, spare driver (used as a loader when not needed), two turret gunners and two anti-aircraft gunners. While the armoured train
was being constructed other rolling stock from the line was used – on the occasion of the Duke of Gloucester’s inspection of the battalion in late July he was transported in one of the pre-war passenger carriages with a Bren gun team in a van on each end, the train hauled by ‘Pacific’ type locomotive ‘Bluebottle’. The first trial run of the armoured train was on 10 September and instructions were issued as to how it would be used. Its main purpose was to reinforce the defensive positions manned by 6th Battalion Somerset Light Infantry between Hythe and New Romney. In case of the line being broken owing to enemy action, one wagon filled with ballast and one filled with coal were kept at Dymchurch as well as a quantity of railway line and other items needed to repair any potential damage.
LEFT: Messerschmitt 109 pilot Uffz Bley is brought ashore into captivity by the Dungeness Lifeboat on 7 October 1940. He was possibly the pilot of the aircraft claimed to have been shot down by the railway-mounted light anti-aircraft guns. BELOW: Shortly after the war, No 5 ‘Hercules’ arrives at the Southern Railway’s Ashford Works for a much needed overhaul.
and it is possible that concrete filled the gap between the original metal sides of the wagons, in the same way as the armour on the standard gauge armoured trains already in use. The fighting compartment at the far end of the wagon (furthest away from the locomotive, which would have been in the centre of the train) was fitted with a Lewis light machine gun and Boys anti-tank rifle on a revolving ring with shield, designed to be fired from the train. The fighting compartment nearest the locomotive had another Lewis gun on a high-angle mounting able to be used against aircraft. The low clearances on the line meant that when in use, the armament had to be temporarily dismounted to allow the train to pass under bridges. While the description and appearance of the miniature armoured train may sound and look amusing, it www.britainatwar.com 115
SMALL BUT DEADLY Kent’s Armoured Railway
TOP LEFT: A visit from one of the men (on the left) who manned the armoured train during the war in front of the replica, on his first visit back to the area since serving there. TOP RIGHT: ‘Hercules’ and one of the original wagon chassis fitted with replica armoured train bodies (made of hardboard instead of steel) seen at Dymchurch in 1990. BELOW: No 5 ‘Hercules’ as the locomotive appears today.
THE TRAIN IN ACTION
The day-to-day use of the train would usually consist of a dawn patrol from Dymchurch to Hythe, though this was sometimes done in reverse. It then spent most of the day standing by, camouflaged, waiting for any German aircraft returning at low level to engage with the Lewis guns. One Me 109E was claimed as shot down into the sea on 7 October which could well have been the aircraft of 4./LG2 flown by Uffz Heinrich Bley who was rescued by the Dungeness Lifeboat, the Charles Cooper Henderson. Lieutenant-Colonel W D C Trotter, commanding the battalion, also stated that a Heinkel HE111 bomber was downed by the guns of the armoured train. The Somersets left the area in early November and the 5th Battalion Royal West Kent Regiment took over, including the train. By now, the likelihood of invasion had passed and the infantry even ran passenger services using the existing locomotives and rolling stock. This was a highly unusual method of operation because railway working was usually – even in
For more information on the Romney, Hythe & Dymchurch Railway you can visit the website at www.rhdr.org.uk or telephone 01797 362 353. 116 www.britainatwar.com
narrow gauges – the sole domain of the Royal Engineers. Meanwhile, the line itself was becoming more and more run down – after all, although the infantry were doing a handy job of running the trains themselves, it was asking a lot more to expect them to be able to maintain a railway adequately. In January 1941 a detachment of three men of the Royal Engineers from the 160th Railway Construction Company and six men from the Pioneer Corps arrived to take over the line and to undertake the required work on the locomotives, rolling stock and infrastructure. By late February 1941 the 5th RWK’s had left, and the area was now defended by the 2/5 Battalion Queens Regiment who also utilised the armoured train, which by now had its four Lewis guns replaced with Bren guns. The train was considered so useful that a request was made (but denied) for a second armoured train. There was also a proposal to extend the line to Camber Sands, which was feasible enough, owing to the flat land and lack of serious obstacles, but the
plan was ultimately abandoned due to lack of manpower. Passenger trains were still run on the line for the soldiers, mainly for recreational use, but with the withdrawal of the army from the coast trains the running of them by the military stopped at the end of April 1943. The Royal Engineers spent two months refurbishing the line to a suitable standard for it to be returned to its peacetime owners – this was necessary to avoid a possibly costly claim for repairs to the War Office. ‘Hercules’ had its armour plating removed and returned to its original livery of London & North Eastern Railway apple green. The armoured wagons were put to one side.
POST WAR
After the war the line was refurbished and put back to its peacetime speciality, transporting crowds of visitors to the area. The armoured wagons had their modifications removed in 1946 and spent a short period transporting ballast before being fitted with passenger carriage bodies. The line was reopened to the public in March 1947 by movie stars Laurel & Hardy. The Romney, Hythe & Dymchurch Railway still operates today, mainly using the fleet of original steam locomotives. ‘Hercules’ is one of those still in regular use (although at the time of going to press it is currently undergoing boiler repairs), and for a short while in the 1990s it carried a replica armoured body, together with a replica armoured wagon. The replica body and wagon are now on display outside the 1940s museum at New Romney station where information on the history of the line, the armoured train and film footage of it in service can all be found. With thanks to Andy Nash and Laura Jacques of the Romney, Hythe & Dymchurch Railway Association Heritage Group.
DISASTER OVER BRACKLESHAM Battle of Britain 75th Anniversary
Bofattle Britain
75th ANNIVERSARY 1940-2015
MAIN PICTURE: A Blenheim IVf, 1940. RIGHT: Plt Off David Noel Woodger. The son of Reginald White Woodger and Edith Muriel Woodger, of Old Coulsdon, Surrey. He was born in Epsom in 1920 and joined the RAF on a short service commission in July 1939, and was posted to his unit in March 1940.
W
ITH THE Battle of Britain at its height, ‘home’ for the personnel of ‘A’ Flight, 235 Squadron, was the RAF airfield at Thorney Island, near Chichester in West Sussex. Formed in October 1939 and operating in the ‘coastal fighter’ role, 235 Sqn were equipped with Bristol Blenheim IVfs, engaged on fighter and shipping protection. Its main operating areas were the northern reaches of the North Sea, southern England, the English Channel, Channel Islands and the southern part of the Norwegian Sea. Under the command of Wg Cdr Ronnie ‘Nobby’ Clarke, 235 Sqn rotated between RAF Bircham
118 www.britainatwar.com
Newton and Thorney Island in the summer of 1940, and it was here, at Thorney Island, during August, that Flt Lt ‘Freddie’ Flood and Sgt Kenneth ‘Skipper’ Naish and Plt Off Dave Woodger found themselves. Also with them was Plt Off Norman JacksonSmith, nicknamed ‘Jacko’. Their recent operations had been from the Norfolk base, but ‘Jacko’ and his colleagues mounted patrols along the coastline of German occupied Europe, sometimes escorting Fairey Battle or Blenheim bombers or Swordfish bi-planes, and other times conducting independent sweeps. Additionally, 235 Sqn’s ‘A Flight’ was also tasked with protecting their airfield and local area, including Portsmouth. This was their role on Saturday 24 August 1940.
DISASTER OVER BRACKLESHAM Battle of Britain 75th Anniversary
Friendly-fire is not a phenomenon exclusive to recent Middle East wars but is something that has haunted warfare since the very earliest of conflicts. Sadly, the Battle of Britain saw many such episodes, and one case involved Hurricanes attacking RAF Blenheims, with unfortunate and fatal results. Andrew Bird relates the sad tale.
AIR RAID IMMINENT
Helping to provide fighter defence for south east England, along with other RAF squadrons, was No. 1 Royal Canadian Air Force Squadron that had been formed in Trenton, Ontario, in 1937. It had arrived in Great Britain in July 1940, uniquely with its own Canadian built Hurricanes. These were not up to operational specifications, and the squadron was declared nonoperational until the latter part of August. Sqn Ldr Ernest ‘Ernie’ McNab was the CO and had managed to get some combat experience flying with 111 Sqn, whilst the remaining pilots scraped together some minimal flying experience and only a limited number of hours on aircraft recognition in order to better identify friend or foe.
As things would turn out, aircraft recognition had perhaps not been a particularly finely honed skill for this group of Canadian pilots. With a formation of one hundred plus enemy aircraft headed for Portsmouth and Southampton, HQ Fighter Command, via its Filter Room, allocated the raid to 11 Group who, in turn, detailed the Northolt Sector to deal with it. Shortly afterwards, twelve Hurricanes lifted off from Northolt with McNab leading the Canadians towards Selsey Bill to intercept the raiders. Unhindered, the German formation had negotiated the Isle of Wight and had Portsmouth well within its sights. Nine miles northwest from here was RAF Thorney Island. It was from
TOP RIGHT: Hurricanes climb to an interception patrol during the summer of 1940. LEFT: Eighteen year old Sgt Daniel Leslie Wright who was killed in action on Saturday 24 August, 1940. He was one of the youngest Battle of Britain casualties.
www.britainatwar.com 119
DISASTER OVER BRACKLESHAM Battle of Britain 75th Anniversary
ABOVE: Pilots of No.1 (RCAF) Squadron pictured with one of their Hurricanes during 1940. RIGHT: Squadron Leader Ernie McNab, RCAF, 1940.
here that ‘Jacko’ Jackson-Smith, a veteran of many ‘ops’, remembered his three fellow pilots being scrambled to intercept the same threat: ‘Our silence was broken by the noise of the ‘phone. Cpl. Les Clarke, the telephone orderly took the call, and immediately shouted ‘Ops confirm ‘air raid warning red’ – Scramble . . . Air raid imminent!’ Three minutes had elapsed since the alarm when Flt Lt ‘Freddie’ Flood, Plt Off David Woodger and Sgt ‘Skipper’ Naish lifted off and were ordered to intercept the German bomber stream. With a sense of urgency the defenders leveled off at 6,000 feet in line astern, their machines silhouetted against the sun. Ahead, ack-ack blossomed in the sky as the three continued to head for Portsmouth to help defend the threatened city and port.
‘BREAK! BREAK! BREAK!’
At 16.39 hours, and with the altimeter reading 10,000 feet, 1 (Canadian) Squadron swung towards Portsmouth. Instantly, fear grabbed hold of McNab, who later wrote: ‘My mouth dried up like cotton wool, ahead at 6,000 feet, three miles northeast of Thorney Island were three machines flying in line astern 120 www.britainatwar.com
through the shifting sunlight and haze. Junkers 88s!’ Flt Lt Gordon ‘Gordie’ McGregor saw the black shapes too. At 16.40 McNab, leading his vic, called: ‘Echelon, starboard –go, go!’ At about 16.41, with the coast off to starboard, one of the Blenheims (T1804) was flown by Woodger, with his Wireless Operator/Air Gunner Sgt. Daniel Wright. They were positioned as the rear aircraft, the ‘Tail end Charlie’ of the three, when his gunner called: ‘Enemy aircraft at 11 o’clock coming straight down towards us.’ Woodger opened the throttles and shouted a warning to Flood and Naish ‘Fighters coming down now!’ The silhouette’s doubtless looked very familiar to Wright, who quickly recognised them. Hawker Hurricanes!
The Hurricanes continued to stream down towards the Blenheim fighters and heading north-east. In seconds, just 3,000 feet separated the Hurricanes from the silhouetted monoplanes, but Ernie McNab and Plt Off Paul Pitcher spotted that something was wrong. Gun turrets! Both men identified the turrets on the aircraft they were about to attack – something the Junkers 88 lacked. And then they spotted the broad white flash on the tails, clearly marking them out as RAF. McNab later reported: ‘On impulse I shouted twice, ‘Break, break, break! Don’t attack!’ Unfortunately, flying at 300 mph, not all of my pilots heard the call. Their concentration focused on the ‘Junkers’ and with their adrenalin pumping.’ (NB: In all probability, too, the unreliable HF TR9D wireless transmitter/ receivers then in use may have played a part in the communication breakdown. This became a common problem during the Battle of Britain) His section broke violently to port, away from the field of potential battle, and didn’t attack. Their leader cursed repeatedly at what was about to unfold, yelling a third time: ‘Break, break, break!’ But his attempts were futile and he couldn’t save his men from the impending situation.
DISASTER OVER BRACKLESHAM Battle of Britain 75th Anniversary
‘Everything was happening so damned quickly – the Hurricane was very manoeuvrable, and extremely fast. My Blenheim on the other hand was shuddering at 200 mph!’ said Naish, later. ‘Henry, my gunner, gave me good positions of where the Hurricanes were, and he like Wright and Sharp, fired off the colours of the day’ The recognition signals cascaded out with a blaze of colour, and burst in the hazy late afternoon sunshine. From their cockpits, the Canadian pilots didn’t register that recognition signals were being fired, but instead they saw ‘long yellow and red spears’ which they took to be gun flashes. ‘Let’s get the Bastards’ shouted Fg Off Arthur ‘Father’ Nesbitt.
UNRESPONSIVE CONTROLS Ken ‘Skipper’ Naish recalled: ‘They were still coming, and started firing at a range of about 1,000 to 900 yards and we turned sharply to starboard and rapidly reduced height to make for sea level. That was hair raising in its self. N3531
received hits several times, including a punctured oil hose in the starboard wing root which caused thick black blotches to appear on the windscreen! I was therefore out to save ourselves.’ After the Hurricane had pulled away, Ken gingerly eased his damaged Blenheim back towards Thorney Island, flying at about 100 ft and continually monitoring the suspect starboard engine and oil gauge. The second Blenheim to be pursued (T1804) was attacked by Flt Lt ‘Gordie’ McGregor and Fg Off Jean-Paul Desloges. While McGregor fired a long burst, Desloges tightened his arc and fired at Woodger. Hits punctured the hydraulic system in the starboard wing and the rear power-operated gun turret instantly became useless. Inside the turret’s confined space, eighteen-yearold Sgt. Daniel Wright, a miner’s son, sat motionless, doubtless praying that the attacking RAF pilots would quickly realise their error. Within a breath, his young life was snuffed out. The rear fuselage was already in bad shape, bullets having shredded much of its structure and with smoke now pouring from the tail. The starboard Mercury radial engine was also ablaze, glowing red hot from the intense heat. Desloges shouted over the R/T: ‘My God! He’s on fire’. But even now, the awful reality of the situation was lost on the attacking pilots.
The heavily damaged Blenheim fighter rolled away to the right. Inside, Woodger struggled with the unresponsive controls but another two-second burst of .303 rounds scythed into the cockpit as what must have been the coup-de-grace. Plt Off Dave Woodger probably died instantly. His machine continued in a lazy spiral, heading downwards towards the water east of Thorney Island, out over Bracklesham Bay. Wreathed in flames and disintegrating, it tumbled into the water bannering a trail of oily black smoke. Eventually, Daniel Wright’s body would be recovered from the English Channel, but of David Woodger no trace was ever found.
BULLETS RAINED IN
The two jubilant Canadians, McGregor and Desloges, peeled away from the engagement claiming their first ‘kill’, but losing sight of their victim after watching it briefly burn. Their fellow combatants, Fg Off Arthur Yuile and William Sprenger, followed their section leader ‘Father’ Nesbitt into an attack firing at point-blank range, not
LEFT: Flying Officer Rod McGregor, RCAF, 1940. He was one of the RCAF pilots who mistakenly attacked the Blenheims over Bracklesham Bay.
ABOVE: Pilot Officer Paul Pitcher, RCAF, 1940. BELOW: Pilots of 1 (RCAF) Squadron pictured between sorties during the Battle of Britain.
www.britainatwar.com 121
DISASTER OVER BRACKLESHAM Battle of Britain 75th Anniversary
ABOVE LEFT: Family newspaper announcements relating to the loss of David Woodger. His body was never found. Instead, he is commemorated on the Air Forces Memorial at Runnymede. TOP RIGHT: A German photograph showing bombs dropping on Portsmouth on 24 August 1940, the very raid that the hapless Hurricanes and Blenheims were supposed to be intercepting. RIGHT: The grave of Sgt Daniel Wright at Chasetown (St Ann) Churchyard, Burtonwood, Staffordshire.
realising that the Wireless Operator/Air Gunner air-gunner had desperately fired off yet another set of Verey cartridges in the colours of the day. Bullets rained in hitting the hydraulic system, tyre, undercarriage and starboard engine cowling. Both Canadian’s then broke off their attacks, convinced that the ‘enemy raider’ would not be returning to France. With commendable skill, ‘Skipper’ Naish guided his battered and scarred Blenheim into Thorney Island, making a wheels-up landing. Training took over, as Naish later recalled: ‘I throttled down the good engine to almost the minimum required for a Mark IV Blenheim, to nurse it and to avoid the radial overheating’. Flood was lucky, too. With his starboard engine holed and his windscreen thick with opaque blotches of oil, it was extremely difficult to see forward, but he drifted in at less than 80 mph before coming to rest just in front of a newly dug slit trench. Remarkably, the surviving four airmen had suffered no more than cuts and bruises. The following morning ‘Skipper’ Naish and Plt Off Charles Pinnock, the squadron adjutant, examined the battered Blenheim. With .303 holes peppering the fuselage, starboard engine and the propeller, it was all but a write off. Of the remainder of the Canadian squadron, a shaken McNab and his pilots had landed and refueled at RAF Tangmere before returning to Northolt. Notwithstanding McNab’s worst fears, claims were made to the squadron intelligence officer: Flt Lt McGregor and Fg Off Desloges together claimed a Ju 88 destroyed
122 www.britainatwar.com
and Fg Offs Nesbit, Arthur, Yuile and Sprenger recorded hits on another Ju 88 which was claimed as a ‘probable’. Of the engagement, Canadian journalist Harold Fair enthusiastically wrote: ‘Roaring into action together as a unit for the first time the First Royal Canadian Air Force fighter squadron to reach England proved itself on Saturday by downing two German bombers.’ This announcement was wired to the Canadian press and ran with the headline: ‘Group of Canadians Goes Into Action First Time as Unit.’ RAF Northolt’s Station Commander, Gp Capt Stanley Vincent, ultimately confirmed the Canadian squadron leaders worse fears. McNab, a former prize-fighter, buried his head in his hands, appalled at what had happened, and cried out: ‘My God, what have we done? What can I do?’ Little or nothing could now be done to make amends, but later on that evening Sqn Ldr Ernie McNab made a difficult visit to Thorney Island to apologise, offer his condolences
and join in a toast the two lost Blenheim boys, Woodger and Wright.
UNSUBSTANTIATED CLAIMS
It was a tragic baptism of fire for No.1 RCAF Squadron’s introduction to the Battle of Britain. RCAF Headquarters in London, however, evidently did not tell the National Defence HQ in Ottawa about the episode until after the war, and not until 27 February 1947. Only then did they do so in reply to an official query. The letter from London blandly stated the facts: ‘The five combat reports submitted by No.1 Canadian Squadron, dated 24 August, 1940, and queried in your referenced letter, were unsubstantiated claims. The two aircraft destroyed in these combats were Blenheims of RAF Coastal Command.’ Interestingly, two versions of the Operations Record Book of No.1 Canadian Squadron for the month of August 1940 are in existence. One version described the attack on the Coastal Command aircraft but implies that the engagement was broken off before any damage was done. This version of the Operations Record Book omits any mention of the genuine Squadron victories on August 26 and August 31, whilst the second version of the ORB omits all mention of the attack on August 24, but does mention the successes of 26 and 31 August. It is this second version of the record that survives in the files of the Canadian Defence Department’s History Directorate, and in the microfilm copy held at the National Archives, Kew. Sometimes, the official record doesn’t always quite tell the full story.
Militaria
Welcome to Fortress Militaria We offer a wide range of Collectable WW1 and WW2 Axis and Allied militaria: Uniforms, Headgear, Field/Personal equipment, Weapons and military collectables etc. In addition you may well find the odd item from an earlier or later period. All our offerings are of the period described and we offer a money back guarantee. We also operate a layaway plan, see terms for details. All our items are offered as collectors pieces and the ideas or political regimes involved are not supported in any way.
www.fortressmilitaria.co.uk 1940’s Events
PAPPLEWICK PUMPING STATION - 1940s WEEKEND -
1940’s Events Ti
October 10th & 11th
m
St e t ep B o 1 ac 93 k i 9- n 19 45
Winstan
11.00am-5.00pm
• Military and civilian displays • Battle around the pond • Land Army re-enactors • Army • Navy • RAF • Vintage vehicles PLUS all engines in • Trade stalls steam and underground • Live entertainment & much much more! reservoir tours available. Rigg Lane, Ravenshead NG15 9AJ
A tribute to our great wartime leader Winston Churchill. Now booking for public, private and corporate events throughout 2015.
www.winstan.co.uk
www.papplewickpumpingstation.org.uk
Spitfire Books
To Advertise here please call
Amie Spooncer Tel:
01780 755131 Email: amie.spooncer@ keypublishing.com
DEADLINE FOR D
OCTOBER
Copy deadline Thursday 3th September On Sale Date Thursday 24th September
ISSUE
Classified Marketplace
Medals
GREAT WAR GALLANTRY September 1915
GREAT WAR GALLANTRY SEPTEMBER 1915
Throughout the First World War, the many announcements of British and Commonwealth gallantry awards appeared in the various issues of The London Gazette. As part of our major monthly series covering the period of the Great War commemorations, we examine some of the actions involved and summarise all of the awards announced in September 1915.
A
MONGST THE 280 gallantry awards announced in September 1915 is the Distinguished Service Cross awarded to Frederick Parslow. Parslow was a member of the crew of a merchant vessel which, formerly employed on the South American nitrate trade, had been chartered by the Admiralty to operate as a horse transport. HMT Anglo-Californian had sailed from Montreal, Canada, and was bound for Avonmouth with a cargo of 927
horses when, on 4 July 1915, it was surprised and attacked by a surfaced U-boat, U-39. The story of what happened was recounted in many newspapers at the time. The following is the description provided by The New York Times two days later: ‘With nine dead sailors stretched on her deck, eight men lying wounded below, and her sides riddled by shot and shell, the British steamship Anglo-Californian steamed into Queenstown Harbour this
morning after having withstood the attack of a German submarine for four hours. The ship’s escape from destruction was accomplished with no other means of defence than the indomitable spirit of her Captain and crew, combined with masterly seamanship, which enabled her to frustrate the efforts of her assailant to torpedo her. ‘The story of how Captain Parslow [Frederick Parslow’s father, who was also called Frederick] stood on the bridge of the Anglo-Californian amid
u While a party of men was at work in a communication trench between Cambrin and La Bassée at 02.00 hours on the morning of 3 August 1915, a bomb from a German trench mortar landed on the side of the parapet, close to it. SecondLieutenant George Arthur Boyd Rochfort, of the Special Reserve, 1st Battalion, Scots Guards, was standing a short way off at the time, and, shouting to the men, he rushed at the bomb, seized it and hurled it over the parapet, where it instantly exploded. His VC was announced in September 1915. (ALL IMAGES HISTORIC MILITARY PRESS UNLESS STATED OTHERWISE)
www.britainatwar.com 125
GREAT WAR GALLANTRY
September 1915
o A portrait of Frederick Parslow Jnr.
(COURTESY OF STEVE SNELLING)
o Lieutenant Frederick Parslow is one of 127 Commonwealth burials of the 1914-1918 war commemorated in Cobh Old Church Cemetery, County Cork. This cemetery has a plot for those men from Lusitania whose remains were washed ashore.
(COURTESY OF THE COMMONWEALTH WAR GRAVES
a rain of shot and calmly directed the movements of his ship until he was killed by a shell, and of how his place was taken by his son until British destroyers appeared and the submarine was compelled to flee, was told by survivors. ‘The Anglo-Californian left Montreal for the British Isles on June 24. The submarine was sighted at 8 o’clock last Sunday morning. Captain Parslow ordered full steam ahead and wireless calls for aid were sent out. The submarine on the surface proved to be a far speedier craft than the steamer and rapidly overhauled her, meanwhile deluging her with shells. One shot put the wireless apparatus on the Anglo-Californian out of action. ‘Finding that he could not escape by running for it, Captain Parslow devoted his attention
GALLANTRY AWARDS GAZETTED IN SEPTEMBER 1915 Victoria Cross Distinguished Service Order Distinguished Service Cross Military Cross Distinguished Flying Cross* Air Force Cross* Distinguished Conduct Medal Conspicuous Gallantry Medal Distinguished Service Medal Military Medal* Distinguished Flying Medal* Air Force Medal* Total
7 27 18 39 140 5 44 280
* Indicates an award that has not yet been instituted. Mentions in Despatches are not included.
126 www.britainatwar.com
to manoeuvring his ship so as to prevent the submarine from using torpedoes effectively. “Our Captain was a brave man,” said one of the narrators. “He kept at his post on the bridge, coolly giving orders as the submarine circled around us vainly seeking to get a position from which it could give us a death blow with a torpedo. All the while the underwater boat continued to rain shot and shell upon us, and at times was so close that she was able to employ rifle fire effectively. ‘“At last one shell blew the Captain off the bridge, killing him outright and terribly mutilating him. Just before that he had given orders to lauch [sic] the boats, but this was very difficult under the shell fire. Several men were struck down while working at the davits. Ultimately four boats were got overboard ad were rowed away until picked up.” ‘The son of Captain Parslow, serving as Second Mate, was standing by his father’s side when the Captain was killed. The son was knocked down by the violence of the explosion. Springing to his feet, he seized the wheel, and, as ably as his father had done, continued dodging the submarine. Another shell burst alongside him, shattering one of the spokes of the wheel, but young Parslow retained his post. ‘The wireless SOS calls that had been sent out at the first alarm had reached those able to give more than passive assistance, however, and British destroyers appeared. On their approach the submarine abandoned the attack and submerged. Young Parslow was still at the wheel when the destroyers came up.’ A reporter for the Illustrated London News wrote that over thirty
horses on board were killed. The submarine, he adds, fired mainly at the bridge and at the boats being lowered. The ship was hit about twenty times. At least two of the dead crewmen were American. One account stated that “Carl Franz List, a crew member on the U-boat, stated that the U 39 crew thought that Captain Parslow deserved the Iron Cross, for the brilliance of his defensive tactics!” For their actions, both Parslows, father and son, were retrospectively or posthumously given commissions in the Royal Naval Reserve. It was with this distinction, and the rank of SubLieutenant, that Parslow Jnr was awarded the DSC in September 1915. The actions of another member of Anglo-Californian’s crew, Engineer James Crawford, were recognised in the same issue of The London Gazette, when he received the same award as Parslow Jnr: ‘For his services as Chief Engineer of the same transport, in the escape of which he was largely instrumental by maintaining the vessel’s maximum speed in spite of a shortage of firemen.’ Parslow Snr would also be posthumously honoured by the award of the Victoria Cross, though it would take some four years for the announcement to be made, in this case in The London Gazette of 24 May 1919. Parslow was the first of two merchant ship captains in the First World War to be awarded the Victoria Cross, the first civilian and, at 59, the oldest Great War recipient.
o
A depiction of the second action relating to Second Lieutenant Herbert James’ VC. On 3 July 1915, he headed a party of bomb throwers up a Turkish communication trench and when all his party had been killed or wounded, he remained alone, under heavy fire and kept back the enemy until a barrier had been built behind him and the trench secured.
GREAT WAR GALLANTRY September 1915
u During A contemporary account added the desperate following detail to the events of 13 fighting at April 1915: ‘Major Wheeler and his Gully Ravine squadron were entrusted with the task on the Gallipoli Peninsula on of carrying the Turkish position on 28 June 1915, a the “North Mound.” The project was a serious danger desperate one, for the Turks were well arose owing entrenched. Major Wheeler decided to to part of a charge straight for the section where regiment being checked in an two Turkish standards were waving, rightly surmising that the loss of their flag assault up a The would demoralize the enemy. The Turks, hillside. slope up however, fought with extreme courage which the men and steadiness and opened a devastating advanced was bare of cover fire on the advancing cavalry. The Lancers began to waver. Then it was that except for bushes of scrub, Major Wheeler showed the spirit that was which, however, in him. Bit by bit he drew ahead of his afforded them no men, and when last seen he was making real protection under heavy fire. straight for the standards, one man against many. He reached the Mound, but Rushing to their aid at a critical only to suffer a hero’s death and to gain a moment, Second hero’s reward – the Victoria Cross.’ Lieutenant
Of other Royal Navy gallantry award recipients listed in September 1915, Lieutenant-Commander Edgar Christopher Cookson was another who had a Victoria Cross link. On 13 September 1915, it was announced that he had been awarded the Distinguished Service Order. The citation stated: ‘For services during the operations in the Shatt-el-Arab. LieutenantCommander Cookson was conducting a reconnaissance up a creek of the Euphrates west of Qurnah in the armed launch Shushan on the 9th May, 1915, when he was heavily attacked by Arabs concealed in the reeds. Although severely wounded early in the action he resumed command after his wound had been temporarily dressed, and succeeded in most ably extricating the vessel from a perilous position under heavy rifle fire.’ During the same month that Cookson’s announcement of the DSO was made, he undertook the actions which would not only lead to the award of a VC, but also cost him his life: ‘On the 28th September, 1915, the river gunboat Comet had been ordered with other gunboats to examine and, if possible, destroy an obstruction placed across the river by the Turks. When the gunboats were approaching the obstruction a very heavy rifle and machine gun fire was opened on them from both banks. An attempt to sink the centre dhow of the obstruction by gunfire
having failed, Lieutenant-Commander Cookson ordered the Comet to be placed alongside, and himself jumped on to the dhow with an axe and tried to cut the wire hawsers connecting it with the two other craft forming the obstruction. He was immediately shot in several places and died within a very few minutes.’ One of the seven VCs announced in September 1915, all of whom were Army recipients, was that of Major George Godfrey Massy Wheeler. Wheeler was serving with the 7th Hariana Lancers, Indian Army. The London Gazette records that the award was made ‘for most conspicuous bravery at Shaiba, Mesopotamia’: ‘On the 12th April, 1915, Major Wheeler asked permission to take out his Squadron and attempt to capture a flag, which was the centre point of a group of the enemy who were firing on one of our picquets. He advanced and attacked the enemy’s infantry with the Lance, doing considerable execution among them. He then retired while the enemy swarmed out of hidden ground and formed an excellent target to our Royal Horse Artillery guns. On the 13th April, 1915, Major Wheeler led his Squadron to the attack of the ‘North Mound’. He was seen far ahead of his men riding single-handed straight for the enemy’s standards. This gallant Officer was killed on the Mound.’
Herbert James, of the 4th Battalion Worcestershire Regiment and who was attached to a neighbouring unit, led them forward under heavy rifle and artillery fire, and having taken them up, he returned to bring on a second party. He was awarded the VC for this action and a subsequent one on 3 July. (COURTESY OF THE AUSTRALIAN WAR MEMORIAL; H16491)
RUNNING TOTAL OF
GALLANTRY AWARDS AS OF THE END OF SEPTEMBER 1915 Victoria Cross Distinguished Service Order Distinguished Service Cross Military Cross Distinguished Flying Cross Air Force Cross Distinguished Conduct Medal Conspicuous Gallantry Medal Distinguished Service Medal Military Medal Distinguished Flying Medal Air Force Medal Total
115 791 107 933 2803 23 442 5214
www.britainatwar.com 127
LORD ASHCROFT'S "HERO OF THE MONTH"
Second Lieutenant Sidney Clayton Woodroffe VC
Second Lieutenant SIDNEY CLAYTON LORD ASHCROFT'S "HERO OF THE MONTH"
WOODROFFE VC 'Simply one of the bravest of the brave.'
LEADERSHIP AGGRESSION • BOLDNESS INITIATIVE • SACRIFICE SKILL • ENDURANCE
The many Victoria Crosses and George Crosses in the Lord Ashcroft Gallery at the Imperial War Museum in London are displayed under one of seven different qualities of bravery. Second Lieutenant Woodroffe’s award is part of the collection and Lord Ashcroft feels that it falls within the category of leadership: “Charismatic, strong, inspirational, the natural leader not only takes command, but also infuses all those around them with confidence and hope. They exude calm and resolve. They are a tower of strength.”
o Second Lieutenant Sidney Woodroffe and his men defending their position at Hooge on the morning of 30 July 1915, the day a new and terrible weapon was unleashed upon the unsuspecting British troops in the Ypres Salient – the flamethrower. (HISTORIC MILITARY PRESS)
S
o
A portrait of Second Lieutenant Sidney Woodroffe.
(THE LORD ASHCROFT COLLECTION)
128 www.britainatwar.com
IDNEY CLAYTON Woodroffe was born in Lewes, Sussex, on 17 December 1895, and was the youngest of four sons of Henry Woodroffe and his wife, Clara. Woodroffe was educated at Marlborough College in Wiltshire, where he was a senior prefect and represented the school at rugby, cricket and hockey. He attended Pembroke College, Cambridge, after gaining a classical scholarship. However, his studies were interrupted by the start of the First World War. On 23 December 1914, just six days after his nineteenth birthday, Woodroffe was gazetted as a second lieutenant in the 8th Battalion, The Rifle Brigade. On 25 May of the following year, he and his battalion were deployed to France, before later moving on to Belgium. At midnight on 30 July 1915, the 8th Battalion started taking over a section of trenches at Hooge, east of Ypres, Belgium. By 02.00 hours, the relief of its sister battalion, the 7th Battalion, The Rifle Brigade, was completed. However, a small group from the
7th Battalion was instructed to remain in the line on the orders of the General Officer Commanding (GOC), possibly because the 8th Battalion was so inexperienced. Woodroffe’s men from ‘A’ Company were separated from the rest of the line by a large bomb crater measuring some 90 feet across and 40 feet deep. At 03.15 hours, the Germans mounted an attack from their position close to the British line, which initially took the form of a heavy bombardment lasting two or three minutes. Casualties in the tightly-packed British trenches were high but worse was to come: a “liquid fire” was sprayed from hoses in the German line causing serious burns to those men that were hit by it. In fact, this was the first use of flame-throwers by the Germans during the Great War and one eyewitness described how “the Boches loosened their liquid fire on us with a vengeance … We were choked by the smoke and half scorched by the heat”.
LORD ASHCROFT'S "HERO OF THE MONTH" Second Lieutenant Sidney Clayton Woodroffe VC
The flame-throwers’ fire had been concentrated on the line either side of the large crater and then, under the cover of the thick smoke and flames, German soldiers surged forward through the crater before fanning out to the left and right behind the British line. Confusion reigned and four British machine-guns were soon out of action. At just before 03.30 hours, Woodroffe and his men came under a sustained attack from enemy soldiers who were advancing down the British trench leading off from the crater, while other Germans were approaching from behind the original line.
A British counter-attack aimed at relieving the endangered position failed. However, Woodroffe and his men fought on courageously until almost all their bombs ran out and they were virtually surrounded by the advancing enemy. At that point, Woodroffe skilfully withdrew his men, first along the Menin Road and then using a culvert to return to the main British line. By around 09.00 hours British reinforcements had finally arrived on the scene and at 12 noon orders arrived from the GOC to launch a counterattack at 02.45 hours. This was to be led – following a 45-minute artillery bombardment – by the 8th Battalion, The Rifle Brigade, even though many of its men had been killed or wounded in the earlier fighting. The artillery bombardment had, however, achieved very little and so, as the counterattack got under way, a fierce enemy machine-gun and rifle fire greeted the advancing British soldiers. Woodroffe was shot dead near “Old Bond Street” trench, Zouave Wood, as he attempted to cut the barbed wire so that the counter-attack could proceed: he died in No Man’s Land aged just nineteen years and seven months. Woodroffe’s father received a letter from Lieutenant Colonel
R.C. Maclachlan that detailed precisely u Second Lieutenant how courageous his son had been: Sidney “Your younger boy was simply one Woodroffe's of the bravest of the brave, and the medals, which work he did that day will stand out are part of the Lord Ashcroft as a record hard to beat … When the Collection. line was attacked and broken on his right he still held his trench, and only u A picture of when the Germans were discovered Hooge Crater to be in the rear of him did he leave Cemetery in the it. He then withdrew his remaining aftermath of men very skilfully right away to a the Armistice. flank, and worked his way alone back It was on the to me to report. He finally brought his site of this cemetery command back, and then took part in that Second the counter-attack. Lieutenant “He was killed out in front, in the Sidney open, cutting the wire to enable the Woodroffe of the 8th Rifle attack to be continued. This is the Brigade held bald statement of his part of that day’s action. He risked his life for others right the German advance after through the day and finally gave it for the attack that the sake of his men. He was a splendid morning. Later type of young officer, always bold as that day he led the remnants a lion, confident and sure of himself of the 8th Rifle too. The loss he is to me personally is in a very great, as I have learnt to appreciate Brigade counter-attack, what a sterling fine lad he was. His men ascending the would have followed him anywhere.” slope from Sanctuary Sidney Woodroffe’s posthumous Wood. A VC was announced on 6 September communication 1915 when his citation praised the trench that actions of “this very gallant Officer”. played a vital His parents were presented with his part in the fighting and award from King George V in an referred to by investiture at Buckingham Palace on the name Old 29 November 1916. Sadly, Mr and Bond Street Mrs Woodroffe lost three of their Trench is four sons to the war. described as Sidney Woodroffe’s body was never having passed recovered and his name is listed on the through the site Menin Gate at Ypres, as well as on the of the cemetery immediately Rifle Brigade Memorial in Winchester or beside its Cathedral, Hampshire. I purchased his eastern medal group privately in 2001 and I boundary on its way to Zouave feel hugely privileged to have the VC of this courageous young officer as part Wood. (HISTORIC MILITARY PRESS) of my collection.
VICTORIA CROSS HEROES
i Lord Ashcroft KCMG
o Second Lieutenant Sidney Woodroffe’s entry on the panels of the Menin Gate is possibly unique in that the post-nominal VC appears before his name, and was added at a later date. (COURTESY OF THE COMMONWEALTH WAR GRAVES COMMISSION)
PC is a businessman, philanthropist, author and pollster. A write-up on Sidney Woodroffe appears in his book Victoria Cross Heroes. For more information, please visit: www. victoriacrossheroes.com Lord Ashcroft’s VC and GC collection is on public display at Imperial War Museums, London. For more information visit: www.iwm.org.uk/heroes. For details about his VC collection, visit: www. lordashcroftmedals.com For more information on Lord Ashcroft’s work, visit: www.lordashcroft.com. Follow him on Twitter: @LordAshcroft
www.britainatwar.com 129
The First W
rld War in Objects
WOODEN GRAVE MARKER NO.14
FIXED TO the wall in the Cloisters at Salisbury Cathedral are a number of original grave markers, wooden crosses that once marked the last resting place of some of those killed or who died of wounds during the First World War. In the first decade after the Armistice, the Imperial War Graves Commission (IWGC) continued with its task of constructing over 2,400 cemeteries in France and Belgium, whilst work progressed in Italy, Egypt, Palestine, Macedonia, Mesopotamia and on the Gallipoli Peninsula. An integral part of this process was the replacement of the original wartime grave markers with the now familiar uniform headstones. The wooden crosses, it was decreed, could be claimed by a casualty’s next of kin. Whether the opportunity to claim a loved one’s original grave marker was little known in the UK, or that the take-up had been small, in March 1920 the IWGC was forced to make a statement in newspapers throughout the country: ‘[They] announce that when the temporary wooden crosses that mark the graves of officers and men abroad are replaced by permanent memorials, it will not be possible to preserve beyond a certain time those that are not required by the relatives.’ Indeed, the message that the wooden crosses could be claimed was still being reiterated three years later, as the following passage from an edition of The Ypres Times in April 1923 (Vol.1, No.7) reveals: ‘It is now possible for relatives to obtain possession of the wooden crosses as circumstances permit. There is a certain amount of formality, however, to be observed. The written authority of the Imperial War Graves Commission is essential in all cases and the crosses can only be handed over personally and under definite conditions. There are, we are sure, ever so many people who would like to have the wooden crosses that once stood over the grave of a loved one, but who do not know how to obtain them or who are unable to go over to France to receive them. All [claimants] should write to the Church Army, War Grave Department who will, if it is possible to get the cross wanted, make arrangements to obtain it.’ (It is worth noting that, according to a letter written by the Chief Secretary of the Church Army, the IWGC was originally responsible for sending grave markers to the various claimants).
ABOVE: The original grave marker of Colonel Frank A. Symons CMG, DSO in Salisbury Cathedral. Symons was the Assistant Director of Medical Services for the 9th (Scottish) Division. He was killed whilst walking to an advance dressing station at St Nicolas on 30 April 1917. From March 1916 to the Armistice, the village of St. Nicolas was occupied by Commonwealth forces and for much of that time it was within the range of German artillery fire. St. Nicolas British Cemetery, in which Symons was buried and the grave marker seen here originally erected, was started in March 1917. Symons, had, in 1900, married Dorothy Bennett of Salisbury. The marital home was in Cathedral Close, which may well explain why the cross can be seen in the Cathedral today. (ALL IMAGES HISTORIC MILITARY PRESS)
ABOVE: Original wooden grave markers, of various designs, in London Rifle Brigade Military Cemetery.
130 www.britainatwar.com
Having also described the facts listed above, a reporter for the Gloucester Citizen on Saturday, 28 July 1923, wrote: ‘There can be no doubt that the possession of these little wooden crosses is a source of much comfort to bereaved relatives, and many clergy are setting aside a small portion of the local churchyard for the reception of the crosses from the graves of local men. In other cases the crosses are placed reverently around the local war memorial.’ In some cases, official ceremonies were held. For example, the Western Daily Press on Wednesday, 7 November 1923, carried this announcement: ‘A service will be held in Bristol Cathedral on Saturday next, at 4 p.m., when a number of original wooden crosses from the war cemeteries will be handed to the relatives of the fallen soldiers.’
The Royal Airforces Assoc F_P.indd 1
14/07/2015 10:42