Issue 50 cover_Layout 1 11/09/2013 09:56 Page 1
SHOWCASING THE VERY BEST IN SCALE AIRCRAFT MODELLING
50 ISSUE
AIR Modeller
October / November 2013
October / Nov 2013 £6.50 UK $14.95 www.airmodeller.com
KAMIL FELIKS SZTARBALA’S VIETNAM SKYRAIDER
CONTENTS 2
SDB3 Dauntless Trumpeter’s large scale Dauntless modelled by Thomas de la Fuente
12
Superbad Spad Kamil Feliks Sztarbala dishes the dirt on Tamiya’s 1:48 Skyraider
20
Rafale M The Hobby Boss 1:72 Rafale gets an ‘M’ makeover by Francois Regis Binder
28
Big Bird B-17, Part 1 The Editor bigins his build of HK Models spectacular 1:32 Flying Fortress
32
A26M Zero trainer Luc Janssen revisits an old project and converts Tamiya’s 1:32 Zero
40
P-51 D Mustang Tamiya’s beautiful 1:32 Mustang built from the box by Girolamo Lorusso
48
Air Born New releases
56
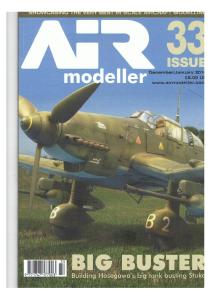
Ju-87 B2 Charles Whall builds a striking Stuka from Italeri’s 1:48 kit
AFV Modeller is published Bimonthly by AFV Modeller ltd Old Stables East Moor Stannington Northumberland NE61 6ES Tel: 01670 823648 Fax: 01670 820274 email:
[email protected] Editor and Designer: David Parker Deputy Editor: Donald Campbell Sales Director: Keith Smith ISSN 1747-177X
We are now on Facebook, ‘Like’ us to follow what we are doing and follow our build projects.
AIR Modeller welcomes contributions from interested parties, but cannot accept any responsibility for unsolicited material. The contents of this publication including all articles, drawings and photographs originated by AFV Modeller ltd become the publishers copyright under copyright law. Reproduction in any form requires the written consent of the publisher. Whilst every care is taken to avoid mistakes AFV Modeller ltd. cannot be liable in any way for errors or ommissions.
1
TRUMPETER’S 1:32
SDB3 DAUNTLESS Modelled and described by Tomas de la Fuente
Midway’s Champion
2
In 1934, the Douglas Company designer, Ed
At the beginning of hostilities against Japan, the
Heinemann began work on a new dive bomber
Dauntless proved itself including in the Battle of
for the U.S. Navy, which was to be based on
the Coral Sea, the Battle of Midway and
aircraft carriers. After many twists and
Guadalcanal. And specifically in Midway where
intermediate type designs, finally on 23 July
they won great respect, being the principal
1938, the first flight of the prototype of the
architects of victory, because in four minutes
Dauntless, the XBT-2 took place. The first
they sank three of four Japanese aircraft
production model was shipped on June 4, 1940,
carriers. The fourth aircraft carrier, was sunk a
the SBD-1. Over the next four years, there were
little later.
several models Dauntless (SBD-1, -2, -3, -4, -5
In particular the model SBD-3 performed well at
and -6), besides being used by the U.S. Navy,
Midway and were the same aircraft that had
other countries, (Australia, Chile, France,
participated in the Coral Sea a month earlier,
Mexico, New Zealand and the UK), and the U.S.
well worn aircraft, and experienced in combat,
Army also used it, under the name of A-24
these are aspects that must be reflected in the
Banshee.
realisation of the model I had planned.
The Trumpeter kit in 1:32 scale, was my choice for the project, and the version I bought, is specific to the SBD-3 at Midway. When I opened the box I wasn’t happy, as the fuselage was moulded in clear plastic. I particularly detest clear plastic, as it is very brittle and difficult to machine and not sanded easily. The rest of the model looked good, with many parts, as is tradition with this brand there’s an option of two versions of the same model, early and late, distinguished, besides the tail gunner weapon, in the
fairing behind the engine. To bring the detail to the standard I wanted I thought it necessary to acquire several improvements, which were: The Eduard Big Ed set dedicated to this aircraft, which is a bumper set with all the Eduard photoetch and masks, Master Casters resin wheels, Master’s metal Gun Barrels and Aires resin .50 M2 Machine Gun (Browning). In total I used around 400 pieces of photoetch, really crazy!
3
Construction I started assembling some pieces sticking photoetched parts in the fuselage and other details and I could see that the transparency of the plastic would be a real problem, I decided to prime all interior parts in black, which gave me a great contrast to work on. After all the interior was painted with Gunze Interior Green, H-58, some parts like the seat and the tail gunner position which were first painted with Alclad II Aluminium Dull (ALC-117), were scratched with a scourer around the edges before the green dried simulating the wear often seen. The ammo box in the tail gunner position is in aluminium, and Model Master metalizer was used for this.
Once I’d painted the entire interior, I proceeded to apply some airbrushed highlights, the same colour mixed with a few drops of yellow. After that all photoetched parts were added: plates, instrument panels, seat belts, front of radio equipment, etc. I also added the necessary wiring, making wire and cable from Plus Model’s lead wire which allows for easy shaping. There are several placards that don’t come in photoetch, but I thought they were important so these were drawn in Photoshop by my good friend Antonio Ramil. The placards were printed in reverse on clear acetate, and then coloured behind in the necessary tones. I painted the details with Vallejo acrylics, and the baskets that carried the oxygen systems and regulators I painted in a different shade of green, specifically Mr Color Russian green C-135, to differentiate as per my references. After all this, I added shading, applying a wash of Mig Productions Dark Wash giving a very convincing finish. Once this is finished, I let it dry for a day and matt varnished with polyurethane acrylic matt varnish from Vallejo, which gives a very good matt finish. Also applied were earthy tones with Mig pigments on the edges of the floor to give the illusion of dust and dirt inside the cabin. 4
5
While I was working with the cockpit, I was working in parallel on the engine adding the photoetch and the spark plug wires with again, Plus Model wire. In total, between the parts of the kit itself, photoetched and cables, the engine consists of nearly a hundred pieces. I painted the engine as follows: crank case I painted with Alclad II steel, the cylinder base with Alclad II Magnesium (ALC-211), the cylinder head with Alclad II aluminium and the starter ring, the gearbox in grey Gunze H-22. The valve caps on the cylinder head and the plates covering the heads were finished with black enamel (XF-1 Tamiya), the intake pipes with Alclad Pale Burnt Metal (ALC-104), the spark plug wires with X-9 Tamiya enamel. Leaks and weathering were achieved with various shades of brown with matte acrylics and Mig pigments and rust tones. Once the engine and cockpit were done, before closing the fuselage, I cut the doors of the compartment that housed the rear guns, a rather delicate operation given the fragile nature of transparent plastic. To make the cut, I use Dymo tape, to support the area and a pin in a chuck to scribe through the plastic until it is free. Then, I could glue the two fuselage halves. I primed it by airbrushing Mr Surfacer diluted with Lacquer Thinner, after which there were some defects in the plastic which I fixed with putty. I Glued the wings together, before adding a series of pieces in photoetch to the wheel wells. and glued the wings to the fuselage, and the elevators, leaving the model ready for the painting phase.
Painting & Weathering The kit provides two aircraft involved in the Battle of Midway, one from the VS-5 on the USS Yorktown, and another belonging to the VB-3, also based in Yorktown, the latter is the one I chose, marked as B-10, piloted by Lt. Harold S. "Syd" Bottomley with tail gunner and radio operator Daniel F. Johnson. Bottomley hit one of the Japanese carriers, and flew back to Yorktown,
6
he had to land on the Enterprise, refuel and reattack the fourth carrier. For this feat Bottomley was awarded the Navy Cross. The Dauntless’ which participated in Midway, had a number of features that make them quite attractive when shown on a model, these peculiarities were: •One month earlier had participated in the Battle of the Coral Sea, so they were pretty dirty and worn. •National markings had just changed, to remove the red circle at the centre of the stars, leaving traces of the red.
•Also removed were the red and white lines painted on the tail. On some aircraft, a patch could be seen in a darker blue or they are painted with a blue grey, but quickly bleaching you could still see the white and red lines, this was my choice. •Despite being painted in a single tone, the grey blue, showed a significant gradation of shades of the same colour, depending on the area of the airplane, due to wear gradation and fading.
For the canopies, first I dipped the parts into Future / Klear and allowed them to dry on absorbent paper. This removes imperfections and provides a good smooth surface. After letting it dry for several days, I proceeded to apply the magnificent Eduard masks, then painted green inside with Gunze H-58, on all parts except the front which was painted black. Once dry, I painted the exterior color, the blue grey, finally, I outlined all screws and panel lines with pen and a dark transparent wash.
As I said, these aircraft were painted in blue grey FS 35189 over FS 26440 and grey on the undersides. To paint this I used Mr Color C-367 lacquer, which corresponds to the FS 35189 very well. For the FS26440 grey I used the Gunze H-325, also gives the exact shade.
I painted the lower surfaces with Grey FS 26440, for the control surfaces I painted with the same grey, but mixed with white Gunze H-316 (an off-white, not pure) in a ratio of 1:4 With the same mix, the panels on the bottom of the fuselage were highlighted and working from references, areas were masked and painted with a mixture of 26440 FS plus one drop of H-37 (Wood brown) Gunze, to give a slight tan tone to the lower surfaces. The control surfaces were masked with thin tape on the protrusion of the ribs, and after airbrushing with a mixture of FS 26440 white mixed with H-316, in a 1:1 ratio, the rib surface is highlighted. Finally I airbrushed with the very diluted FS-26440 to add some contrasts in areas.
green, which was a primer on all naval aircraft and exposed when the blue paint was lost by abrasion and wear by the crew. This effect on the Dauntless is particularly noticeable on the wing root area closest to the fuselage. Once green areas were done, I decided first to paint the stars since the blue grey paint could darken the white tones. To paint the stars, I used some masking tape with grid pattern from Tamiya, first I started painting the red dots, which later had to be transparent. Once dry, I proceeded to apply the white, ensuring that the red was just visible, and finally using the star masks, painted the mixture of insignia blue. The result is more than satisfactory, far better than what could be achieved with decals.
Before painting the upper surfaces, some areas of the fuselage were painted with interior
7
I applied salt on the green where I wanted the appearence of chipped blue, this is done by first wetting the surface with a brush and then depositing the salt where required. Once the blue is applied and dried it was removed from where I wanted with a brush or toothpick.
Along with painting the stars, I painted the top of the movable surfaces and the rudder in blue, for this I mixed blue grey with off-white FS 35189 H-316, in 1:4 ratio. Once dry, I airbrushed the ribbing freehand with white H-316. I masked with thin tape and airbrushed again with a mixture of blue grey and white, this time in the ratio 1:2. The area of the cowling behind the engine has a number of screws, in the photographs I had this appears in a bright metallic tone, a very characteristic effect also on these aircraft, I painted this with
Alcald II aluminium. As for the blue grey paint, I did many tests on plasticard sheets, and basically used three colours in gradations, the justification for using three different colours to represent a single colour is that in all sources it’s seen that although the aircraft were only painted in blue grey FS 35189, this took different colour gradations depending on which area of the aircraft, ie the tip of the wings and fuselage upper the colour was very light, probably because of the intense sun of the Pacific, then there are areas on the sides of the fuselage and
in the area close to the wings, which show a very dark tone, and between them, there is an intermediate blue transition, although in some areas, the transition between light to dark tone is abrupt. For all this, I used for the lighter areas Mr Color lacquer C-367 blue grey FS 35 189, for dark areas H-42 Gunze blue grey, and intermediate areas, a mixture, (which I still had from a PBY-5A Catalina in 2004), consisting of: 60% of Medium Blue XF-18 + 30% of matt white XF-2 + 10% matte blue XF-8, all Tamiya acrylic. When painting, I chose to do the darkest colour first, then lightest and finish with the intermediate colour.
Panel lines and fixings are enhanced by Mig Productions dark washes and a fine tipped pen. Here we see the application before removing the
8
excess with cloth moistened with thinners.
Once the blue grey was complete I proceeded to paint some panel lines, a random tone in the air flow direction, for which I masked with Tamiya tape and airbrushed with XF-63 diluted to 10%. After that I painted the walkway with Tamiya matt black XF-1, and highlighted a little with Tamiya royal light grey XF-80. Exhaust stains are made black in principle with XF-1 mixed with a bit XF-64, very dilute, once dry, I painted the central part of the stain used with XF-80. I painted the white inclined stripe across the tail which informed the landing officer the inclination angle of the plane as it came in to land on the aircraft carrier.
preparing all navigation lights, at the tip of the wings, the left painted with transparent varnish red X-27, the right of the green transparent X-25, the top of the wings and one of the two behind the tail gunner in transparent blue X-23, not to forget the formation lights along the underside of the fuselage, in red, blue and yellow.
It was time to varnish Futur/Klear and put on the multiple stencils. Alongside this, I was painting the inside of the flaps-dive brakes, bright red Tamiya X-7, and once dry, a wash of Mig Dark wash was added to give sense of use and dirt. I was also
9
10
Almost at the end, I began to apply a Mig dark wash to panel lines, all joints and seams and rivets enhancing the detail. I applied the wash with a brush and remove the excess with a clean, lint-free cloth, always moving in the direction of air flow, giving a ‘patina’ which removes any remaining brightness. I avoided the use of matt varnish to finish and let the satin effect remain giving a very real and convincing finish. I finished the model gluing all remaining parts, such as bombs, rear machine guns, transparents and flaps-dive brakes, this action requiring much patience and care because of the fragile actuators that hold the brakes.
The Trumpeter model is the only one of this aircraft on the market in this scale, except for the discontinued Matchbox kit (SBD-5), but I must say that the model is not bad at all, and well worth spending some extra effort to have a Dauntless in your collection in this large scale.
I dedicate this aircraft to my wife and my children, inexhaustible sources of inspiration.
11
The 1:48 Skyraider kit is quite typical Tamiya release so there is no need to talk about quality of the moulding and their fit etc. We all know that Tamiya has a history of motorisation with its kits and this is one of their motorised aircraft releases. The engine powering the propeller is a funny feature of this kit, but I decided to use it nevertheless. The manufacturer suggests passing the engine power cable through a hole drilled in the fuselage, so my main goal was to try and hide the power supply in a more natural way. The quality of mouldings is just perfect. What’s more, the kit has both raised and recessed rivets, while the panel lines are of varying thicknesses. The pilot figure is not scary like those included in many other aircraft kits. Although some cockpit parts could be more detailed it’s not a big issue as this area will be hardly noticeable on the finished kit with the canopy closed. This particular boxing also contains a moulded base plinth and engine together with some parts allowing to mount it inside the kit. The decal sheets supplied with the kit contain almost everything that is needed except for the bomb markings, but I decided to use an aftermarket set from Aeromaster instead. 12
1:48 VIETNAM SKYRAIDER
M O D E L L E D B Y K A M I L F E L I K S S Z TA R B A L A
13
Assembly My first step was to check the fit of the main parts. Fortunately, the result was promising as this had an impact on the order of further works as I wanted to alter the method of powering the engine. That required some modifications of the kit. My first idea was to drill the main gear legs and pass the power cables through them, but I found it too time-consuming. The second concept was less complicated. Catapults were often used to launch Skyraiders from aircraft carriers. Therefore, properly mounted power cables could act as the catapult bridle. However, I had to complete the cockpit first. As it is rather tight and hardly visible after closing the fuselage halves and attaching the canopy, I didn’t bother to add any details. I just glued the parts together and then airbrushed the interior with Tamiya paints. Details as well as the pilot figure were brush painted with Vallejo acrylics. To avoid troublesome masking at the later stage of work, I also sprayed the areas behind the cockpit and in front of it with grey and black paints respectively. Thanks to this only a subtle retouch was required after gluing the fuselage halves together.
14
Of course, the engine had to be installed
additionally enhanced shadows after doing
earlier. Here I made the first modification.
any washes. The wing halves went
An electric device, which had to be placed
together without any problems. The cables
under the base plinth according to the
were connected, crimped and insulated.
instructions, was mounted near the engine to be hidden inside the fuselage.
Gluing the fuselage to the wings allowed me to focus on some smaller parts.
Once the fuselage was finished, I could
The tractor rocket and ejector of the
deal with the wings. First, I drilled through
Stanley Yankee ejection system behind the
the catapult bridle attachments hooks and
pilot are simplified, but correcting them
glued pieces of 1 mm brass tube inside
may be avoided by adding a distinctive
the holes. Next I soldered two pieces of
fabric cover. This is visible even on the box
wire to the ends of tubes and attached two
art, however Tamiya didn’t provide it. I
more similar brass tubes to the wires.
sculpted it myself from Kneadatite Duro
Pieces of brass tubes were also soldered
Green putty modelling compound. The
to the ends of power cables to make
imitation of engine is almost invisible after
connecting them easier. The wheel wells
attaching the cowling. Therefore I just
were primed with black paint and then
painted it with metallic colours and brought
sprayed white. Even though I usually don’t
out the details by doing an acrylic wash.
apply any primers, I used it here to get
External weapons Although Tamiya’s kit contains a large
blunt end. I cut the kit’s part and sealed
variety of external weapons, none of them
the hole with a piece of styrene sheet.
could be found on the photos of the particular aircraft I had chosen to depict.
The work on the ‘special’ bomb began by
The smaller bombs were borrowed from
roughly building up its body from Magic
Italeri’s 1:48 Avenger kit, while the bigger
Sculp. Once the compound had hardened,
ones were scratch built using parts of
I shaped the toilet properly with a scalpel
Skyraider’s rocket launchers and bombs
blade and file. Styrene profiles were used
from Trumpeter’s 1:35 Mi-24 kit.
to build the bomb mount. Next the bomb was given some colours and decals. Other
One of the archive photos showed that the
weapons were also painted at the same
under-belly fuel tank had a non-standard
time.
15
Paintwork I started by pre-shading all recessed lines in black. Next I sprayed two shades of grey from the Tamiya range over the upper surfaces. It is worth noting that XF-20 Medium Grey is actually lighter than XF-66 Light Grey. Very diluted white paint was used to highlight the panels which required using a minimal air pressure. To mask the fuselage I had to employ UHU Patafix compound, Tamiya masking tape and pieces of Oramask stencil film. Then I applied a base coat of Gunze H21 off white over the undersides, ailerons, elevators and rudder. The panels on the under
Another layer of clear gloss coat worked as
surfaces as well as on other areas painted
a base for the wash. A quite dense mixture
white were highlighted with gloss white
of Van Dyke Brown oil paint and lighter
paint.
fluid was applied to the kit with a flat brush and soon rubbed off with a paper towel. I
The top of the fin and anti-glare panel
chose the lighter fluid because when it is
were given green and black finish
used as the medium, the wash is more
respectively. Then I had to put the airbrush
strongly absorbed into the surface than
aside for a while and do some more
when using white spirit. Therefore, that
masking before I could apply Mr. Metal
way I didn’t only darken the recesses and
Color Chrome Silver on the leading edges
bring out the details, but also initially
of wings and tailplane as well as on the
dirtied the surfaces.
front part of the engine cowling. The first stage of weathering was done
16
The paintwork was protected with a layer
with oils. I was applying Van Dyke Brown
of clear gloss varnish and it was time for
with a fine brush and rubbing it with flat
the decals. A bad time, as it turned out!
brushes, either dry or slightly dampened
The Kit’s decals were thick like a slice of
with White Spirit. Next I took Smoke and
ham and I had to retouch the borders of
Oil acrylics from Lifecolor’s Tensocrom
stars with a fine brush because they were
range and painted some streaks and
misaligned. On the other hand, the decals
stains. Then I switched to pigments from
from Aeromaster, although printed by
MIG Productions. Black Smoke and
Cartograf, were reluctant to conform to the
Vietnam Earth were used to imitate the
irregularities of the kit’s surface despite
exhaust stains, while the dirt on the wings
using Microscale decal solutions.
was done with other earth colours.
17
The stand As I had already reworked the power cable arrangement inside the kit, now I had to modify the base into an aircraft carrier flight deck section. My first step was to prepare the catapult bridle. I removed the insulation from the cables and soldered pieces of brass tube to their ends and short metal rods were embedded into the tubes. After viewing some period photos I decided to use a piece of 320-grit sand paper to imitate the flight deck surface. I cut it to size of the stand and then removed a strip in the middle to allow for the catapult track. Next I punched some holes in both pieces of sand paper and glued them to the stand with acrylic resin. Some styrene profiles as well as pieces of 0.25 & 0.5 mm styrene sheets were used to make the catapult track and the various small hatches and tie down covers. A base coat of Tamiya XF-69 NATO Black was followed up by some highlights and 18
shadows done with XF-63 German Grey and Mr.Color C33 Black. Then I had to give some parts a metal finish. The catapult track was airbrushed gun metal and flat aluminium from Tamiya after masking the adjacent areas, while all the smaller bits were brush painted Vallejo Gunmetal Grey. The catapult shuttle was made from pieces of 1.5 mm styrene sheet. Once it was ready, I drilled two small holes in the stand, passed the cables through them, and placed the shuttle in the track between the cables. The joint was wrapped with thin twine soaked with C.A. adhesive to hide that the cables were actually passed through the stand. Afterwards I had to weather the deck. I dampened the surface with white spirit and randomly applied various shades of oils with an airbrush and different brushes. These were not only used to apply paint, but also to blur the previously applied oil layers to get the effect of heavily used and not well-maintained surface, full of various stains as well as streaks left by tires. The final touch was to add some small numbers to the panels of catapult track, using a white crayon. 19
This kit is well known now by modellers but my article is dedicated to the Marine version (Aéronavale) and particularly to the most recent version: the Standard F3. The Hobby Boss kit is good and the assembly quite easy except for the air intakes which require a little attention. However, Hobby Boss made shortcuts on visible details that can be improved, most importantly, it is necessary to update the model to achieve an accurate F3 version. In addition I bought the Skyraider Model Designs (SMDS) resin correction set and decal sheet and also the Dream Model photo etched sheet. To bring some life to this overall grey finish, I took the
intakes and the exhaust nozzle. After many tests with
decision to open up some areas like the right engine
different materials, I opted for aluminium self-adhesive
compartment, the main wheel well, the gun bay and
tape sold in DIY stores. The tooth-like patterns are
diverse little inspection covers. Initially, the areas to cut
marked out by embossing the tape over the examples
open are thinned on the inside using a ball bur. Then, it
moulded on the model. Then, they are carefully cut out
only remains to cut with a scalpel following the
with a scalpel. At the end of the assembly, I remade all
engraved panel lines. This technique allows you to
of them because the aluminium tape glue had a
save the cut out parts like the wheel bay doors.
tendency to bleed. I therefore used the same material, but removed the glue from the aluminium with
At this stage, the tooth shaped reinforcements
thinners, and finally glued them with cyanoacrylate.
forgotten by Hobby Boss can be added to the underside. These are mainly present behind the air
RAFALE M
20
Francois Regis Binder adds his own touches to the 1:72 Hobby Boss kit
21
Cockpit
Wheel bays
The cockpit is quite basic, so I upgraded it
As I opened the wheel bay main doors I
by adding plastic card. On the wall and
had to improve on the Hobby Boss
side consoles I added some switches and
forward parts. The bottom is quite a
buttons in order to give some relief detail. I
complex shape to replicate so many tests
took the opportunity to build the joystick
and reworking was necessary to make a
with its support for the forearm on the right
good fit with the fuselage. Once the well
side and the throttle control on the left
was complete I started to make the interior
side. On the area behind the seat, two
detail and cables. Landing gears look good
cases are present on the last Rafale
so I only added a few cables and a little
versions (F2 and F3).
plate on the compass damper. I also built
The photoetch is provided by parts in the
a small hydraulic cylinder not present in
Dream Model set and upgraded with
the kit parts
additional details.
22
The highly visible seat, is the original with a
The forward wheel bay on the naval
back cushion (reworked as it’s too low) and
version has some specific detail from the
belts made of thin metal sheet. Buckles
C version. The landing gear is also
come from a photo-etched sheet
updated with missing rib details from
(Renaissance ref 72009). The main
plastic and others reinforcements or
difficulty with this cockpit lies in its overall
anchor points. The main hydraulic cylinder
black colour so it’s necessary to highlight
is redone with metallic tube from a syringe.
and over exaggerate some relief detail, so
Small springs are made by wrapping some
the overall assembly received a Gunze
copper wire around plastic rod.
black coat and a grey drybrush (Humbrol
Often seen open, the small avionic bay
64).
placed around the air intakes and the access ladder, are built with Evergreen
Gun bay and grilles
Exhaust nozzles
The right gun bay was also opened. I found very few
Exhaust nozzles are very basic, not deep enough and quite
pictures of this area clear enough to work from. I based the
thick. Dream Model parts improve this area by adding
detailing on a picture found on the Internet. For the 30 mm
reinforcements on each petal. This option is good but does
gun, there are plenty of pictures. Here again, I constructed
not resolve the lack of interior details so I used an Aires part
an insert to hold the cannon. I took the opportunity to add
designed the F-4 Phantom for the internal area (conduit and
the little grille in front of this opening, I used some photo-
bottom). The external part of the exhaust nozzle is made
etched grille from Extratech. At this stage, the SDMS fairing
from scratch with thin plastic sheet. Plastic petals are glue
could be fixed behind the gun exhaust.
together around the ring provided by Hobby Boss, then I added the internal mechanism and the Dream Model
A small defect of the Hobby Boss model is located at the
reinforcements. In order to have two identical and solid
foot of the fin where grilles are poorly represented.
pieces I duplicated the master in cast resin.
Having no idea how to resolve this problem, I called on
The right jet engine is made with Evergreen plastic rod of
colleagues who design custom photo-etched grilles who
different diameters. For the area between the two exhaust
came up with the goods! Thanks to them for all for the help.
nozzles, Dream Model Provides a piece but it’s too small
23
small and the inferior kit part should be
new air intakes to insert correctly.
detectors provided by Hobby Boss are
detailed. The big SPECTRA antenna (Self
With plastic sheet, I extended the air
inverted. Under the left air intake, Hobby
Protection Equipment Countering Threats
intakes and plugged them with an Aires fan
Boss placed a little oval fairing that should
of Rafale Aircraft) received a new
in order to simulate the blades.
be on the right Intake and looks transparent in reference photos.
protection plate too.
Standard F3 modifications Upper grilles
It’s necessary to perform several
Other small errors shared with all Rafale
Dream Model provides two small grilles to
modifications (some of them are also
versions:
fix on the fuselage at the wing roots.
present on the F2 version). First of all, the
The light on the dorsal edge is not at the
However nothing is supplied for the very
‘Optronique Secteur Central’ system (OSF)
point and should be moved by about 1 cm.
characteristic oval grille located on the
has to be added just in front of the
Missile launchers on the wingtips
right so I had to make my own from photo-
windshield. This piece is provided in the
correspond to the prototype version and
etched perforated sheet
‘Armée de l’Air’ set so a friend of mine lent
the embossing has to be removed.
me this piece and I duplicated it in resin. I
The Anchor points of the canard wings
Air scoops and intakes
also corrected the general look especially
need to move forward 1 mm.
These items are overlooked by Hobby
the spherical shape which was too big.
Finally, do not forget to fix the 4 tiny
Boss. The air intakes on the model have no
At the top of the fin, the left Spectra
triangular antennas around the nose
internal details so I tried to correct this
detectors had to be moved to the rear. A
provided by Dream Model.
fault. When studying my reference, I saw
piece is provided by the SDMS set but I
that several other oversights were made in
decided not use it.
this area. First of all, the air intake shape is
24
wrong. I used Miliput to correct the internal
On each side of the exhaust nozzles,
shapes. Once dried, the small toothed
decoy launchers have to be added. For this
reinforcement can be added (quite invisible
modification, I used the SMDS pieces
on the finished model…). This correction
updated with small bolts on their internal
requires cutting the fuselage to allow the
surface. On the air intakes, the Spectra
Paint and Decals On modern jets, the low visibility grey is now the norm. To get a more interesting finish I searched many photographs and found in ‘Air Fan’ of July 2011, a particularly dirty Rafale. I opted for Humbrol H1 as base colour, which corresponds to the Humbrol primer but is also very close of the Rafale grey. A darker grey wash was applied to all recessed detail, after drying, the excess is removed with a paper towel dampened with lighter fluid in order to
25
create effects of staining, especially on the walking areas. With small foam pieces soaked in maskol masking fluid, I touched gently the most contacted area of the plane by the crew at work. When dry, the overall model is sprayed with lighter and darker base colour to create mottles on the surfaces. At the end the Maskol fluid can be removed and subtle colour differences are revealed. Decals provided by Hobby Boss are poor quality and I opted to use SDMS decals. Theses decals are very well printed and all the stencils are present. They are easily placed and fixed in Klear (Future) with no silvering. Walking areas around the cockpit are provided as decals but I found the grey colour too ‘yellow’ compared with my base colour so I preferred to paint them, taking care not to make them too visible. On many picture theses area are barely visible when the aircraft are dirty.
26
Conclusion
For all Rafale versions:
In conclusion, here are the modifications to obtain a
• Dorsal light to shift to the rear by 1 cm
Rafale F3:
• Canard shifted by 1 mm forward • Correct the Inside of the air intake and add toothed
• Decoy launchers (SMDS) • OSF • Air scoop on the underside
reinforcements • Correct the shape of the missile launchers on the wingtips
• Toothed reinforcements on the underside
• Add the triangular antenna around the nose
• Arrow-shaped reinforcements and two protection
• Add grille in front of the gun access door.
plates under the exhausts nozzles • Left Spectra fairing at the top of the fin have to be
• Add a lateral stick and a throttle grip in the cockpit • Add an oval grille at the right wing root
shifted to the rear (eventually use the SMDS piece) • Transparent fairing under the right air intake and one hole under the left air intake. • Two boxes added at the rear of the seat • One F3 specific fairing behind the gun exit.
27
Big Bird
BUILDING THE HK MODELS 1:32 FLYING FORTRESS
BY DAVID PARKER Welcome to the first installment of our build project on the massive 1:32 scale B-17G bomber from HK Models. Given the shear size of this model we thought it would be best to split the coverage into bite-sized chunks and hopefully if you are going to build your own example this will provide a few tips and pointers as we go. My aim here is to take the build on from a purely out of the box assembly with some simple improvements, corrections and details which will address the most visible areas of the kit. With a full interior to the fuselage you could go mad adding detail from end to end but I am just going to work on improving the parts that are easily visible through the windows. Even so this is a big build in every sense, so lets get started!
Starting with the cockpit side wall panels and the moulded on oxygen mask hoses were cut off on each side wall panel and I began to fill the numerous release pin marks that pepper the insides of the fuselage.
I decided to add the fabric insulation panels to the side walls and began by spreading a thin layer of Magic Sculp over the required areas. I use a wooden kebab skewer with the end sliced off at an angle to help spread the putty.
Once it is all reasonably smooth I used a selection of rubber tipped ‘brushes’
Once the putty has dried any excess or overspill can be easily cleaned up to give this finished effect. Notice how the creases are radiating from the different fittings.
28 to emboss the different folds a creases into the putty. These are ideal as you get no sharp edges and are very controllable.
Test fitting the revised side wall with the cockpit floor to make sure that everything still fits as it should and the fabric really adds to the look of the cockpit.
The kit is supplied with crew seats which lack the bright yellow cushions so I made my own again using Magic Sculp. I studied pictures of the real cushions and made sure that the creases on mine were not identical on each one.
Whilst I had some putty mixed I also reworked the control columns to add the protective gators at their base. Once again the rubber tip brushes were used to add the creases and the zipper lines down the front were drawn on with a sharpened cocktail stick.
The cockpit floor is comprised of plywood sheets so I cut my own panels from plastic sheet. Work has started on the gangway hatch in the floor with rivet detail added using Archer Fine Transfers Surface Detail rivets. Notice also that the oxygen hose has been replaced with a scratchbuilt example.
More work on the gangway with rib details added and the bridging panel between the two sides having been replaced with a plastic sheet replacement with the two lightening holes added.
Moving to the nose, and the two lightening holes were added to the step along with the rivet detail. Panel lines were engraved on the floor and photoetched screw heads by Aber were added.
Time to get some paint on and the base interior green has been sprayed over the cockpit using Gunze acrylics. The wooden floors have been primed in a pale wood colour and then overlaid with the very effective Uschi Van der Rosten woodgrain decals.
The seat cushions have been painted and shaded and the seats finished in the darker bronze green. The dials and placards on the centre console have also been painted.
29
The oxygen bottles at the rear of the cockpit did not have their mounting straps so I cut my own from self-adhesive aluminium foil as a quick fix.
Another view of the cockpit at this stage showing the brush painted Boeing logos in the centre of the control yokes - quite pleased with those!
The instrument panel looks a little bland when compared to the real one. I engraved the panel lines and added the rivet detail around each dial using the MDC rivet tool. In reality these are raised details but this method was quick and quite effective.
For the lettering on the seat I recreated the lettering on my computer, faded it and printed it onto some decal film. The ‘do not remove from aircraft’ warning can just be seen under the seat belts.
The seat belts are adapted from some pre-production HGW belts for the B-25 which I teamed with some spare Eduard buckles - not perfect but they give the right impression.
In the nose again and the drive mechanism for the chin turret is not supplied. I
In making the new floor panel it became apparent that the Bombardier’s control panel is too deep so I reduced the depth of it so that it did not extend out so far from the fuselage.
30 began by making the circular plywood cover plate for the floor. From this I was able judge the size of the central mechanism which was scratchbuilt from plastic
Left More progress on the floor with the motor mechanism painted and fitted and the assorted cables have been added using lead wires. The ammunition boxes are also finished with wood grain decals. Archer Fine Transfers provided the placards on the motor. Above I had no plans to open the bomb bay so this was assembled and only the bulkheads on either side were painted.
The nose bulkhead as supplied in the kit has the exposed backs of the instrument panel dials visible at the top so I decided to add the missing covers here and on the rest of the bulkhead. I rolled our sheets of Magic
Sculp which were cut to shape and placed in position. The various creases were added using a rubber tipped brush and the circular fasteners were embossed while the putty was still wet.
Left The completed fabric covers with the cover for the doorway depicted hanging loosely for a little extra interest. Below The bulkhead was then painted using acrylic colours. All the placards and assorted small lettering was brush painted to give an impression of lettering. Right The nose compartment floor is test fitted into position to give an idea of the finished appearance.
31
Starting some work on the engines I cleaned up the main parts and applied some base colours - done of course for all four engines not just the single set seen here.
32
The fit is all quite snug and I applied an initial wash to the cylinders prior to moving on.
The wiring system is of course not replicated in the kit so I began to add this by removing the pips around the circumference of the harness ring and drilling holes to accept the lead wire leads.
Time for a little work on the chin turret and I quickly spotted a few errors here. The two slots that allow the guns to pivot should not run right up the back of the turret so I plugged them with sections of plastic.
These were sanded filled and shaped and whilst the filler was drying I marked out the shapes of the two slots in the base to eject the spent cases.
These were the drilled and the slots cleaned up using a scalpel and files to give a regular finish. The turret also lacks the inspection windows on the back but as my turret will be facing ahead I decided not to bother fixing this.
The cleanup ejection slots are seen here and the breaches of the guns have been test fitted too. The zipper covers for the front slots on the turret are reasonably well detailed but I want to add the zipper texture to the centreline.
Here the modified chin turret is test fitted into position with the reworked interior parts which really add to the finished appearance. This floor panel was completely devoid of detail as supplied in the kit.
The Project continues in the next Issue
AIR_Subscriptions(plus app)_2011 2:Layout 1 17/01/2013 14:02 Page 1
More ways to Subscribe Today Recieve AIR Modeller direct to your doorstep or Subscribe digitally with the AIR Modeller App* *Available on Apple, Andorid, Kindle Fire and Blackberry Playbook devices.
FREE SAMPLE In-App Purchases Purchase individual issues (£5.99), a 3 issue bundle (£12.99) or a 12 months (6 issues) subscription (£23.99). For subscriptions to the printed version go to www.afvmodeller.com then click onto shop and register/login and then go to magazine subscriptions.
You can now download the app FREE of charge, along with a sample issue to try before you buy!
Please return your completed form to: AFV Modeller, Old Stables, East Moor, Stannington, Morpeth, Northumberland NE61 6ES
Printed Subscription to AIR Modeller
Your details
UK Europe/ROW USA
Name ................................................................................
6 Months £20.00 6 Months £26.00 6 Months $42.00
1 Year £36.00 1 Year £48.30 1 Year $78.00
2 Year £64.80 3 Year £91.80 2 Year £91.20 3 Year £128.70 2 Year $148.00 3 Year $208.00
BLOCK CAPITALS PLEASE
Address ............................................................................ ..........................................................................................
Cheques ( UK & USA only) send to to the address above. All cheques made payable to AFV Modeller Ltd.
.......................................................................................... ..........................................................................................
Visa
Mastercard
Visa Debit
Maestro
..........................................................................................
Cardholder’s name
Post/Zip Code....................................................................
Card No.
Country..............................................................................
Expiry date
Security Number
Phone ............................................................................... E-mail ...............................................................................
E-mail:
[email protected] Tel: +44 (0)1670 823648 Fax: +44 (0)1670 820274 www.afvmodeller.com
M O D E L L E D
B Y
L U C
J A N S S E N
Mitsubishi A6M2 TWO-SEAT ZERO TRAINER Way back in 1989 I started a 1:32 A6M2 Zero from Swallow Model that I wanted to rework into a 2-seat trainer. I started with a lot of optimism but soon I realized that it was a difficult conversion as no reference information, except for some photographs, was available. After having made the basic parts of a complete new cockpit from scratch and after working out some basic adaptions and changes to the unassembled model, I decided to shelve the project. I put all the pieces back in the box, and put the box in the cupboard and forgot about it for 23 years! It was in the beginning of this year that I started a 1:32 Tamiya A6M5 Zero and, when checking my reference books, magazines and the internet, I remembered my old two-seat trainer project again! I had a closer look at the parts of the Tamiya kit and I came to the conclusion that now there was 34
enough material available to finish the job I had started in 1989.
35
Building
36
The old Swallow kit has only basic detail in
landing gear was detailed with the brake
the cockpit and wheel bays, but is fairly
lines, I also made new actuators for the
correct in terms of size and has nice,
ailerons. The tail wheel assembly with the
engraved panel lines although they are on
towing cable gear to tow targets for air
the(very) heavy side. Fortunately this can
gunnery practice was completely built from
be used to good effect when painting and
scratch, even the actuator. However I did
weathering the model later.
not rework the wheel bays, which are not
As no after market conversion sets are
really deep enough in the kit.
available, I had to complete all the basic
The seat belts were made from lead foil,
details and the two-seat canopy from
cut to the correct size, bent in a realistic
scratch. I went to work building the
way , painted, varnished and weathered,
complete interior of the cockpit with its
and the buckles were made from spare
seats, instrument panels, equipment,
photoetched parts. The navigation lights,
levers and handles, wiring, gauges, etc. I
not provided in the kit, were made from
used the parts from the kit for the
the transparent coloured plastic handles of
windscreen and the rear canopy and used
old tooth brushes, cut up and sanded to
a spare canopy part of the Trumpeter TBM
shape.
Avenger kit 1:32 to create the fixed middle
The underwing pods for the gunnery target
canopy where the antenna is mounted.
banner were made from a knitting needle.
Furthermore I detailed the radial engine
They were cut to size, shaped to give a
adding the wiring and I reworked the
slightly pointed nose and an open back
cowling flaps and exhausts. The main
end with the stowed banner inside.
37
Painting
mixture of the paint several times before
reverse side of a black decal sheet from
Two seat Zeros were painted in different
getting the right tone. Once dry, a diluted
Microscale Decals, cut them out and put
ways, either in overall Orange with a black
coat of a lighter Orange (3 parts thinner – 1
them on the model using the proven
cowling and antiglare panel, overall Grey
part paint) was sprayed on the upper
MicroSol & MicroSet system. The
with black or Green on the upper surfaces
surfaces to give the bleaching effect of the
Japanese ‘No Step’ warnings above the
and Orange on the under surfaces. In
sun and I added some more Yellow to the
flaps were hand painted.
general, archive pictures show frequently-
basic Orange mixture.
used aircraft with the classic Japanese
The National insignia were spray painted
Weathering
heavily chipped paint in varying degrees
under the wings and on the fuselage. I
For the weathering of a model, I use my
from light to very heavy. I went for an
used masks easily made with a compass
own system which consists of 2 steps, the
Orange plane with the paint visibly worn
and a sheet of masking tape. After
first on the glossy coat of Varnish and the
and chipped off.
thoroughly drying, using masking tape I
second on a lightly shiny finishing coat of
I started by giving the model an overall
removed the Maskol that was still
Varnish. After cleaning the entire model
coat of Alclad Dull Aluminum after which I
remaining under the 2 last coats of
with lukewarm water with a drop of
sprayed 2 coats of Gloss Varnish. When
Orange. By patting the tape onto the
detergent soap (after thoroughly drying of
thoroughly dry, using a small sponge I
model and pulling it away, the Maskol is
course), I accentuated the panel lines with
randomly applied Maskol across the
removed resulting in a realistic chipped
a sharp ‘Bordeaux-Red’ coloured pencil.
cowling, the leading edges of the main
paint look. The last coat before weathering
With pastel chalks you can buy in every art
wings, the wing roots and all the places
was an overall coat of Gloss Varnish (2
shop I made pastel powder by sanding the
that are stepped on by the ground crew
parts thinner – 1 part Varnish).
chalks on sand paper. Depending on the
when servicing the aircraft.
38
colours of the model, I use darker or lighter
I do not paint my models using the ‘pre-
Decals
tones. For the upper sides of this model, I
shading system’ but prefer to give colour
I could not find decent aftermarket decals
used a mixture of Burnt Umber and Red
effects with pastels (see later). So, now I
with the correct size and I decided to
and another mixture of Burnt Umber, Grey
sprayed an overall coat of Orange that I
make them myself, after all, the codes are
and Black. Working with pastels on a
made by mixing International Orange with
simple and easy to make. I drew the tail
glossy surface has the big advantage that,
White and Yellow. I had to adjust the
symbols and numbers in reverse on the
even with intense weathering, the surface
39
40
overdone mistakes can be corrected by
Finishing the A6M2 Zero Two Seat
cleaning with a wet cloth. On the places
All details such as antenna, pitot tube,
where the aircraft is boarded or serviced,
boarding steps, gunnery target banner
some dirt and oil patches were simulated.
pods, wheels, flap and aileron balances,
Once the first weathering is completed and
etc. were put in place. The towing cables,
the basic look of the almost finished model
made from fishing line painted Steel, were
seemed good, a finishing coat of varnish (
attached to the pods and sweeping
5 parts Gloss + 1.5 parts matt) was
equipment. The wireless antenna was
sprayed over the entire model. On the final
made from metal coloured stretched sprue
coat a second weathering was done (more
from the box of spares. The base was very
carefully than the first one), this time with
simple. I used a rough vinyl floot tile and
Dark Brown and Black pastel powders. The
cut it to the right size. Then I sprayed the
heavy exhaust strains and other less
White lines and the base was weathered
pronounced airflow strains were simulated
using Sand coloured pastel powder. The
and some dirt and oil patches on the inner
wheel chocks were scratch built from
sides of the wings were created as well.
sheet styrene, painted Yellow, lightly
is not affected too heavily and any
References •
Squadron/Signal Publications
•
Aero Detail
•
Famous Airplanes of the World
•
Robert C. Mikesh
•
Monogram Close-up 14
A6M Zero in action Mitsubishi A6M Zero Fighter No 5 + No 9 Japanese Aircraft Interiors Japanese Cockpit Interiors
weathered and finished with a handling cord. The finished base was sprayed with a varnish mixture of Dull (5 parts) and Gloss (0.5 part).
41
TA M I YA ’ S
G I R O L A M O
1 : 3 2
L O R U S S O
models the Mighty Tamiya Mustang
42
W
henever Tamiya announce a
The contents pack the box to the brim;
All aircraft are in natural metal finish except
new release the modelling
styrene sprues (twenty two in all), two
for the last which displays patches of olive
world waits expectantly, and
sheets of photoetch, poly caps, vinyl tires,
green on the upper surfaces, an interesting
never more so than with their
screws, nuts, small magnets and even the
variation to produce from a modeling point
beautiful large scale aircraft. This kit was
inevitable screwdriver! The three proposed
of view with the reproduction of the patchy
built for a friend who wanted to display the
versions are all aircraft that were part of the
surface .
model in his shop which stocks the Tamiya
Eighth Air Force located throughout Europe;
brand. I finished the model in around a
334 th Fighter Squadron , 4th Fighter
I chose the red nose and tail as it goes well
month building it from the box without
Group- personal aircraft of Lieutenant
with the aluminum colour creating a lively
adding any extra details. To tell the truth,
Arthur, with the cute pin up ‘Blondie’ nose
and excellent colour contrast. The use of
this kit is just so nice with such beautiful
art, the nose forward of this and the tail are
Alclad II lacquers, I would say, is a must for
detail and design, it’s a pleasure to build it
red. Obviously this was my chosen scheme.
a perfect bare aluminium finish. Take your time to follow the application process and
as Tamiya intended. Alternatives are 478th Fighter Squadron ,
practice on spare parts if it’s your first time
Each piece is assembled with extreme
352th Fighter Group . Aircraft commander
using Alclad, some beautiful realistic results
ease and the removal of parts from the
Lt. Colonel Meyer , the legendary blue-
can be achieved.
sprues is designed in such a way as not to
nosed ‘Petie II’ in August 1944 and
marr any visible areas. With a stroke of the
79th Fighter Squadron , 20th Fighter Group,
sprue cutters and a very light file the pieces
Captain Webb with numerous mission
is ready to be assembled and I guarantee
marking on the muzzle from
that the use of filler is superfluous if the
April/November 1944
parts are carefuly assembled correctly.
43
There’s little to point out when building this
replaced, even if the three subjects offered
can be attached firmly to the cockpit via
kit, just follow the instructions , glue and
are among the most beautiful!
the sturdy pegs.
lovers of the P- 51D will be very satisfied
I followed, almost to the letter, the
The cockpit, as the engine, is a kit within a
with their accurate replica. I only have two
instructions of the kit. The first step is to
kit mostly coloured in the classic " interior
pieces of advice to give from my
assemble and mount the engine, really
green" which I choose Gunze H 58 as a
experience: The first; It is best to replace
well done in that it can be left on show by
very good match. On top of the base coat
the gear legs with metal ones from Scale
means of an ingenious system using
the various sub-assemblies are shaded
Aircraft Conversions, certainly more robust
minute in-built magnets inside the cowls
and weathered with washes, highlighted
than plastic ones, in spite of the steel
allowing easy removal and re-fitting. The
and detail painted including some areas of
insert the kit provides. The second; The
engine is a little kit in itself with nice detail
worn paint
Tamiya decals are nice but not quite as
which I enhanced with some drybrushing
good as some available and also could be
over the black base-coat. Once painted it
paint each piece as Tamiya intend and
44
The model progressed smoothly without finding even the slightest hitch. The only piece that deserves some attention on the fuselage assembly is the radiator covers which I found the fit not as perfectly as the rest of the model, a very minor point and still not worthy of any filler. Joining the wings to the fuselage did require an application of Mr. Surface 500 to close the join a little. Once applied by brush, a gentle wipe with a cotton-bud wet with Mr.Color Thinner produces a clean seam without the need for sanding.
45
Above: contarasting shadows and highlights give depth to the detail of the gun and wheel bays.
46
All the control surfaces of the aircraft can
lacquers are very simple to use, no need
metallic finishes on my models. I’ve heard
be placed as per the kit instructions and
to dilute them because they are already
occasionally modellers complain about
remain moveable. I found this feature a
ready to airbrush, won’t clog the airbrush
problems using Alclad’s system, but
little toy-like for my tastes and had
and have a fast drying time of only ten
following the rules carefully has never given
concerns about stability in future so
minutes. Truly the ultimate metal finishes!
me a problem. I coloured the entire model
decided to fix mine with Tamiya Thin
They have a good resistance to both the
in ‘Aluminum base A’ . In addition I chose
Cement when I’d decided on the position.
tape and masking fluid, so they can be
shades compatible with the refernce I was
masked with extreme simplicity. Alclad
working from noting that the control
For such a big kit with many parts,
also has a strong resistance to solvents
surfaces were significantly brighter than
assembly is so fast and, without realizing
such as those found in oil paints. Their
the rest of the airframe and subtle tonal
it, you get to the painting of the exterior. As
pigment is made of aluminum powder to
differences of panels throughout.
already mentioned, I chose the color
replicate the real metal, you just have to
scheme of red and aluminum. When
follow the rules of the manufacturer:
The anti-glare section of paint in front of
choosing an aluminum finish I have no
primer, black paint and colour of your
the cockpit was masked and airbrushed in
doubts about the paints to use-
choice. One thing to note is to spray with
Gunze 52. More Gunze, 327 red, was
Alclad II !
good ventalation, laquers should not be
airbrushed across the nose area and tail,
inhaled. Today, the range has been
but first an undercoat of flat white and
Why? I found these colours back in 2004
expanded considerably with new colours
shading in grey gives good depth and
and using only the few colours available
and I’ve added to my series of colours
shape to the ribbing of the tail control
then I achieved great results. These
becoming irreplaceable for me to achieve
surfaces.
Above: the painting sequence for the bare metal areas using the Alclad II system and colours. Below: shading and highlighting of the tail’s ribs produces a pleasing and realistic effect
47
Many modellers don’t like vinyl or rubber tyres due to the enevitable moulding seam being difficult to remove, rotating against a coase sanding stick achieved a better finish
The canopy was polished with an ultra-fine sanding stick and Tamiya polishing compound. Tamiya wax gives the final sparkle.
Micro-sol and Micro-set help the decals settle into the detail directly onto the Alclad surface.
48
Promodeller’s water-based washes can be randomly applied and the excess removed with a damp cloth with great results
Tamiya engineering at it’s very best allows numerous panels to be left open including magnetic fixing of the engine cowls.
The Micro-sol and Micro-set system
fastener detail. A mix of black and brown
satisfied with how these powders
helped settle the decals into place once all
was applied and dried quickly with the aid
performed giving great control and subtle
paintwork was completely dry. As I
of a hair dryer. Their use is very simple and
tones adding nice realism.
mentioned earlier, although good, some
non-invasive compared to an oil colour or
better quality decals are available from the
solvent-based wash. I would recommend
What more can I say? A model with
after-market guys.
these liquids to all those who fear the use
extraordinary features that provides the
of oils on their freshly airbrushed finish.
ultimate modelling pleasure, from opening
For weathering I tried a new product (to
More new products were tried at this
the spectacular packaging to giving it pride
me anyway), water-based washes from
stage, the range of weathering powders
of place in your collection. One of the true
Promodeller to emphasize the panels and
from Tamiya themselves. I was very
Tamiya classics. Happy modelling! 49
AIR BORN
new releases
Airfix 1:72 Avro Lancaster B.II I don't recall ever seeing a styrene kit of the radial engined B.II so a master-stroke from Airfix to build on their new tooling and produce this version. A very attractive and chunky box will feel like instant value for money and lifting the lid confirms this as we're packed out with sprues. The moulding quality is immediately apparent, nice fine surface detail across the fuselage and great finesse with the smaller details show that Airfix are really on a roll these days with consistent high quality in all their new releases. A full new sprue provides engines, cowls and nacelles which all look very nice indeed and as with all of the kit we're free from any flash or sink marks. Internal details are good with bulkheads and the bomb bay becoming an integral part of the models strength with good sized
wing spars allowing sturdy wing alignment. Along with a well detailed interior we're offered positionable ailerons, flaps rudders etc, weighted tyres, optional bomb doors…great stuff. If you want to display a bomb load it's available with the new re-supply set we're taking a peek at below. Cartograf decals provide two options of markings, B.II, DS842, 514 Sqn, JI-F, 'Fanny Ferkin II', RAF, 1944 and B.II, LL725, 408 Sqn, EQ-Z, 'Zombie', RCAF, 1944. My Fatherin-law happened to call by when I had this kit spread across the bench, he used to produce tooling for Airfix ‘way back when’, and was staggered at the quality of tooling and moulding. An all-round top-notch kit which will be welcome by occasional hobbyists and the more serious modeller alike- fantastic value!
Airfix 1:72 WWII RAF Bomber Re-supply set
50
What better accompaniment to their Lancaster than this set of ground supply equipment? a really fresh idea from Airfix which we were instantly impressed with. The packed box provides an Austin Tilly, Bedford MWD (or an MWC can be built) maintenance tower, 450 gallon fuel bowser, 1000lb bombs, 80000 bombs, bomb trolley and tow tractor, ladders, more bombs, motorcycle, bicyle…everything you might need in fact, except ground crew
figures which would have been a bonus. The detail and design throughout is superb with ease of assembly in mind, beautifully rendered tyre tread patterns, detailed chassis, even the canvass hoods are first rate. Decals provide all the markings you'd need and are perfectly printed. This set would really produce a busy and detailed diorama and I'm sure will be just as popular with modellers of British vehicles. Top marks Airfix.
Revell 1:72 Sea Hurricane Mk.II C A re-release from the late 1990s here of Revell's small scale Hurricane with it's plug-in rear lower fuselage to create the Sea Hurricane. Moulding is decent but the tooling shows it's over a decade old with some flash present and simplified detail in places. That said, the surface details such as panel lines and the fabric surfaces are really very nice indeed and being a simple build would really warrant some extras thrown at it, a resin cockpit
and exhausts would certainly raise the game here and the low cost of the kit means you can keep within a very reasonable budget. Top quality decals provide two sets of markings making this still a decent small scale Hurricane. Revell model kits are available from all good toy and model retailers. For further information visit www.revell.eu or email
[email protected]
Lifecolor paint and pigment sets Three sets of colours here from one of our favoured paint manufacturers, Lifecolor. Set XS 09 is six colours to suit Finnish aircraft of the WWII era produced in cooperation with Ilmailumuseo aviation museum. These acrylics airbrush beautifully but we've found Lifecolor's thinner to be the best medium to get your paint to the right consistency and prevent the paint 'beading' on the surface. Lifecolour performs equally well brushed. Two sets probably aimed at armour modellers but equally applicable to
aircraft if you're looking to add some weathering or create groundwork. 'Dust' and 'Mud' each contain three paint colours and three pigment powders with specifics such as 'Eastern European dust'. Both the acrylics and pigments can be mixed to produce subtle variations. Ideal for those undercarriage wheels and very handy sets. Lifecolor products are distributed in the UK by the helpful folk at the Airbrush Company www.airbrushes.com
Italeri 1:72 CR.32 'Chirri' 'Historic Upgrade' as stated on the box may refer to the age of this original 'Supermodel' tooling (a spin-off from Italeri if I'm not mistaken) which must be from the early eighties. It looks as though Italeri have re-jigged the sprues and amended a few parts along with the inclusion of a clear stand to give the option of displaying 'in flight' although the pilot figure has been omitted which makes the stand a bit of a nonsense! A simple kit in this scale, the CR.32 is undoubtably a beautiful aircraft of the era and the detail presented is decent if not spectacular. An attempt to replicate a texture on the fabric surfaces is over the top in 1:72
but shouldn't take much work to smooth-out should you wish. The star of the show is the Cartograf decal sheet with no less than seven schemes ranging from the mid-1930s through the Spanish Civil War to early WWII with some very testing camo patterns, I really think the way my eyesight is these days I'd have to be looking at this Italian stallion in 1:48! If you can't wait to see if AZ Models release a new tooling of the CR.32 in small scale this release is worth looking out for if even for the decals alone.
51
new releases
Revell 1:32 Messerschmitt Bf 109G-6 Late & Early version
52
The eagerly anticipated brand new large scale Messerschmitt from Revell has just landed here and we are pleased to report that it looks like a real winner. Revell obviously have an eye on futher variants too judging by the design of the parts and the sprues and few will complain that this kit provides a choice of parts for either early or late versions of the G-6. The fuselage has been designed for alternate cowlings and the decision to provide the taller rudder by cutting the vertical stabilizer rather than slicing off the whole tail as in Hasegawa’s clumsy solution is genius. So, whats in the box? Well to start with there are some greatly improved instructions with much cleaner, less ‘shouty’ drawings that have already lowered my pulse. The cockpit looks very good straight from the box with choice of cannon covers and excellent detail on the instrument panel. The only gripe here are the moulded on seatbelts which will be tricky to remove from the depths of the bucket seat. The fuel line on the cockpit sidewall is moulded in clear plastic as is the gunsight. I am pleased to see a main spar has been provided to locate under the cockpit as this should help to align the wings. Happily there is no attempt to provide an engine as this is always better left to the resin boys but the separate cowls are provided with an underlying support frame and the distinctive MG bulges are also separate. The absence of the ‘trop’ supercharger filter is
disapointing but easily fixed with an aftermarket part. Similarly there are no underwing cannon pods supplied. The upper wings are moulded in two sections no doubt to allow for the highly detailed wheel wells and all the control surfaces are separate as we would expect. The taller late tail option simply plugs onto the root of the tail as we discussed and the kit comes with a choice of excellent wheels with treaded or smooth tires and separate hubs. The clear sprue provides two styles of windscreen and two styles of canopy which can be modelled open or closed. The propeller has separately moulded blades with the roots of the blades suffering from some sink marks on our sample. Two sets of marking are provided, one early and one late and the well printed decal sheet produced in conjunction with AirDOC also provides the instrument panel dials but as anticipated no hakenkreuz. Overall a great looking kit with well defined yet subtle surface detail which looks like being recognised as the new definitive Bf 109 G-6 in this scale. Given that this is also offered at Revell’s extremely reasonable price point of around £20.00 and you have a winning choice! Highly recommended. Revell model kits are available from all good toy and model retailers. For further information visit www.revell.eu or email
[email protected]
Airfix 1:72 Hawker Siddeley Harrier GR.1 Surely there's nobody better than Airfix to produce a newly tooled Harrier? with a GR.3 already promised late in the year this is all good news for modellers of this legend of an aircraft. The sprues are indeed all fresh in the nice matt pale blue-grey preferred of late and the detail and quality are as you'd expect from state of the art tooling. With around one hundred parts construction should be simple enough and there looks to be no surprises regarding the kit's design starting with a good looking multi-part cockpit (including the obligatory pilot) and optional parts provided
for the cowl doors to show 'in-flight' or stationary (engine off). Panel lines have been kept nice and fine and there looks like nothing in the way of clean-up of the parts other than the sprue runner points. The Cartograf decal sheet is very detailed and of the highest quality with markings for two British GR.1s No.1(F) Squadron RAF Wittering, England, September 1970 and No.20(R) Squadron RAF Wildenrath, Germany, June 1971. Another affordable quality release from Airfix
Airfix 1:72 Focke-Wulf Fw190A-8 More small scale from Airfix with a new approach to an old-school style kit with this Fw190A-8. The small end-opening box contains three small sprues in the pleasant grey styrene with fine detail and crisp moulding immediately apparent. Something I noticed was a reduction in the size of the attachment points on the sprues which is welcome. The cockpit tub shows raised instrument detail and a well rendered seat, thankfully without moulded-on seatbelts. Facia detail is offered as a decal and the moulding of the clear canopies
is very nice allowing a good view of the cockpit. Fuselage detail is nice and fine including open exhaust cowls and a basic engine to plug in. Excellent detail extends to the wing surfaces and the option of raised or lowered landing gear is offered. One option of markings comes on the Cartograf sheet of Jagdgruppe 10, Germany 1944, no tail markings are present. More great value modelling for all.
53
new releases
Aviaeology Decals A great collection here for RAF and RCAF modellers with these five sets from Canadian manufacturer Sky Grid. A summery of the sets is AOD32009m RCAF Fighter Recce Spitfires in 1:32, AOD48011 more RCAF Mosquitoes in 1:48, AOD72007.1 Early Hurricanes part 1 in 1:72, AOD482007.2 Early Hurricanes part 2 in 1:48 and AOD48002m RCAF Beaufighters 404 Squadron. A couple of the sets have been available previously but the new releases have been updated and expanded. First and foremost is the decal quality which is first rate, sharp register, solid colours
and even the smallest of stencilling perfectly legible. Even more impressive is the information provided on the folded A4 sheets, the quality of the presentation, the graphics, the illustrations and detailed information would make a nice small format softback book of maybe a dozen pages! Perhaps this is cost prohibitive and information is provided of how to obtain a pdf file of the coloured artwork to your email address. Very impressive sets indeed, www.aviaeology.com
Polish Wings Vol.17 By Tomasz J. Kopanski A4 Softback format, 88 pages ISBN 978-83-63678-09-8 www.mmpbooks.biz
54
The next volume in MMP’s Polish Wings series covers the most famous Polish bomber family the PZL.23 Karas (Crow) which was in service at the outbreak of WWII. If you have plans for the tasty Mirage 1:48 kit, or even the vintage Heller 1:72 offering this book will be a great inspiration to get you started. MMP’s visual modelling reference follows the usual format with superb colour profiles and largely unpublished period black and white photographs. Along with Polish markings there’s Romanian,
Bulgarian and captured German schemes. Along with the PZL.23 the PZL.42/PZL.43 and the PZL.46 ‘Sum’ are covered. The high quality and detail of the colour profiles offer excellent reference of weathering with the illustrations posed alongside the photographs of the actual aircraft. If you’re already collecting this series, volume 17 won’t disappoint at all. More great, affordable modelling reference from MMP who are never afraid to explore niche subjects.
German Air Projects 1935-1945, Fighters By Marek Rys A4 hardback format, 176 pages ISBN 978-83-61421-76-4 www.mmpbooks.biz The subject of 'What If' Luftwaffe aircraft seems to gather popularity, and another book in MMP's series 'German Air Projects' highlights the fighters that might have been. This book is in fact an amalgamation of two previous volumes (I and II) with updated information and images. In common with other MMP volumes on the subject there is a wealth of quality illustrations and background information along with line drawings. A few period photographs of factory prototypes give a little credibility to
Germany's plans to dominate the air with some very creative engineering with most of the designs appearing highly plausible. The chapters are split by manufacturers featuring amongst others, Arado, BMW, Dornier, Heinkel and Messerschmitt. I'm sure Luftwaffe enthusiasts will find the information and illustrations interesting and the book has a nice feel to it being a large format hardback.
Hungarian Fighter Colours 1930-1945 Vol.1 By Dénes Bernád and György Punka A4 Hardback format, 188 pages ISBN 978-83-61421-731-9 www.mmpbooks.biz If you're interested in wartime Hungarian aircraft prepare for a visual feast! The first volume on the subject of Hungarian fighters is absolutely packed with great period photographs (with a large number in original colour) beautiful colour profile illustrations and plenty of informative reading covering generic markings and colours from the very beginning in 1919 with period technical drawings and photographs of preserved parts providing sound reference for modelling. Italian and German aircraft in service covered in this first volume are Fokker D.XVI,FIAT CR.20, CR.20B,AVIS I-IV.,FIAT CR.30, CR.30B,FIAT CR.32, CR.32bis, FIAT
CR.42, CR.42CN,Messerschmitt Bf 109D-1,Messerschmitt Bf 109E-3, E-4, E-7 and Messerschmitt Bf 109F-2, F-4- there really are some great schemes to get you thinking. A fully detailed appendices logs aircraft type, numbers etc and their organisation during major fighting. It's obvious a massive amount of research has gone into this labour of love on the authors part, coupled with Volume II when released I'd imagine you'd have all the reference you would need for modelling a Hungarian project. An excellent book worth getting hold of for the photographs alone!
55
new releases 48234
72065
48235
72066
48233
7206
Scale Aircraft Conversions SAC's range of replacement metal landing gear continues to expand starting with 1:72 72064 designed to replace the landing gear on the Airfix Vampire and 72065 is a set to fit Cyber Hobby’s Sea Venom- both these releases contain 2 sets of gear. Also in 1:72 is 72066 for Academy’s F/A-18A-D.
In 1:48 new releases are 48233 for Kitty Hawk’s Jas-39 A/C, 48234 is designed for Italeri’s A-10 and finally 48235 an upgrade for Eduard’s I-16 Type 24/29. There’s a huge range available to view at www.scaleaircraftconversions.com
Italeri 1:48 A-36 Apache
56
The sleek Mustang predecessor would have been a bit of a surprise release from Italeri as an 'all new' kit and the usual 'Super Decals' flash on the box artwork hints that this may well be a rebox, which indeed it is. The good news is that it's the well respected Accurate Miniatures kit which seemed to disappear for a while, it's original release was in the mid nineties- hard to believe! A fresh look at this kit leaves a good impression; nice detail, simple assembly and the great decal sheet with four inspiring colour schemes (three USAAC and one RAF) there's little to grumble about. Moulding quality is clean and sharp showing no signs of the kit's vintage although one gripe is the quality of the
canopy clear moulding, a little thick without an option to display open- some modellers may look to the available aftermarket parts, the nose mounted .50 Cals would also look superb replaced with brass versions. The surface detail across the airframe is excellent with a delicate 'in scale' appearance. A quick look over the 1:48 plans in a recent MMP publication proves a good match of all the major shapes. A very nice and worthy re-release, even if you have the original kit hidden away it's worth picking one up for the decals. Our thanks as always to The Hobby Company for our Italeri samples.
Revell 1:32 Junkers Ju 88A-4 with bombs It was back in 2008 when Revell released their first 1:32 Ju 88 A-1 to considerable acclaim and just when we had given up hope of any other variants, here we have the new A-4! Naturally there are many familiar parts from the 2008 kit but also a lot of new parts including the distinctive bulged canopy. I had forgotten just what a good job Revell had made of this complex cockpit and it really can be built from the box especially now that the instrument dials are included on the decal sheet. There is a new instrument panel, revised ‘belt-free’ seats and new ammo boxes for the rear gun positions but no ammo feed chutes for the guns themselves. The rear dorsal MGs are moulded in two parts for each side of the glazing and the barrel part features an unusual tubular gun sight which I cannot find any reference for. As well as the new twopiece rear canopy there is a new twin MG mount for the rear gondola/crew access door which can be modelled open or closed. The kit provides completely new high quality engine nacelles with the lower radiators and separately moulded propeller blades and there is also a completely revised rudder, wing tips and ailerons. The kit provides a new spine for the fuselage with a recessed
mounting for the PeilG 6 direction finder. The wheels and undercarriage have been carried over from the A-1 and the A-4 had fractionally bigger wheels and beefed up undercarriage. Fortunately the original A-1 wheels are erroneously the bigger size so perfect for the A-4. Other new parts are the four underwing bomb racks which are expertly handled and pleasingly come with an appropriate bomb load to fit them out. Two schemes are provided with the kit, with a conventional two colour splinter scheme and the more gaudy scheme depicted on the box art. The decal sheet looks excellent and is packed with numerous small stencils along with markings for the bombs and even the dive angle markings for the canopy windows. As usual with Revell kits there are no hakenkreuz supplied. It is great to see Revell tackle the most common version of the Ju 88 and with such flair too! We cant help but give this a massive thumbs up and a wholehearted recommendation. Revell model kits are available from all good toy and model retailers. For further information visit www.revell.eu or email
[email protected]
57
Ju87 B-2 1./St.G3, North Africa, 1942
CHARLES WHALL ADDS SOME PERSONAL TOUCHES T O I TA L E R I ’ S K I T Italeri’s latest Ju87 Stuka makes a refreshing change from the older Hasegawa offering which, until now, was the only decent kit in this scale. The Italeri offering is a completely new tool with sharp details, crisp panel lines and a number of other refinements over Hasegawa’s (which is still an excellent kit however). Four different markings schemes are available, based within in the European Theatre of Operations with the usual splinter scheme camo. Having built my first Stuka from the Battle of Britain period, I wanted to find a scheme that was different from ‘the norm’ and I certainly found what I was looking for with this tropical scheme I came across from an old modelling manual.
58
ITALERI
59
INTERIOR CONSTRUCTION
with the lead wiring from Plus Model picked out with acrylic
I have never built a kit straight from the box as there are always
colours and other small features like the map-box, maps and PE
loads of great aftermarket sets available these days. This kit being
instrument panel enhanced an otherwise fairly dull grey cockpit.
no exception, it is an ideal starting point for additional detailing so as usual I went to town with adding a number of parts, and some
The kit seat is an odd shape so I raided the spares box for an old
scratch-built parts too. A Jumo engine set is available if the
PE seat which was enhanced using brass wire for the framework.
modeller wishes to show a stripped down Stuka and this area is
Once the cockpit was finished, thin strips of styrene rod were used
nicely detailed, complete with firewall, engine bearers and other
for the canopy rails. 0.2mm wiring was added to the radio and
plumbing, but is screaming out for some super-detailing….maybe
gunner compartment. I added a leather cushion for the pilot’s seat
next time!
made from Blue-Tak and used Eduard photoetch seatbelts. The cockpit went together ok but having glued the sidewalls to the
The kit does offer a small PE set for the instrument panel,
fuselage, a fairly wide gap was apparent along the length of the
seatbelts and wing walkways, but the cockpit itself is very basic so
cockpit sills where the sidewall did not follow the contour of the
I went to work adding a number of etched and styrene parts.
fuselage and needs some careful manipulation to get it to marry-
Gunner and radio compartment details were added and the
up.
framework behind the pilot’s seat was re-worked using brass rod to create a more accurate construction and fitted into the canopy. A coat of RLM66 blended everything together
60
EXTERIOR As I was making a tropical B-2 I had to use a Hasegawa air intake kit part as Italeri do not provide an alternative. The clear canopy parts are well scaled and were given a coat of Future then masked using an Eduard set. The front canopy does not fit well and a noticeable ‘step’ between the canopy and the fuselage sides were immediately apparent, but a small amount of green putty filled the gap nicely and was sanded level. The famous gullwing section aligned perfectly at the fuselage roots and only a very small amount of liquid cement was used here. A nice addition on the PE set mentioned earlier, are counter-balances for the elevators. Italeri have been thoughtful here and provided the modeller with an option to drop the elevators which have been
provided as separate parts to the rear stabilisers. A significant area of the Stuka’s wing is taken up by the flaps and ailerons and while Italeri have provided a separate set of much neater actuator details over the plastic triangles that attach those parts to the wings on the Hasegawa kit, I chose scratch-build the flap actuators from styrene and piano wire for a more accurate representation - quite time consuming but worth it in the end. The kit bomb support mechanism was enhanced using some brass wire to represent actuator rods and left in the dropped position ready for ‘bombing up’.
61
d my e t s e t “really capability to hing lly airbrus int of actua the po p the whole u giving ject!” pro
62
PAINTING AND MARKINGSA LESSON IN PERSEVERANCE! Not one to shirk a challenge, the tropical camouflage scheme really makes this Stuka stand out but is incredibly time consuming and really tested my airbrushing capability to the point of actually giving up the whole project! Following a number of mistakes which I had to keep correcting- the smallest deviation with the airbrush would create a glaring error! But I knew what I wanted to achieve and stuck with it, which proved worthwhile as I was very pleased with the end result and have learnt something new about fine airbrush work, which is what modelling is all about in my opinion!! The paints scheme is RLM 79 (Light Blue) (RLM 79 (Sand Yellow), RLM 80 (Olive Green), the fuselage band and underside
wing bands were RLM 21 (White). All painting was carried out with various acrylics (Tamiya, Gunze, PollyScale and Aircraft Colours) and applied using my trusty Iwata HP-B airbrush with 0.2mm nozzle. The base colour for the green was applied at a pressure of 20psi, to create the fine edge to the pattern and various lighter shades colour was built up in ‘filters’ providing more depth to the colour. After a flat coat to seal everything, I used the oildot filter technique to create weathering streaks over the top of the completed scheme. A small amount of post shading was carried out to enhance various areas with some highly thinned black-brown Tamiya paint. General weathering to the wings and walkway areas was done with a wash of black/brown oils and a dusting of
Tamiya and MIG pigments. General scuffing was done using Prismacolour silver and HB pencils. The Super Scale International decals I needed for the markings are currently out of print and after a great deal of searching, the set was provided by a very kind member of the Hyperscale community. Apparently, the decals were old which did not bode well as I expected them to crack up in warm water. So I only had one shot with them but thankfully they went down beautifully with a minimal amount of Microset/sol and sealed with a flat coat of Vallejo matt varnish mixed with a little satin.
63
64
nd “overall I fou asy the kit very e to manage” SETTING THE SCENE The base was made from Jelutong (soft wood) with a simple molding routed around the edge. A layer of cork matting provides a great base onto which I added very fine sand (collected from Taquali airfield in Malta!) using white glue. I used the wonderfully detailed Verlinden starter trolley and added ladders from Eduard PE sets which are rather pricey but do make a nice addition. Oil drums and empty boxes were added for additional interest.
Aftermarket additions Eduard photoetch parts Gunze/Aircraft Colours/Tamiya acrylics Quickboost Pitot tube, wing mounted machine gun barrels, magazine drums and corrected prop/spinner Moskit copper exhausts Master brass MG17 barrel Verlinden & Hasegawa Luftwaffe airfield sets
References Classic Colours, Luftwaffe Colours, Stuka volume 1, Luftwaffe Ju87 Dive-bomber units 1939-1941, Peter C Smith Applied modelling encyclopaedia, Squadron Signal Publications
WAS IT WORTH IT? In a nutshell, yes. Overall, I found the kit very easy to manage but with a few minor fit issues. Great for beginners or seasoned veterans alike and provides a great base for lots of extra detailing. I have already started working on the D-5 version next but with a much less mentally demanding Eastern Front splinter scheme!